Welcome to Expert Tips — a growing collection of practical, real-world tips to help you get the most out of Extension Kit Core. Use the table of contents to jump to any tip and find practical guidance, examples, and visuals to support your implementation.
Table Of Contents
- General
- Syncing related properties between object types
- Reduce repetitive configuration with Environments
- Using regular expressions in Extension Kit Core
- Make rule testing easier with Run Once
- Advanced use of Vault Search
- Advanced scheduling with cron expressions
- Use filename wildcards to target specific files
- Integrations
- Property Operations
- Content operations
- Object operations
- Notifications
General #
Syncing related properties between object types #
In this tip, we’re tackling a common scenario where related properties need to stay synchronized between two object types to ensure data consistency and save time.
The challenge
You have an Employee object type with a multi-select property called Customers, containing a list of customers. Meanwhile, your Customer object type has a single-select property Employee, indicating the assigned employee. Since each customer can have only one project leader, but an employee can manage multiple customers, you want changes made in one object type to be automatically reflected in the other.
The solution
Here’s how to set up synchronization using an orchestrated rule that automatically updates properties between two object types:
- Create an Orchestrated Rule within Property Operations where Customer is the trigger source.
- Rule 1: Search for Employee using an indirect reference and remove self (%.%).
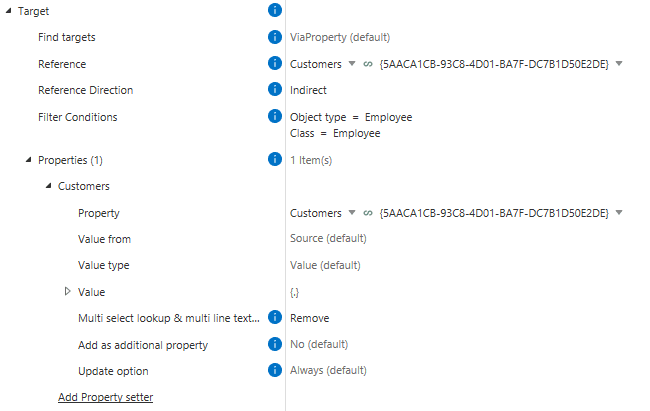
3. Rule 2: Directly search for the same Employee and append self (%.%).
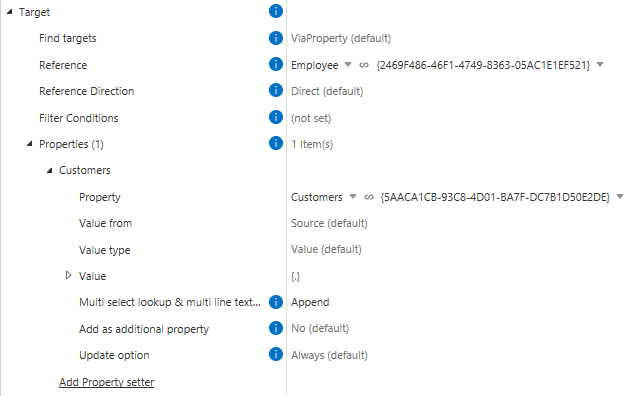
This setup ensures that whenever a customer is added or removed from an employee, the changes are automatically reflected in both the Employee and Customer object types.
Important: Make the Customers property on the Employee object Read-Only to ensure that the Customer object remains your single source of truth.
By automating the synchronization of these properties, you’ll save time, reduce errors, and keep your data consistent across your organization.
Reduce repetitive configuration with Environments #
In Extension Kit Core, the Environments option is designed to help reduce repetitive configuration by allowing you to define common settings once and use them across multiple rules.
Example
Currently, Environments are available for Calendar settings. You can define non-working days in your Calendar environment (Picture 1) and then apply it to any Extended Auto Properties rule that uses calendar data (Picture 2).
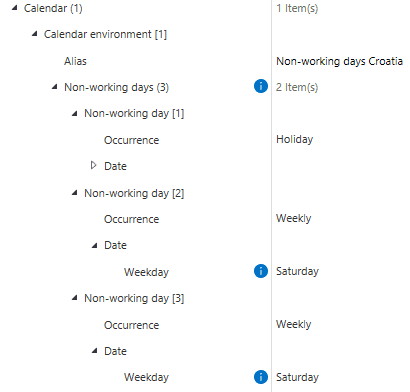

Instead of manually defining non-working days for each rule, you can simply reference the environment, saving time and reducing errors.
Using regular expressions in Extension Kit Core #
Regular expressions (regex) are a powerful way to extract, transform, or validate text — and you can use them in multiple modules in Extension Kit Core to automate and streamline your M-Files processes. In this tip, we’ll show you:
- Examples of what you can do with regex in Extension Kit
- Where regex is supported in Extension Kit
- A practical use case with the Property Operations module
- Best practices for writing and testing regex patterns
Using regex in Extension Kit Core
With the regex operator, you can manipulate, validate, and extract data across multiple modules in Extension Kit. Regex can be used to split or format property values, create validation rules that ensure specific conditions are met, and extract values based on defined patterns — enabling dynamic property calculations from text input. It also helps identify files that belong to the same object during imports, improving data organization and accuracy. In more complex workflows, regex can play a key role in orchestrating data flows and calculations, supporting automation, and maintaining data integrity throughout your M-Files configuration.
Regex is currently supported in the following modules:
- Orchestrator
- Property Operations
- Email Notifications
- Extended Auto Properties
- Auto Numbering Properties
- Object Operations
- Validation
- SQL Integration
- HTTP Integration
- Excel Reader
- Word Reader
- Versioning
- Reporting
- Data Transfer
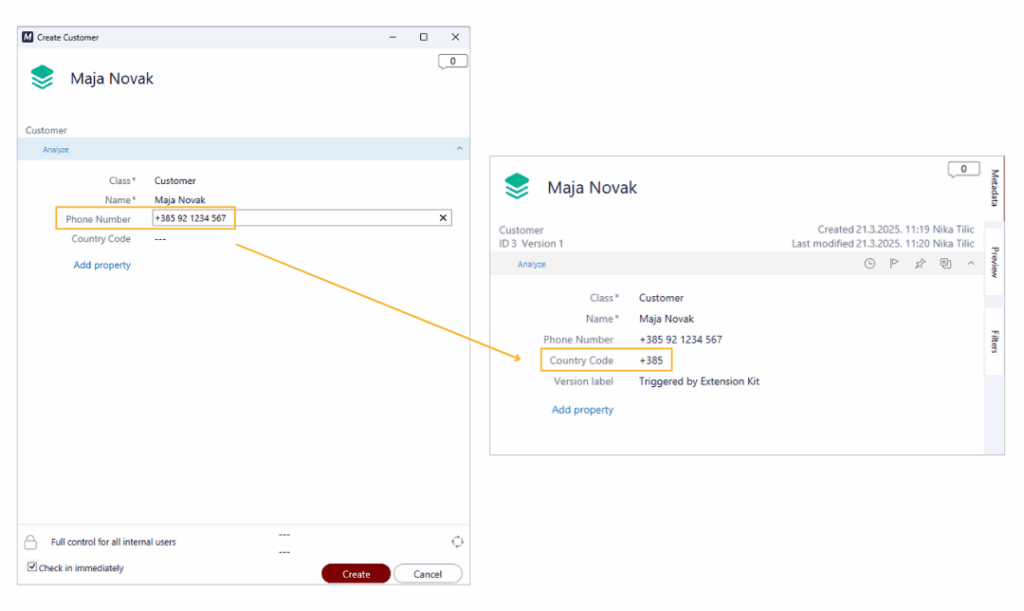
Example: Extracting a country code from a phone number
On a Customer object, we have a property storing phone numbers in this format:
+385 91 123 4567
When the object changes, we want to extract just the country code (e.g., +385) and store it in a separate property on the source object. To capture the + and 1–3 digits at the beginning of the string followed by a space, we’ll use this regex pattern:
^\\+?\\d{1,4}
Here’s how to configure this rule in Property Operations (Picture 1):

The result
When a phone number is entered, the rule extracts the country code and saves it to the target property (Picture 2).
Best practices when using regex
- Use a dedicated site to build, test, and debug your regex patterns. For example, we like to use regex101.com, as it highlights matches and shows capturing groups – which is both useful when setting up Extension Kit rules.
- Start small and test your patterns on real data before deploying.
- Document your regex patterns in the rule descriptions for clarity.
Regex can help you clean and structure data automatically, adding flexibility and precision to your M-Files configuration.
Make rule testing easier with Run Once #
When testing Extension Kit Core rules, it’s common to rely on changing object states, adding comments, or creating objects to trigger rule execution. But doing those steps repeatedly just to check if your rule works can be time-consuming, not to mention a bit frustrating.
That’s where the Run Once feature on the Dashboard comes in.
What is Run Once and how it works
Run Once lets you manually trigger a rule once, executing it on all matching objects in the vault. It’s especially useful during testing and configuration.
Here’s how to use it:
- Set up your rule as usual.
- Set the trigger to Run Once.
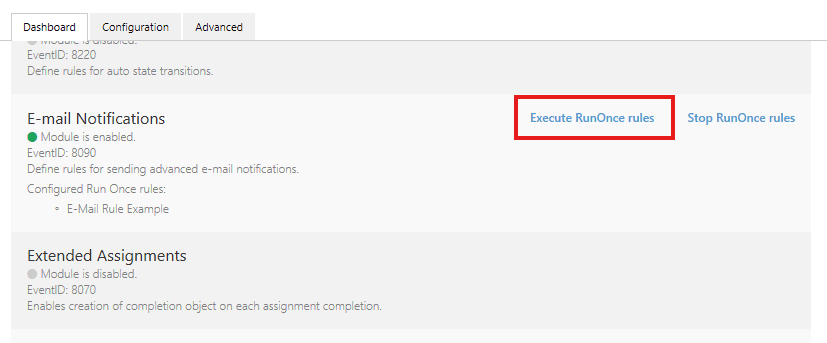
- Go to the Dashboard tab.
- Click the Execute RunOnce rules button within the desired module.
All rules with the Run Once trigger in that module will run immediately, without the need to simulate a workflow or perform repetitive actions.
Example use case
Let’s say you’re configuring an email notification and want to make sure everything looks right — clean formatting, no typos, and all the details in place. Instead of repeatedly adding comments or changing states on the same object, you can configure a rule like this (see Picture 1):
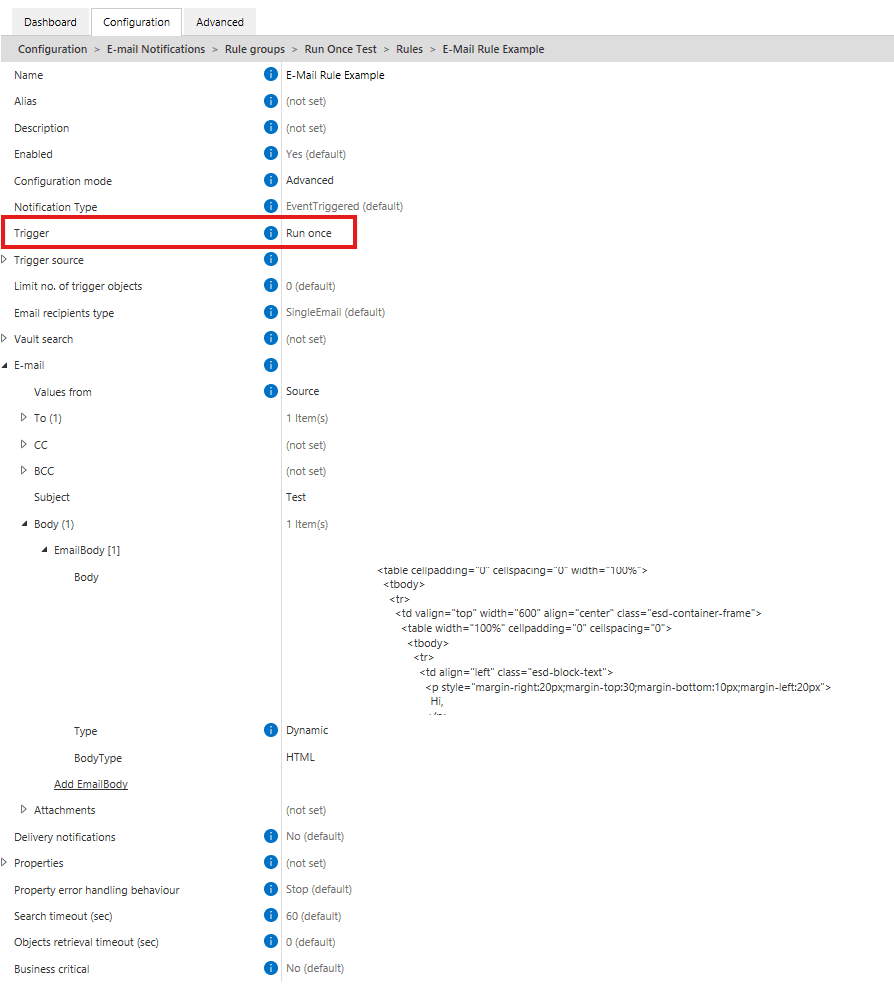
To test the rule, go to the Dashboard tab and click Execute RunOnce rules under the E-mail Notifications module (Picture 2). It’s a faster and cleaner way to test your configuration, without cluttering the vault or wasting time.
And if the rule takes a while to execute? You can stop it directly from the same screen using the Stop RunOnce rules button.
Run Once can be a great time-saver when you’re fine-tuning a rule and want to test the output multiple times. Next time you’re testing, use Run Once — it’s a simple feature that can make a big difference.
Advanced use of Vault Search #
In the Property Operations module, the Vault Search feature is typically used to find an object whose property value should be set based on a value from the Trigger Source, or vice versa — to retrieve metadata from a related object and apply it to the Trigger Source.
This tip starts with a quick introduction to Vault Search, then dives into advanced use cases showing how to use Vault Search to filter the Trigger Source based on data from multiple related objects in the vault.
Basic Vault Search functionality
Here’s a classic use case to illustrate how Vault Search works.
A rule in the Property Operations module (Picture 1) uses Vault Search to set the Invoice Owner property based on the Created by property of the Invoice object. Since Created by stores the Login Account of the user who created the object, and Invoice Owner expects an OT Employee, we can’t directly copy the value.
Instead, Vault Search helps by locating the Employee whose Login Account matches the Created by value. That Employee is then assigned to the Invoice Owner property.

Advanced filtering options
In addition to this intuitive usage, Vault Search can also serve as an advanced filtering step that extends your ability to filter objects across the vault. While Trigger Source filtering only allows filtering its own properties, Vault Search lets you define conditions the Trigger Source must satisfy based on information from other related objects in the vault.
In an invoice processing scenario with Vendor and Invoice objects, you might want to evaluate a Vendor based on data from its related Invoices, such as:
- Have they issued an unusually high-value invoice?
- Do they have any unpaid invoices?
- How long has it been since their last invoice?
Vault Search checks related Invoices and determines whether the Vendor meets the specified criteria, executing the rule only when those conditions are met. You can configure it to:
- Execute the rule if at least one related object matches the criteria (Search Result Type = Any), or
- Execute the rule only if no related objects match the criteria (Search Result Type = None).
Important: If the rule is orchestrated, make sure to set the Use vault search option to Yes to retain this behavior.
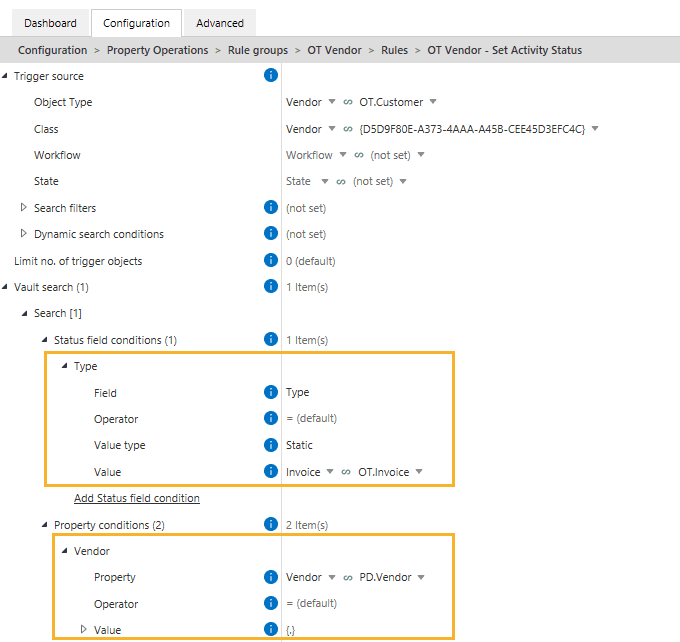
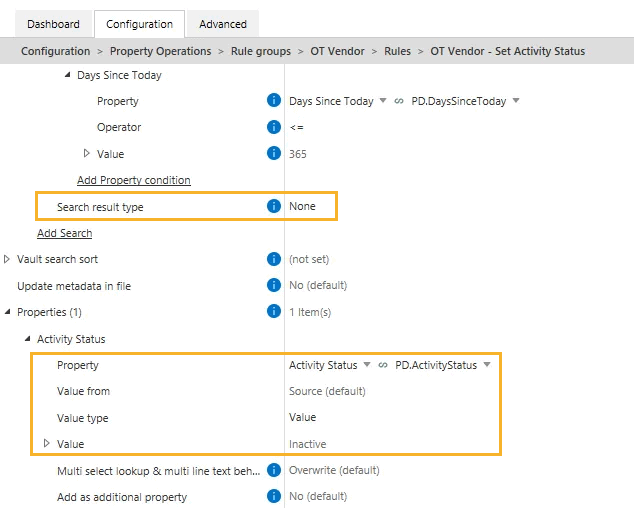
Example 1: No invoices in the last year (Search Result Type = None)
This rule sets the Activity Status of any Vendor to Inactive if they haven’t had any invoices in the past 12 months. If Vault Search returns no results, the condition is met, and the Activity Status property is updated (Pictures 2 and 3).
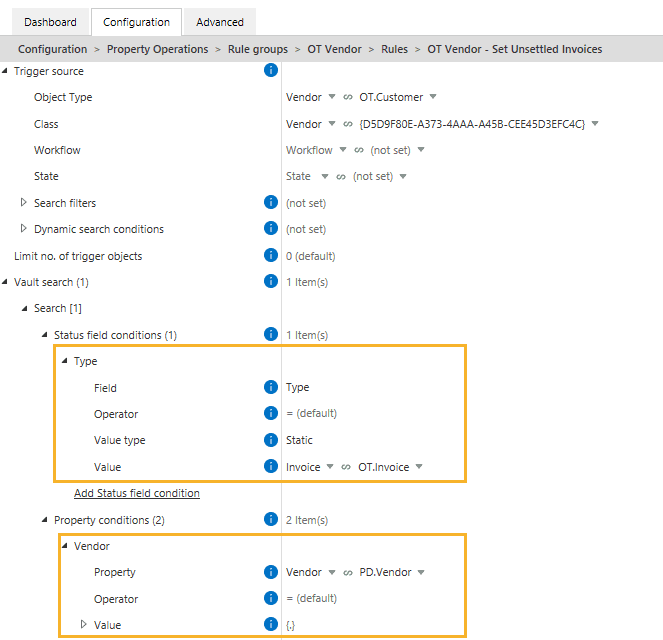
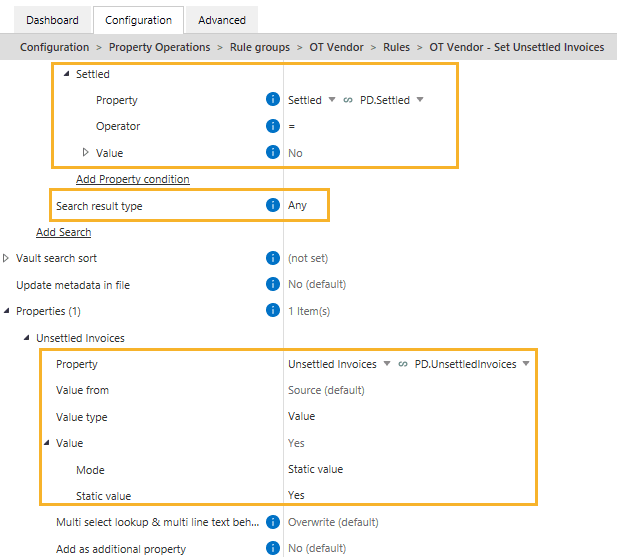
Example 2: Vendor has unsettled invoices (Search Result Type = Any)
In this case, the rule identifies each Vendor, finds all related Invoices using Vault Search, and checks if any invoice has the property Settled set to No. If even one such invoice exists, Vault Search returns a result, and the Unsettled Invoices property on the OT Vendor is set to Yes (Pictures 4 and 5).
Vault Search provides a powerful, flexible way to filter objects based on data spread across multiple objects in the vault. Along with the Orchestrator and Validation modules, Search filters, and Dynamic search conditions, Vault Search expands your ability to validate and automate processes on objects across the vault, increasing speed and efficiency in the configuration process.
Advanced scheduling with cron expressions #
Need to run a rule every workday at a specific time, or just on the second Friday of each month?
The Scheduled trigger type in Extension Kit Core lets you define when rules should run. You can set basic frequencies like once, hourly, daily, etc. — but if you need more precision, you can create custom schedules using cron expressions.
What is a cron expression?
A cron expression is a five-part string that represents a schedule for executing tasks at specific times or intervals. Each part represents a unit of time:
- Minute (0-59)
- Hour (0-23)
- Day of Month (1-31)
- Month (1-12)
- Day of Week (0-6, where 0 = Sunday)
For example, a cron expression like 0 12 * * 1 would schedule a task to run at 12:00 PM every Monday.
Using cron in Extension Kit Core
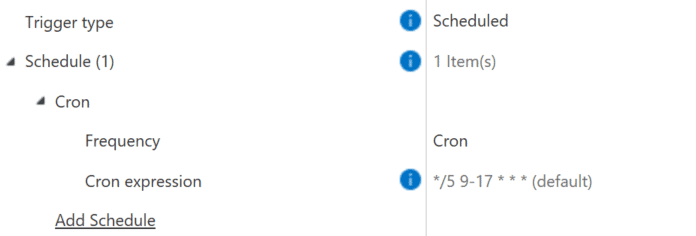
When scheduling with cron, Extension Kit uses this expression as a default value: */5 9-17 * * *
Which means: Every 5 minutes, from 9 AM to 5 PM, Monday through Friday (Picture 1).
Example use cases
Here are a couple of practical cron expression examples:
- Automated invoice syncing: Using the HTTP Integration module, fetch invoices from a service every 20 minutes during working hours:
*/20 9-17 * * * - Biweekly contract archiving: Using the Archiving module, archive contracts every second Friday at 5 PM:
0 17 */14 * 5
Not sure if your expression is correct? Use the cron helper to explore and test cron expressions easily.
If your process needs precise timing, cron expressions give you the flexibility to match your rules to real-world business schedules — down to the minute.
Use filename wildcards to target specific files #
When working with multi-file documents in M-Files, you often need to fetch or process only specific files within a multi-file document. That’s where filename wildcards in Extension Kit Core come in handy. They allow you to specify which documents to include or exclude.
What is a filename wildcard?
A filename wildcard is a special character (or set of characters) used to match filenames or patterns in file systems. It helps you filter and select the right document(s) when an object includes multiple files.
Example: Filtering specific files in a multi-file document
For example, let’s say you have a multi-file Contract document with the following files:
Annex_A.pdfAnnex_B.pdfContract.docxNDA.docx
You want to archive only the NDA documents for all employees using the Archive module. In this case, you would use the filename wildcard NDA, which will pick up all files containing “NDA” in their name, while ignoring Annex and Contract files (Picture 1).

Filename wildcards in EK Core
In Extension Kit Core, you mainly use two wildcard patterns:
- * that matches any number of characters Example:
file*matchesfile,file1,file_test.txt, etc. - File-type specific wildcards, like
*.pdf,*.docx,*.jpg
Example use case: Cleaning up multi-file email documents
Imagine your company receives invoices via email attachments in common formats like PDF, XLS, and DOC. In M-Files, you’ve configured the Connections to External Sources to import these emails with attachments into M-Files.
The resulting M-Files object is a multi-file document that may include:
- An image from the email signature (
.jpg) - The email body (
.html) - The actual invoice attachment in its original format
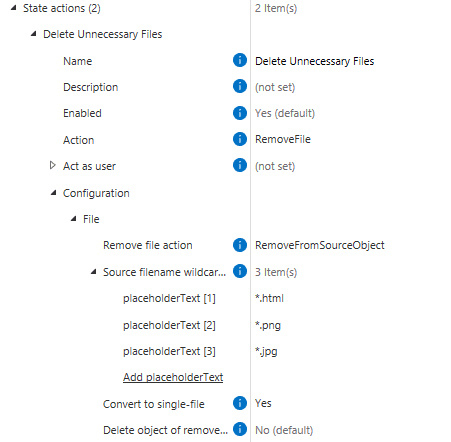
Since you only need the invoice, you can use the Document Processing module to create a rule that keeps only files matching *.pdf, *.xls, *.doc, and deletes the rest (like .html and .jpg) (Picture 2).
Using filename wildcards helps you easily target exactly the files you need from multi-file objects, keeping your objects clean and focused on the documents that matter.
Integrations #
Excel Reader: Rollback action when error occurs #
When importing data from Excel to M-Files using the Excel Reader module, data errors can interrupt the process and result in incomplete imports. To prevent this and maintain data integrity, you can configure M-Files to roll back the entire action if an error occurs.
Here’s how to do it. Within the rule in Extension Kit’s Excel Reader module:
- Set Execution Mode to Background Transaction.
- Set Error Handling Behavior to Stop.

This setup ensures that if any errors are encountered during the import, no updates or creations will take place. For instance, if you are importing 10 rows from Excel and one row contains an error (like missing or incorrect data), the entire action will roll back, preventing the creation of any of the 10 rows.
Without this configuration, encountering an error at row 6 would result in only the first five rows being created, leaving the import process incomplete.
By following these steps, you can ensure a smooth and error-free data import from Excel to M-Files.
Dynamically inserting property values into URLs with HTTP Integration #
In the HTTP settings of Extension Kit Core’s HTTP Integration module, URLs are typically set in a static text editor. However, did you know that you can enrich URLs dynamically with property expressions that will be resolved during rule execution?
How does it work?
When configuring an HTTP request, you can use property expressions to format the URL so that property values from M-Files are automatically inserted before making the request.
Example
Let’s say you are using the HTTP Integration module to update Contacts from an external CRM system. When making a request, you need to set the URL under the HTTP settings.
The CRM system is using a URL structure like this:
www.crmsystem.com/contact/<ID OF CONTACT>.
The rule must periodically update the contact information in the CRM system, creating a request to the URL with the dynamically inserted Contact ID value.
In M-Files, each contact has a unique ID stored in the Contact ID property with an ID 2392 and an Alias PD.ContactId . To make a request with the contact’s ID, you can set the URL dynamically in one of the following ways:
www.crmsystem.com/contact/**%PROPERTY_2392%**
OR
www.crmsystem.com/contact/**%PROPERTY_{PD.ContactId}%**

Format URLs with property expressions to dynamically insert property values.
In both cases, the contact’s unique ID will be pulled from M-Files and inserted into the URL.
Dynamically set properties using SQL Integration #
Did you know that the SQL Integration module in Extension Kit Core allows you to set properties based on SQL responses not only on the source object but also on related objects, and even assign additional properties unrelated to SQL responses, all within the same rule? This flexibility enables you to automate data updates in M-Files based on external database values, ensuring consistency and reducing manual effort.
Example use case
Imagine managing a Project object in M-Files that needs regular updates from an external database. You might need to:
- Retrieve and set project details like status, start and end dates, or budget.
- Dynamically update related objects with data from an external database (e.g., marking a linked Activity as “Active”).
- Set additional properties (unrelated to SQL query results) on the same object, such as automatically updating the Workflow state based on predefined conditions.
With SQL Integration, all of this can be handled within a single rule.
How to configure
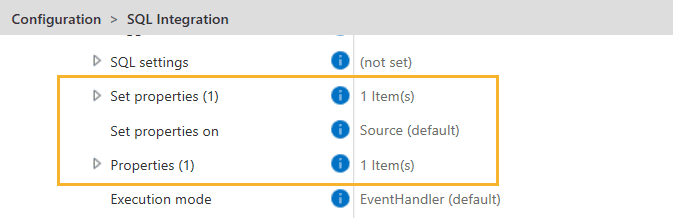
1. Set properties on the source object based on SQL response
- Configure Set properties on to Source (default).
- Use Set properties to define which properties should be updated with SQL query results.
2. Dynamically update related objects based on SQL response
- Configure Set properties on to Specify.
- Define Static or Dynamic search filters to locate related objects (e.g., Status = Active).
- Optionally, enable Exclude source from search results to avoid duplication.
- Use Set properties to define which properties should be updated with SQL query results.
3. Assign additional properties to the same object (unrelated to SQL response)
- Ensure that Set properties on targets the correct object.
- Use Properties → Property setter to define additional properties (e.g., Workflow state).
- Configure Value from to determine how the value is assigned (from the source object, a vault search, or specified search results for multiple objects).
With this configuration, you can automate data enrichment across multiple objects, ensuring your M-Files data stays accurate.
Creating tables with Word Writer #
In this tip, we’ll guide you through creating tables in Word documents that automatically display data from a specified source. With the Word Writer module in Extension Kit Core, there are two ways to create tables, depending on whether your data source is M-Files or an Excel range.
1. Using data from M-Files
First, let’s cover how to create tables using M-Files data as the source.
Example scenario
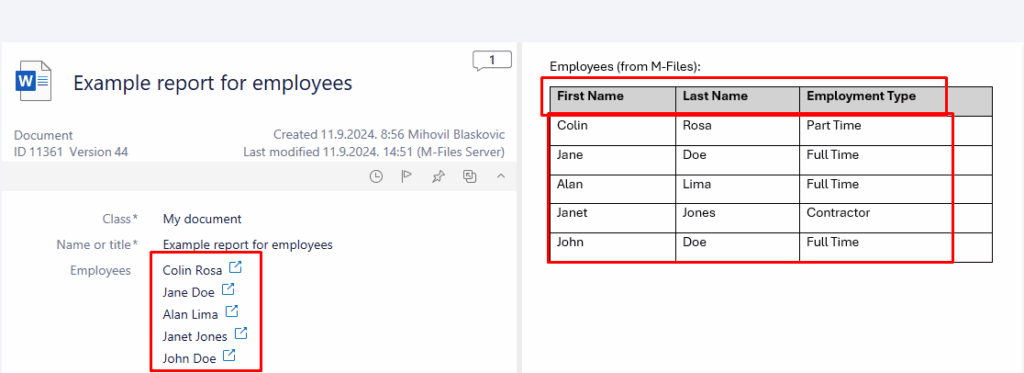
Imagine you need to generate Word reports that automatically pull data stored in M-Files upon a trigger. You need a table that is dynamically populated with employees’ first names, last names, and employment types, all extracted from an M-Files object.
How to create tables using M-Files as the data source
To create a table in a Word document that will be automatically populated with M-Files property values upon a trigger, follow these steps:
- In the Word Writer module, select the class to use as your data source. In this example, we’re using the My document class, which has a property Employees.
- In the Filename wildcards field, specify the name of the document where you want to insert the table.
- In the Action field under the File actions section, select the InsertTable action.
- Configure the table in Word:
- Insert a placeholder table so the system knows where to populate the data. A simple 1×1 table will suffice, as it will be dynamically filled with rows and columns based on your configuration. Note that custom table formatting is not supported, so the default style will be applied.
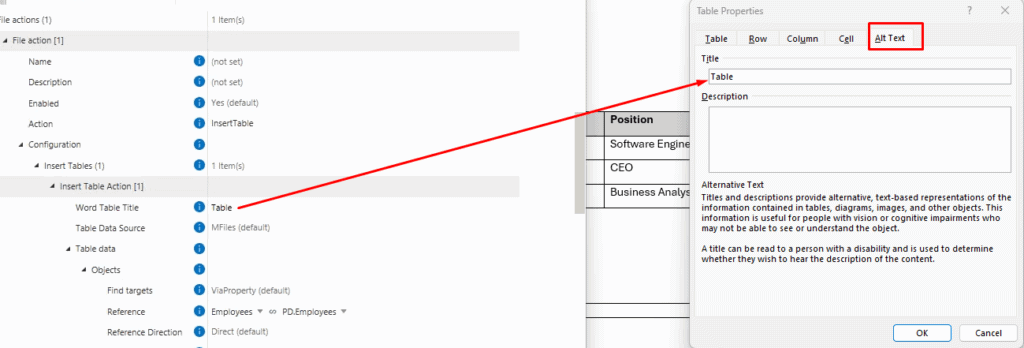
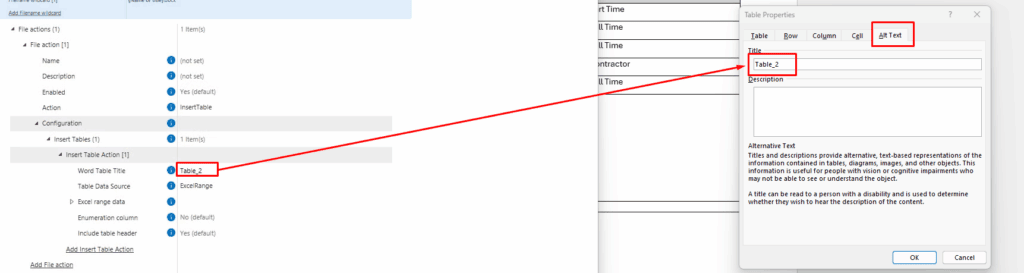
- Set the table title: right-click on the table in Word, select Table properties, then go to Alt Text and enter a title (e.g. “Table”). This step is essential as the system uses the title as a reference point.
- Configure the Insert Table Action in the Word Writer module:
- Enter the same table title in the Word Table Title field. Ensure the title matches exactly, or the rule will not execute.
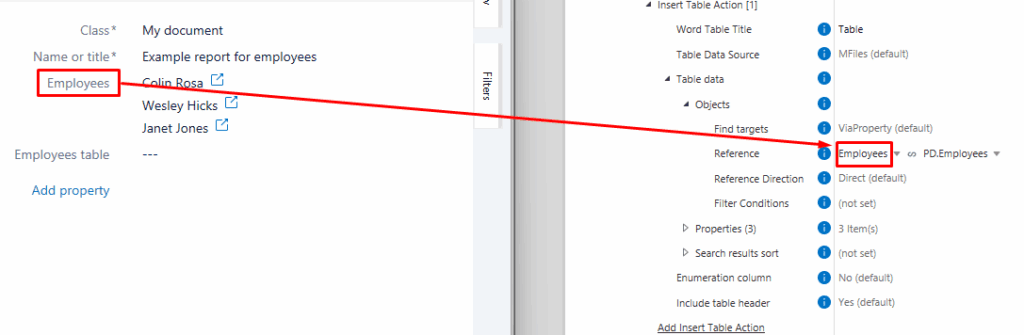
- Select M-Files as the Table Data Source, and define which objects (e.g. Employees) and properties (e.g. First Name, Last Name, etc.) to include in the table. These properties will become the headers of your table.
Note: Modifying the document content won’t trigger the Word Writer action. The rule is triggered by a change in metadata, such as an update to properties, state, or comments.
2. Using Excel data
Here’s how to create tables using data from an Excel range.
Example scenario
Imagine you need to generate Word reports automatically pulling data stored in an Excel table upon a trigger. You need a Word table that is dynamically populated with employees’ first names, last names, and employment types, all extracted from an Excel range.
How to create tables using Excel as the data source
To create a table in a Word document that will be automatically populated with values from a specified Excel range upon a trigger, follow these steps:
- In the Word Writer module, select the class to use as your trigger source. In this example, we’re using the My document class.
- In the Filename wildcards field, specify the name of the document where you want to insert the table. Make sure to specify the correct file name, or if you want to insert a table into multiple files inside an object, use a * wildcard.
- In the Action field under the File actions section, select the InsertTable action.
- Configure the table in Word:
- Insert a placeholder table so the system knows where to populate the data. A simple 1×1 table will suffice, as it will be dynamically filled with rows and columns based on your configuration. Note that custom table formatting is not supported, so the default style will be applied.
- Set the table title: right-click on the table in Word, select Table properties, then go to Alt Text and enter a title (e.g. “Table2”). This step is essential as the system uses the title as a reference point.
- Configure the Insert Table Action in the Word Writer module:
- Enter the same table title in the Word Table Title field. Ensure the title matches exactly, or the rule will not execute. If there are multiple tables in the document, the titles must be unique. If they are not, the first table will be used for all changes, and the others will be skipped.
- Select ExcelRange as the Table Data Source.
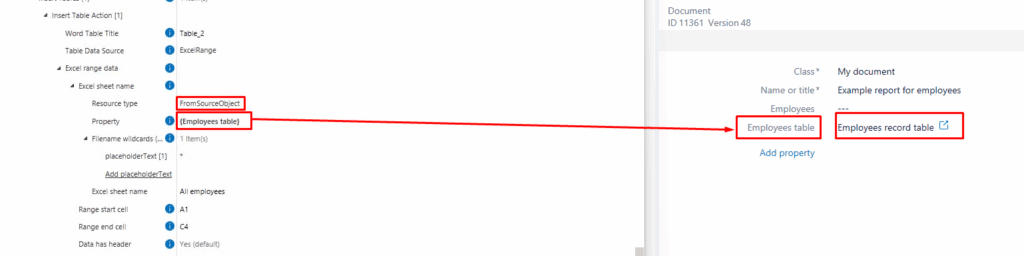
- Under the Excel sheet name section, define the Resource type and a Property. The Excel table can be either an object in M-Files or stored locally on the computer (e.g. C:/path/to/table.xlsx). In our example, the Excel table is located in M-Files and directly referenced from the source object.
- Specify the range under the Excel range data section. Here, the range starts at A1 and ends at C4. The system will pull exactly what is defined, including empty cells if they fall within the range.
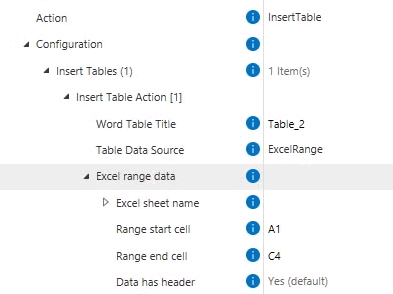
- Ensure the Excel sheet name is accurate (e.g. All employees).
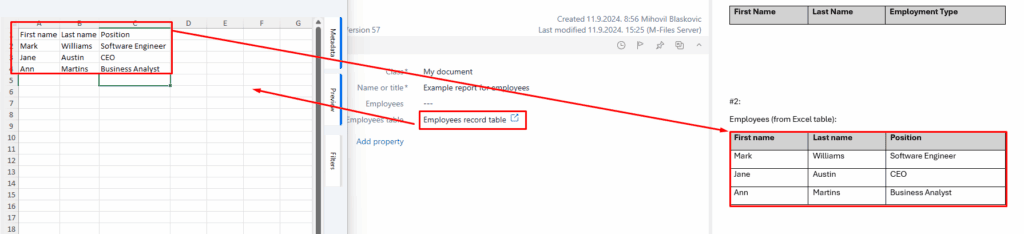
This is the final result. The Excel data is pulled into the Word table.
Mapping Excel data to M-Files #
The Excel Reader module in Extension Kit Core allows you to easily map data from an Excel sheet to M-Files properties. You can configure the rule to either read a specific cell or an entire range of data, offering flexibility based on your needs.
Choosing Action type: Property or Range
In the M-Files Excel actions section, you can choose the Action type:
- Property: Reads a specific cell from the Excel sheet and maps it to a defined property in M-Files. The exact cell is determined by specifying the column (letter) and row (number).
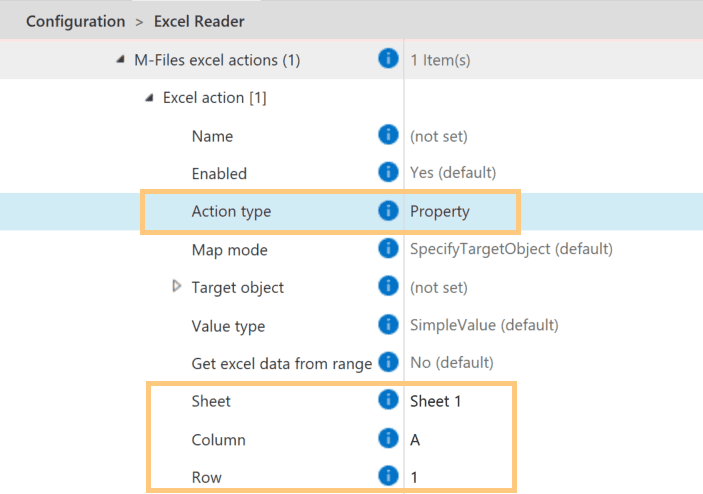
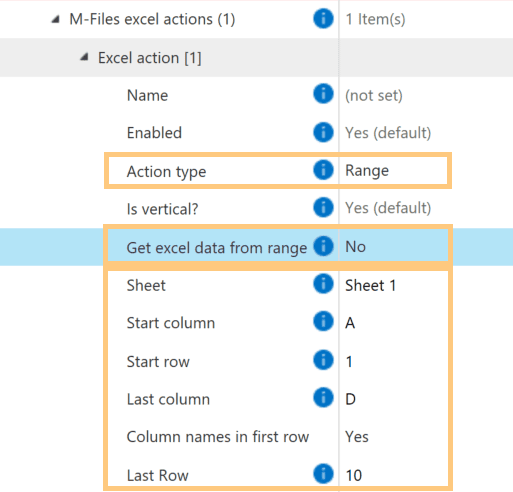
- Range: Reads a range of data from the Excel sheet, allowing you to map multiple cells to M-Files properties. There are two options for defining this range:
Static or Named Range Definition
When the Action type is set to Range, the Get Excel data from range option provides two ways to define the range:
- Static definition: If Get Excel Data from Range = No, define the range using the start and end column/row coordinates. This option is ideal when the data is fixed or predictable.
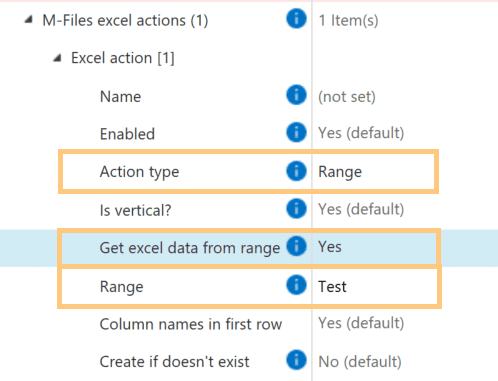
2. Named range definition: If Get Excel Data from Range = Yes, use a named range from the Excel sheet. This option works best for flexible or dynamically changing data, as the range name is predefined in Excel.
Additional key settings
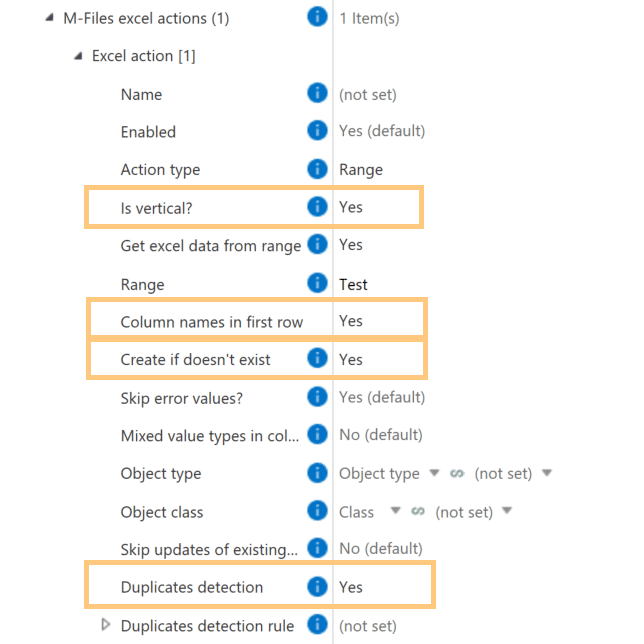
- Is vertical?: Excel Reader supports both horizontal and vertical table formats, making it adaptable for different data layouts.
- Column names in first row: Specify whether the first row in the Excel range contains column headers.
- Create if doesn’t exist: When using the Range option, you can choose to create or update objects in M-Files based on the Excel data. With the Duplicates detection feature, you can prevent duplicate object creation.
Property Operations #
Skip non-working days or holidays when calculating with date properties #
In Extension Kit Core, you can calculate the difference between two dates while excluding non-working days. This feature is useful for scenarios like calculating how many working days you spent on vacation.
How does it work?
Let’s say you create a Vacation object in M-Files, and you need to fill in properties for the start and end dates of your vacation. We’ll call these “Start Date” and “End Date.” You also want a “Working Days” property, showing the number of working days spent on vacation.
This functionality can be achieved using the Extended Auto Properties module.
Example configuration
The key part of the configuration is the expression that calculates the number of days between the two dates:
<<DATEDIFF('%PROPERTY_{PD.StartDate}%','%PROPERTY_{PD.EndDate}%','DAYS')>>
However, for the calculation to exclude non-working days, you need to enable the Use calendar in Date functions option. This will allow you to define the calendar that includes days to be excluded from the calculation.
- Skip weekends: First, specify that weekends should be excluded. Set Weekly occurrence of Sundays and Saturdays as non-working days.
- Add holidays: Next, you can set up the calendar to include holidays. If you want all holidays to be skipped, enable the Use all holidays option. If you prefer to skip only specific holidays, disable this option and manually select the holidays to exclude.
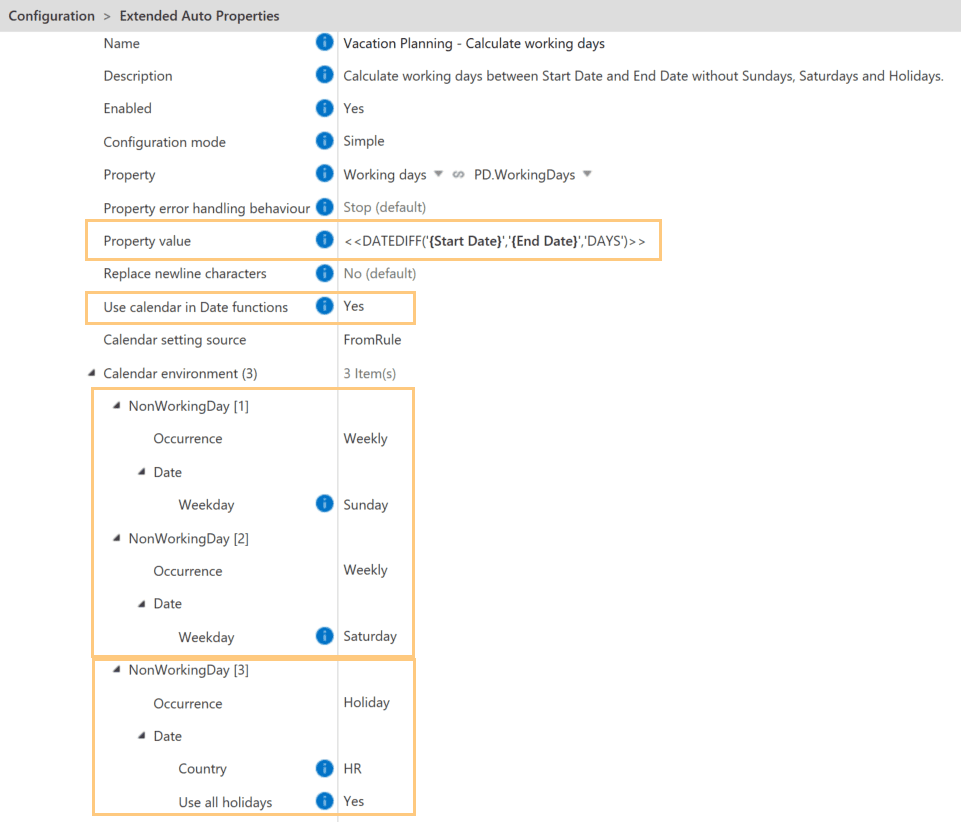
This setup ensures that the “Working Days” property accurately reflects the number of working days during the vacation, excluding weekends and holidays.
Instantly update values with Recalculate properties #
The Extended Auto Properties, Auto Numbering Properties, and Property Builder modules in Extension Kit Core don’t rely on triggers like state changes or user actions. Rules in these modules run automatically when a used property changes, and can be orchestrated if needed.
But what if you update the logic in your rule and want that change to apply to existing objects?
That’s where the Recalculate properties option on the Dashboard comes in.
When and how to use Recalculate properties
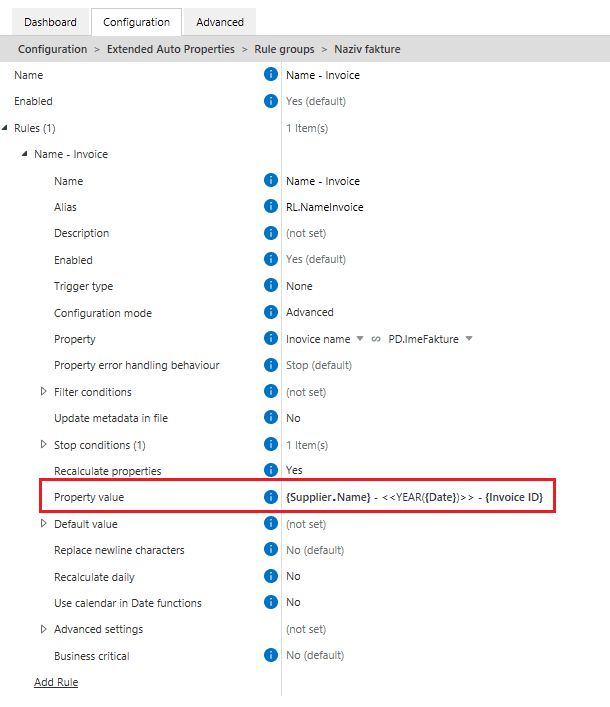
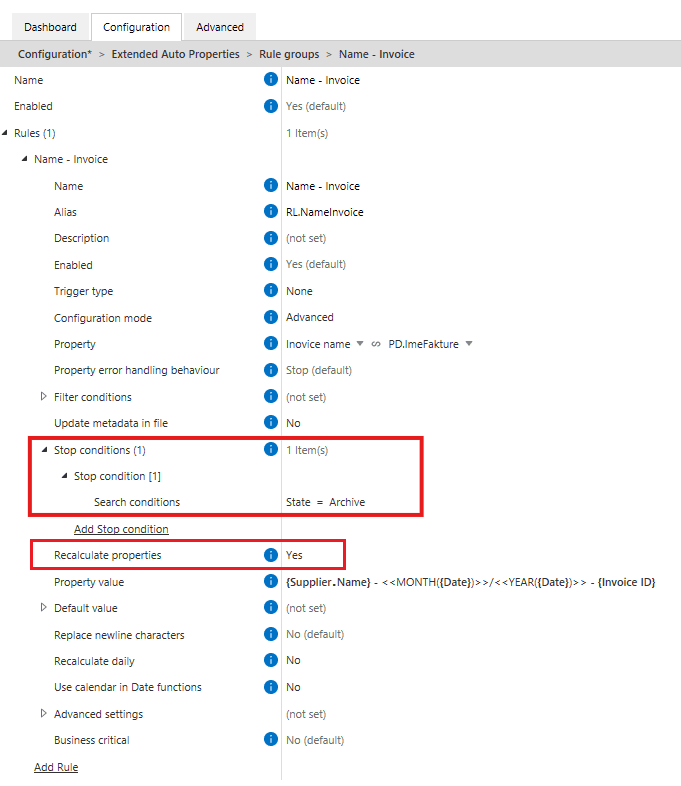
Let’s say you’re using Extended Auto Properties to generate the name of an invoice in this format: Supplier – Year – Invoice ID (Picture 1). The rule creates a name like Supplier_2025_12345.
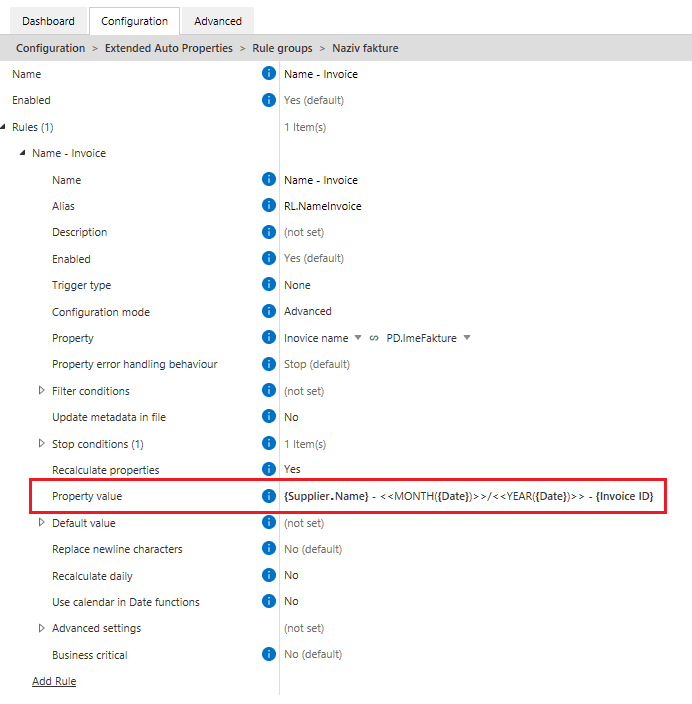
But later, the client asks to modify the naming convention to include the month, so you update the rule with this format: Supplier – Month/Year – Invoice ID (Picture 2).
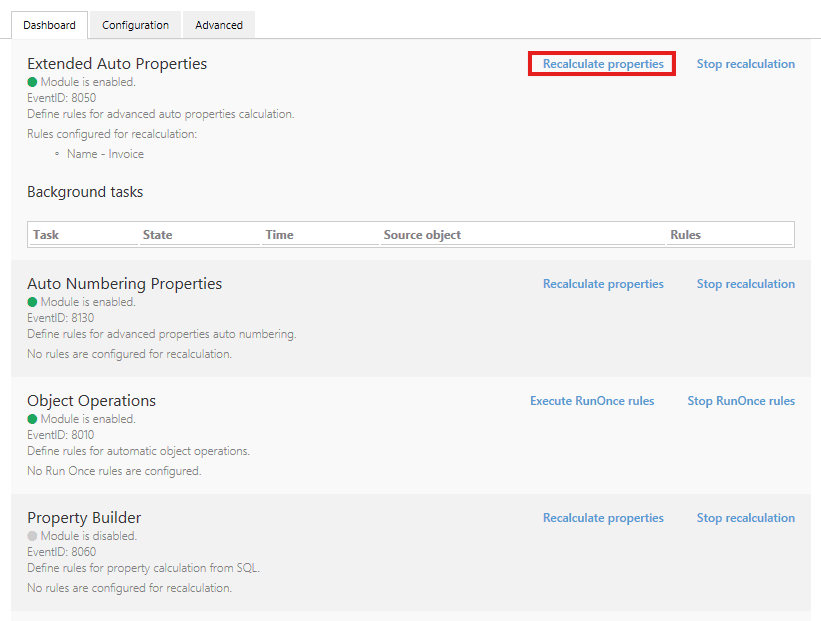
Now, to apply this change to all existing invoices that were named using the old format, go to the Dashboard and click Recalculate properties (Picture 3). All matching documents will be renamed according to the updated rule.
A few things to keep in mind
- The Recalculate properties setting in the rule configuration Within the rule configuration, the Recalculate Properties option is enabled by default (Picture 4), meaning property values will be updated when you click Recalculate properties on the Dashboard. If you set it to No, the values won’t be recalculated even if you click the button.
- Stop conditions You can also define Stop conditions to prevent rule execution once certain criteria are met. For example, you may not want the invoice name to change once the invoice is archived. In this case, setting a condition like
State = Archiveensures the rule will not run and the values will not be recalculated for those objects (Picture 4).
Recalculate properties is a quick and reliable way to apply rule changes across your vault, without relying on triggers or manual edits. It keeps your data aligned with your latest configuration in just a few clicks.
How to build error-free nested expressions #
Expressions in the Extended Auto Properties module of Extension Kit Core can range from very simple to complex, especially when combining functions.
This tip shows you how to build expressions step by step and avoid the most common mistakes.
Simple expressions: one value, one function
Expressions based on a single property are straightforward and don’t require quotation marks. Just wrap the property in curly braces.
In Picture 1, the MONTH expression extracts the month from the Start Date property. For example, if Start Date = 1.7.2025, the result is 7.

Expressions with multiple values or properties
When using functions with multiple variables (like DATEADD), make sure to wrap each variable in single quotes, whether it’s a fixed value or a property reference.
In Picture 2, the DATEADD expression calculates a new date by adding 7 days to the Start Date. For example, if Start Date = 1.7.2025, the result is 8.7.2025.

Nested expressions: Build them step by step
When using expressions within expressions — especially with conditional logic — it’s easy to miss a quote or bracket. One small typo can cause the entire expression to fail.
Let’s say:
If the invoice amount is over €10,000, set the payment due in 60 days. Otherwise, set it in 30 days.
To create this, follow a structured approach:
- Start with the Ternary expression parser:
<<'text' operator 'text' ? 'text' : 'text'>> - Insert the
DATEADDexpressions. To make sure quotes are in place, carefully select the word “text” and replace it with the new expression:<<'text' operator 'text' ? '<<DATEADD('date','value','units')>>' : '<<DATEADD('date','value','units')>>'>> - Insert actual values and properties, keeping the quotes:
<<'{Amount Due}' < '10000' ? '<<DATEADD('{Start Date}','30','DAYS')>>' : '<<DATEADD('{Start Date}','60','DAYS')>>'>>
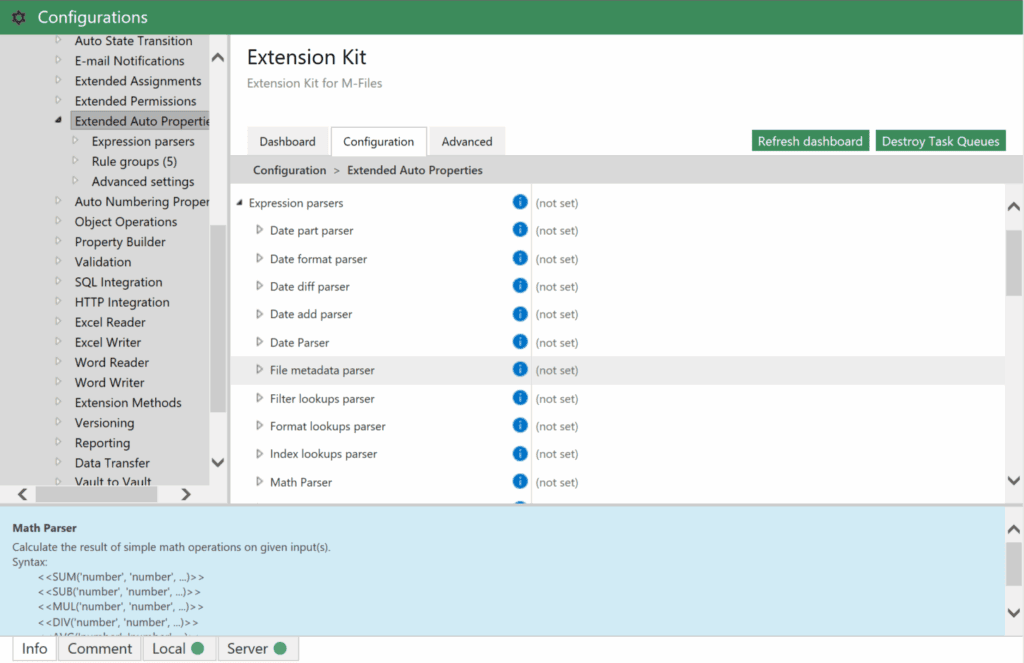
Bonus tip: Use the Expression Parsers section
The Expression parsers section in the Extended Auto Properties module contains all available parsers and their syntax (Picture 3). Use it as a reference to copy expressions until you’re familiar with them.
Content operations #
Automatically add or read barcodes in M-Files #
In Extension Kit Core’s Document Processing module, you can configure various actions to modify documents when they enter a specific workflow state. One powerful functionality is adding and reading barcodes or QR codes within M-Files.
Let’s explore how you can enhance your document processing with barcodes.
Adding barcodes to documents
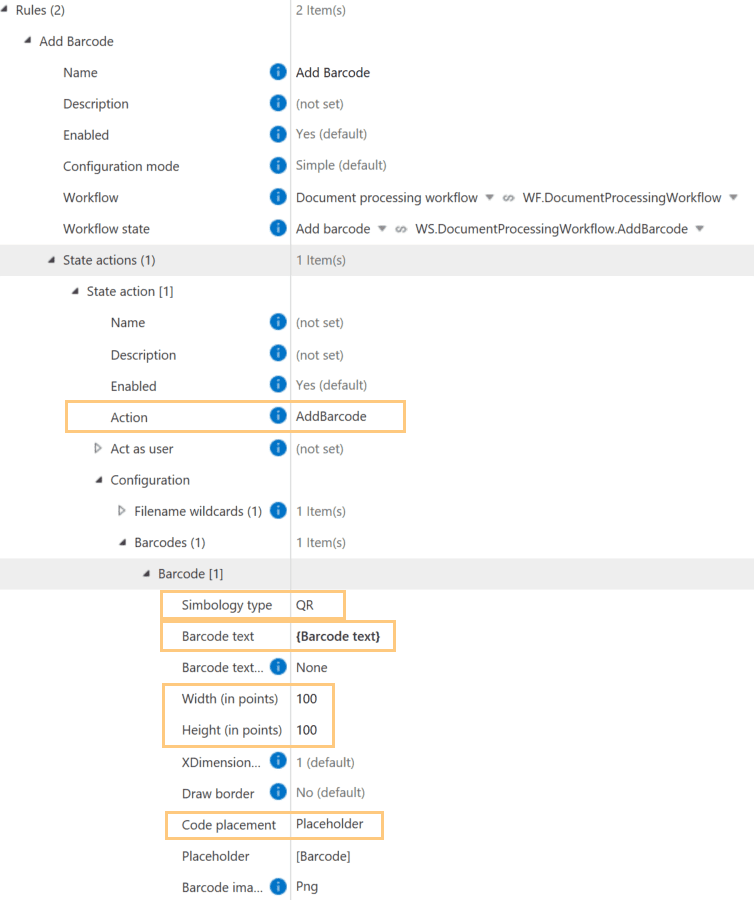
The AddBarcode action inserts barcodes into documents when they reach a designated workflow state (e.g., Add Barcode). Configuration is simple (Picture 1):
- Symbology type: Choose the barcode type (e.g., QR code).
- Barcode text: Define static or dynamic text to embed (e.g., {Barcode text}).
- Code placement: Specify a fixed location or use a placeholder to define barcode placement.
- Set the barcode’s Width and Height.
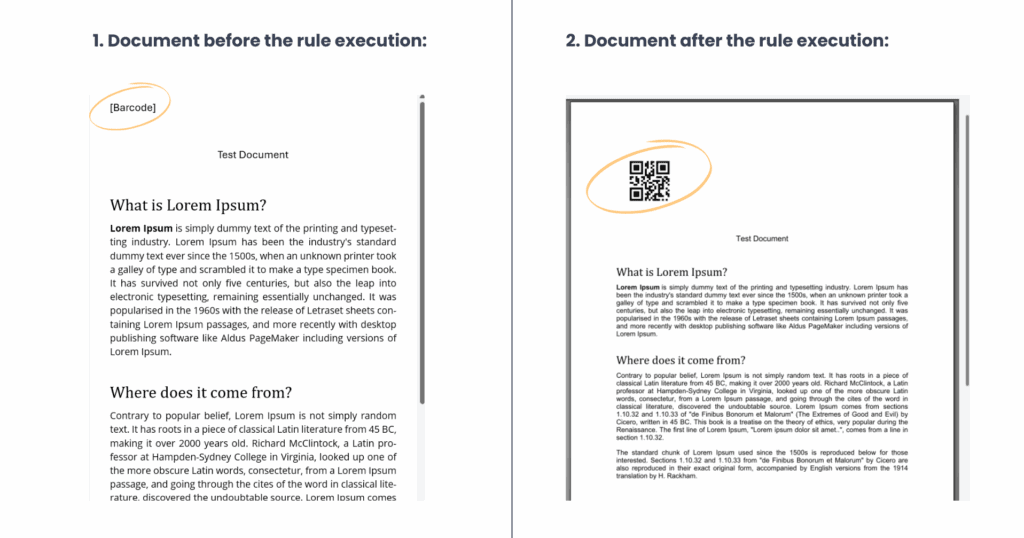
Once set up, the barcode is automatically added to the document after the rule execution (Picture 2).
Reading barcode data from documents
The ReadBarcode action extracts barcode or QR code text and saves it to an M-Files property. Configuration steps include (Picture 3):
- Symbology type: Specify the barcode type (e.g., QR code).
- Read from pages: Define which pages to scan.
- Property: Choose the property where the extracted text should be saved.
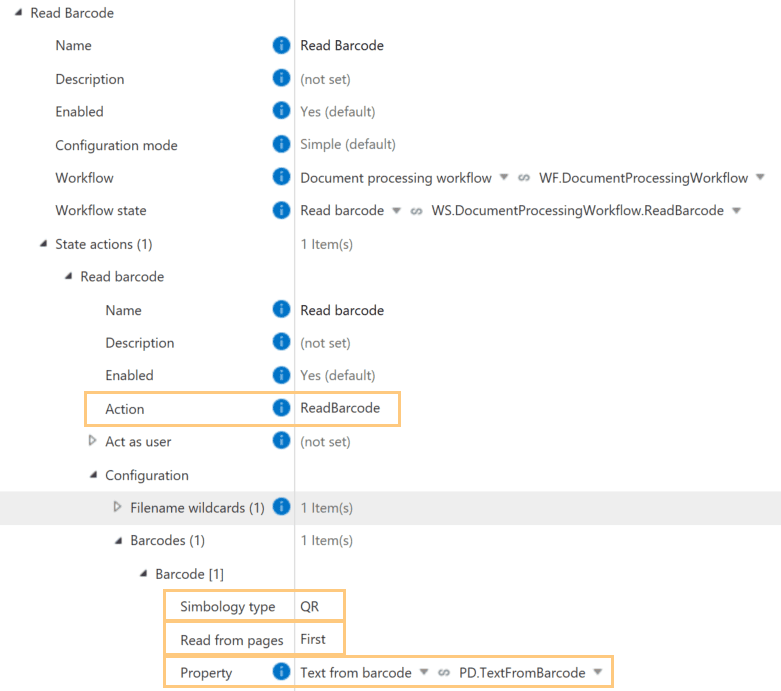
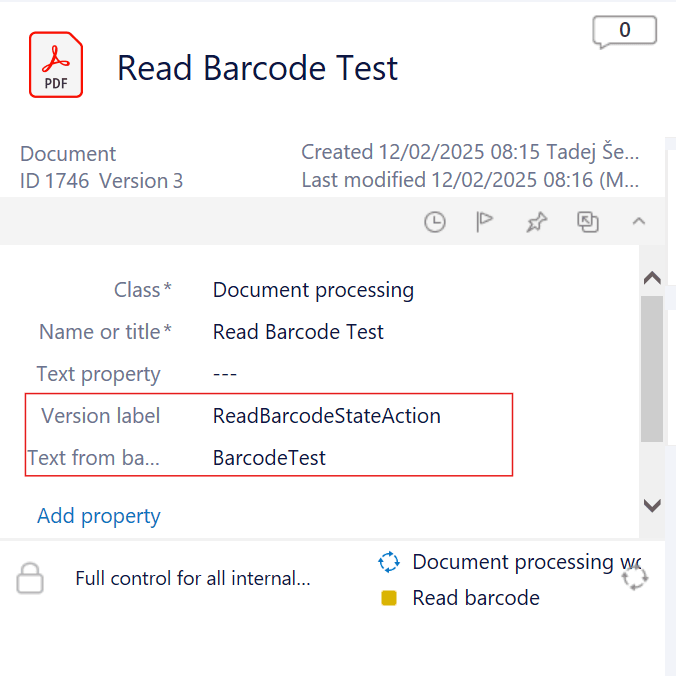
Once configured, barcode data is automatically extracted and stored in the specified property when the document enters the workflow state (e.g., Read Barcode). (Picture 4)
With these capabilities, you can automate barcode handling in M-Files to reduce manual data entry, improve accuracy, and enhance document workflows.
How to automatically compress files in M-Files #
One of Extension Kit Core’s latest modules, the Archiving module, lets you compress files into ZIP, 7Z, or TAR archives, or decompress them from ZIP, 7Z, TAR, or RAR formats. Rules can be trigger-based, scheduled, or run-once.
This tip shows how to automatically archive documents on a schedule, and what to watch out for in your configuration.
Compress documents using a scheduled rule
In our example, we created a scheduled rule that runs daily at 23:00, collects all Travel Orders in the state ‘Completed Travel Orders’, and compresses them into a single ZIP archive. The resulting archive is stored in M-Files, serving as a historical record of the completed Travel Orders.
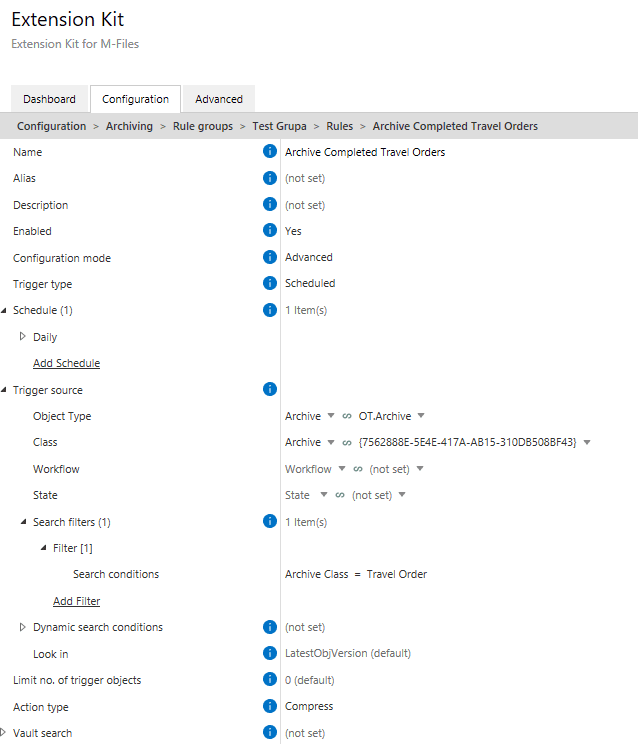
Important: Trigger sources in scheduled rules
For scheduled or run-once rules, a trigger source must still be defined. This does not define which documents will be archived — it simply provides the object on which the rule will execute, without affecting that object in any way.
For this purpose, we created a new object type called Archive, with a class Archive that will serve as a trigger source and a container for ZIP files (Picture 1).
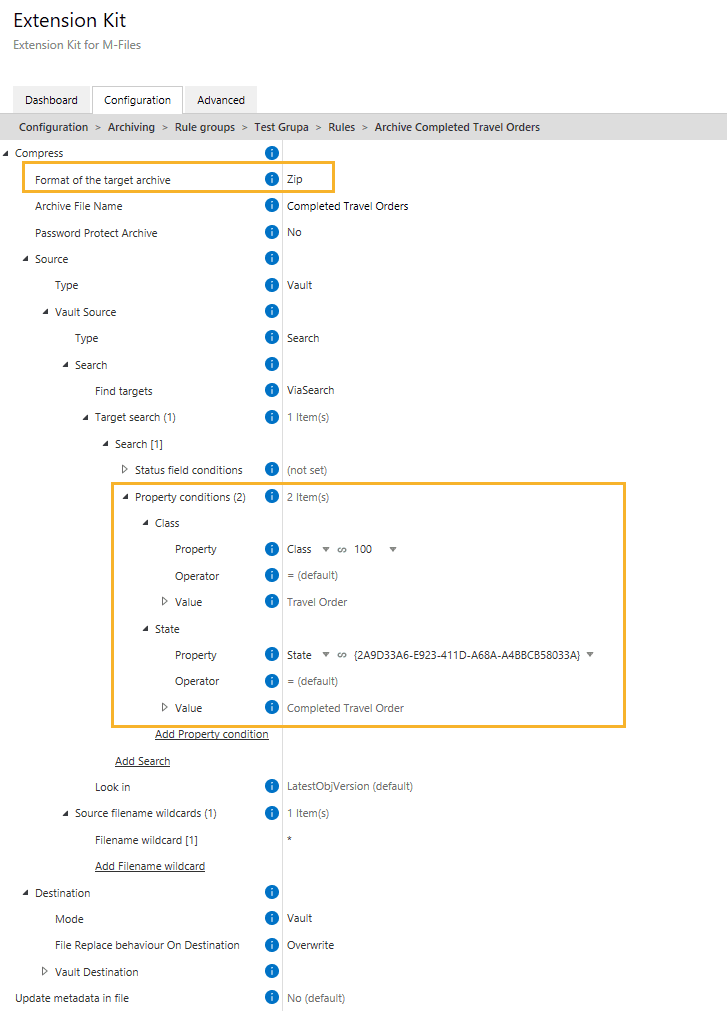
Setting up the rule
Using the Compress action in the Archive module, configure what will be archived. Define a search filter to find all objects of class Travel Orders with the state Completed Travel Order (Picture 2).
Result
The resulting ZIP archive containing all matching Travel Orders is stored in M-Files (Picture 3).
Alternative setup: No Archive class needed?
In our example, we used the Archive object both to store the ZIP file and to act as the trigger source for the rule.
However, if you don’t need a dedicated object to store the archive, you can use any object as the trigger source for scheduled or run-once rules. The object’s content doesn’t matter — the rule simply needs something to execute on.
Just make sure to set Limit number of trigger objects to 1 (Picture 4). Otherwise, the rule could execute on multiple objects, resulting in multiple ZIP files instead of a single archive.

The Archive module is a powerful tool for packaging files in M-Files, but scheduled rules require careful setup. Use a dedicated object as a safe trigger, or limit your triggers to avoid unwanted ZIPs.
Object operations #
Automate object creation from multi-select properties #
This tip explores how to automatically create objects in M-Files based on values selected in a multi-select property. It’s a great way to streamline your workflows and eliminate repetitive manual work.
Example
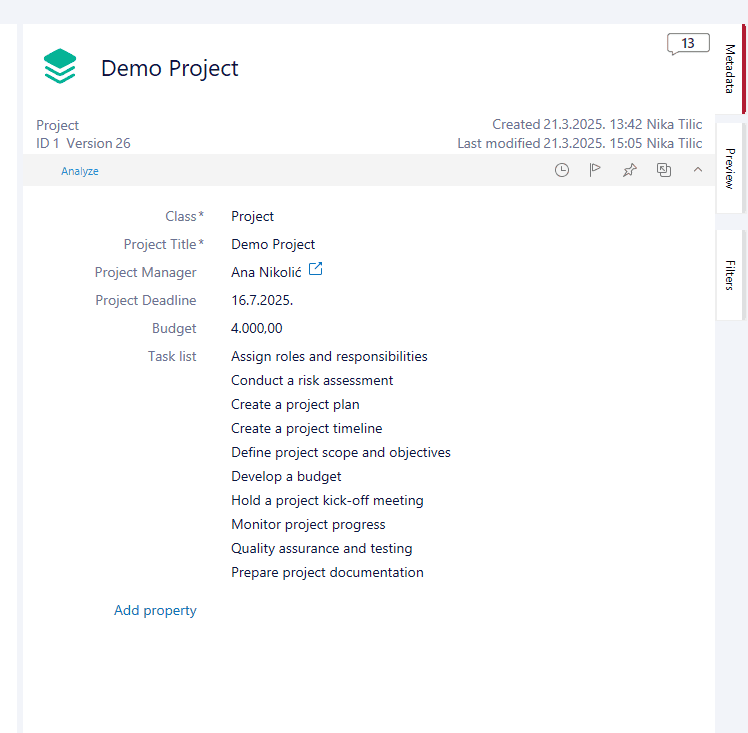
Let’s say you have a Project object with these properties: Name, Budget, Deadline, and a multi-select Task list template for creating objects.
Each project may include several tasks – and you want each of them to be managed as a separate object. Instead of creating those task objects manually, you can automate this process with Extension Kit Core.
Configuration steps
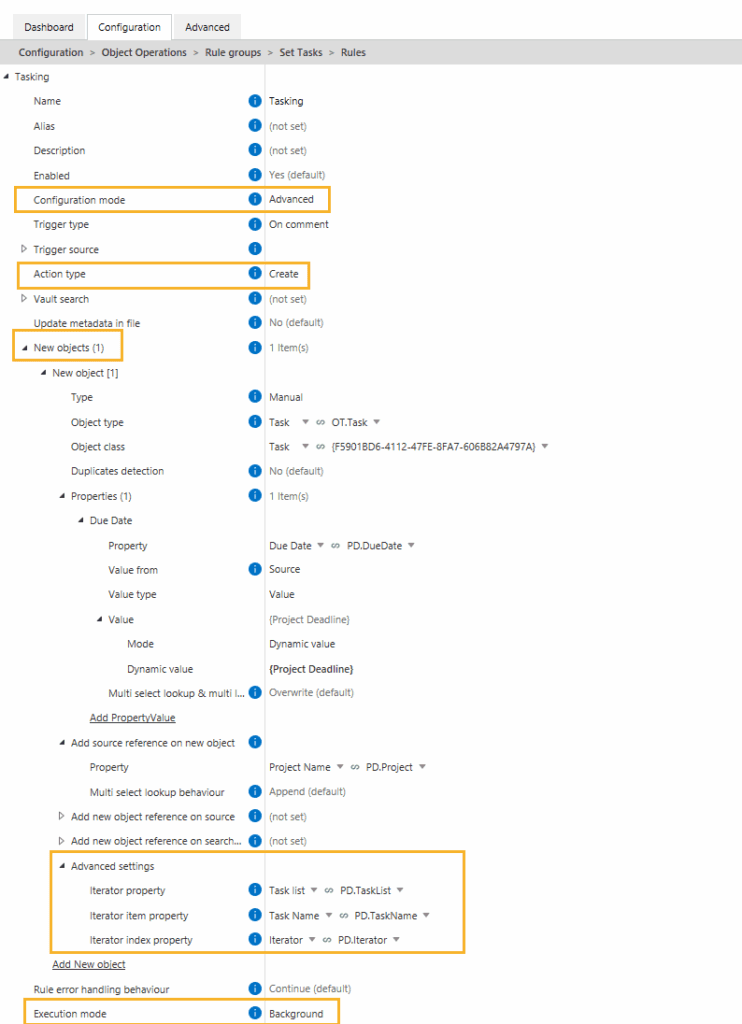
Use advanced configuration mode in the Object Operations module to set up a rule that creates a new object for every selected task in the Task list (Picture 1).
- Action type: Set the action type to Create to generate new objects.
- New object setup: In the New objects section, define the Object type, Object class, and any relevant properties for the new object.
- Advanced settings: Under New objects → Advanced settings, you must specify the following to ensure each task is processed individually:
- Iterator property: Specify the property on the source object that serves as an iterator. In this case, the Task list property acts as the iterator, as new objects need to be created for each selected task.
- Iterator item property: Specify the property where the current task value should be stored in the new object, e.g. a Task Name.
- Iterator index property: Specify the property on the new object that will store an index of the current iterator item. In this example, the index is stored in the Iterator property on the OT Task.
- Execution mode: Set it to Background or BackgroundTransaction to ensure the rule runs smoothly in the background.
The result in M-Files
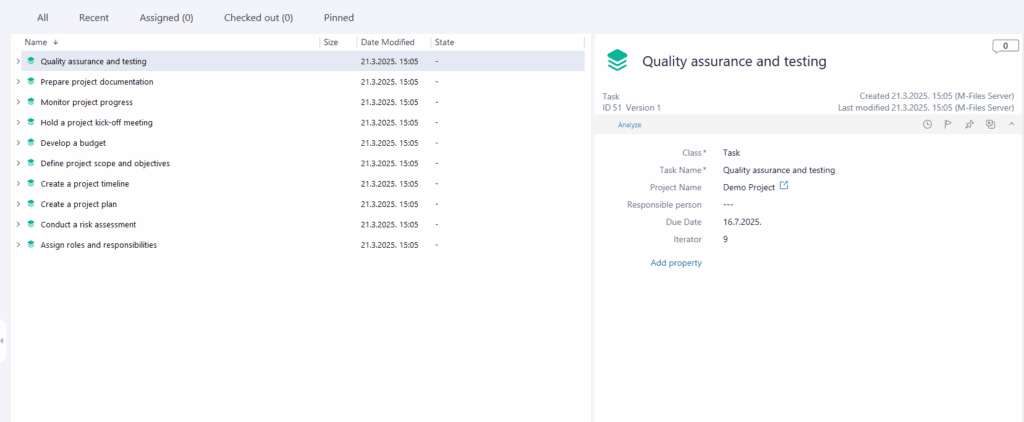
Let’s say you select ten tasks in the Task list of your Demo Project (see Picture 2).
Once the rule is triggered, 10 individual Task objects are automatically created – one for each selected task (see Picture 3). This setup saves time, reduces errors, and ensures every task is properly tracked in M-Files.
Automating object creation based on a multi-select property is a simple but powerful way to reduce manual effort and enhance overall efficiency in M-Files.
Notifications #
HTML formatting and attachments in email notifications #
Want your M-Files email notifications to look clean, professional, and visually appealing (think branded headers, styled sections, or CTA buttons)?
With the Email Notifications module in Extension Kit Core, you can send emails that not only reflect your brand using custom HTML but also include attachments directly from M-Files.
Why use this module?
The Email Notifications module gives you the flexibility to design emails that match your communication style:
- Create rich, styled layouts using custom HTML
- Attach documents or files from M-Files objects
- Trigger notifications based on any event or condition
Example configuration
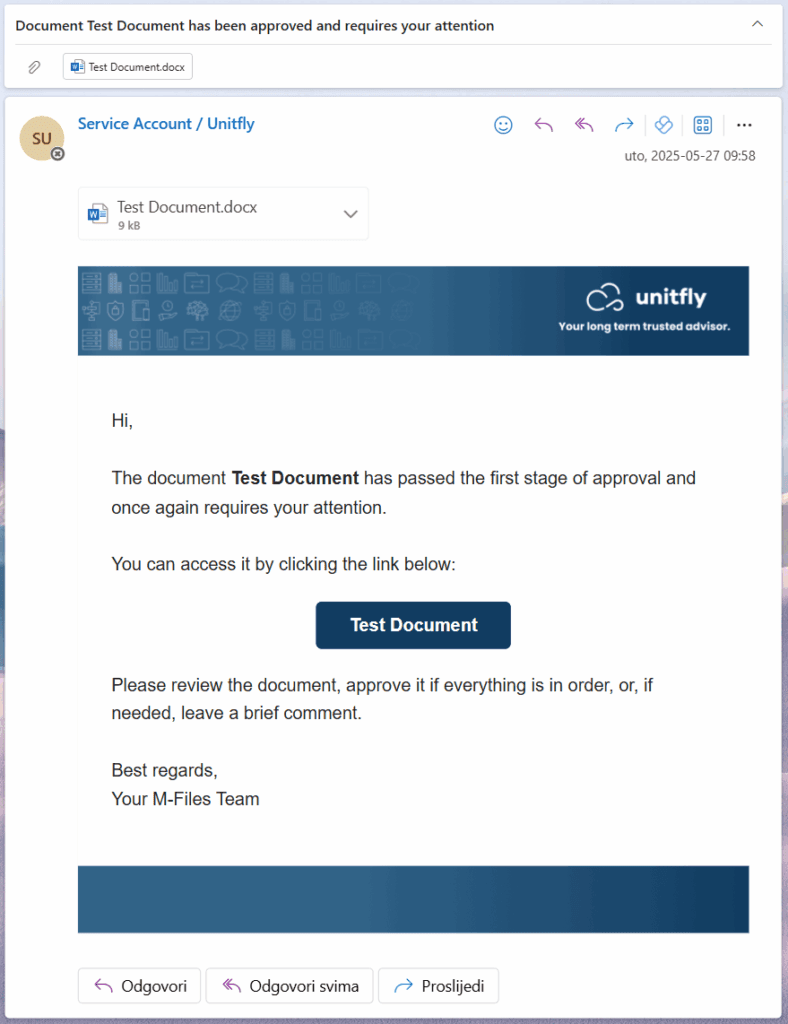
Let’s say you want to send a notification when an object enters a specific state. The email should:
- Match your brand style
- Include a document attachment
- Feature a call-to-action button
Here’s how you can configure it (Picture 1):
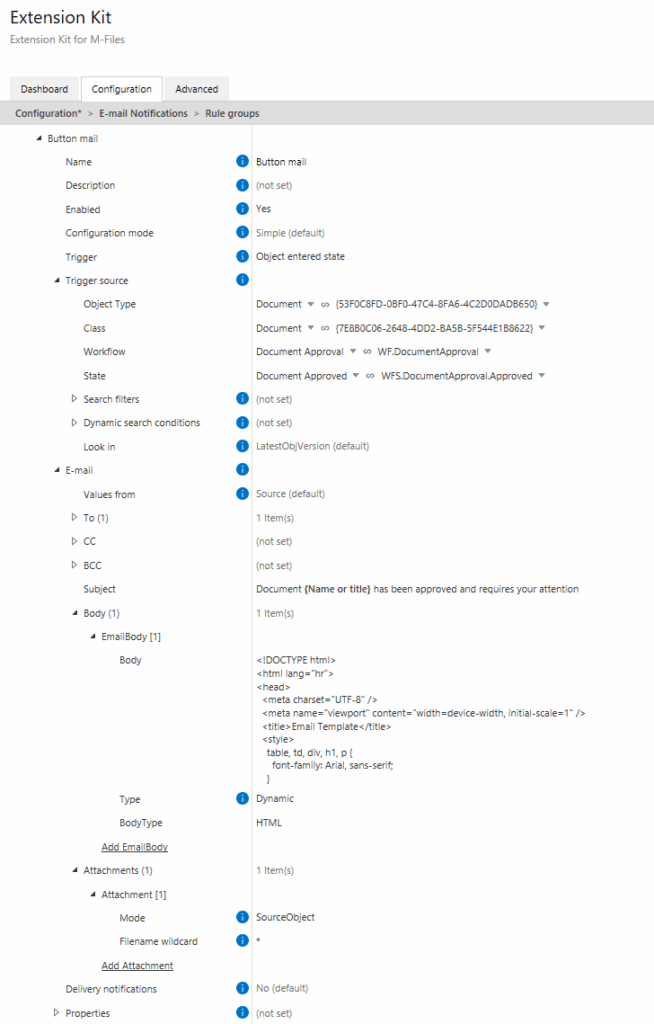
And here’s what the final email looks like — clean, styled, and effective (Picture 2):
You can still send plain-text notifications if you prefer. But if you’re aiming for a branded or more complex layout, HTML gives you full creative control.