Welcome to Expert Tips — a growing collection of practical tips and real-world examples to help you get the most out of Extension Kit Core.
This page focuses on the Property Operations module group, which includes the following modules: Property Operations, Property Calculations, Extended Auto Properties, Auto Numbering Properties, Property Builder.
To get a new expert tip delivered to your inbox every week, subscribe to the Tip of the Week newsletter here.
Skip non-working days or holidays when calculating with date properties
Skip non-working days or holidays when calculating with date properties #
In Extension Kit Core, you can calculate the difference between two dates while excluding non-working days. This feature is useful for scenarios like calculating how many working days you spent on vacation.
How does it work?
Let’s say you create a Vacation object in M-Files, and you need to fill in properties for the start and end dates of your vacation. We’ll call these “Start Date” and “End Date.” You also want a “Working Days” property, showing the number of working days spent on vacation.
This functionality can be achieved using the Extended Auto Properties module.
Example configuration
The key part of the configuration is the expression that calculates the number of days between the two dates:
<<DATEDIFF('%PROPERTY_{PD.StartDate}%','%PROPERTY_{PD.EndDate}%','DAYS')>>
However, for the calculation to exclude non-working days, you need to enable the Use calendar in Date functions option. This will allow you to define the calendar that includes days to be excluded from the calculation.
- Skip weekends: First, specify that weekends should be excluded. Set Weekly occurrence of Sundays and Saturdays as non-working days.
- Add holidays: Next, you can set up the calendar to include holidays. If you want all holidays to be skipped, enable the Use all holidays option. If you prefer to skip only specific holidays, disable this option and manually select the holidays to exclude.
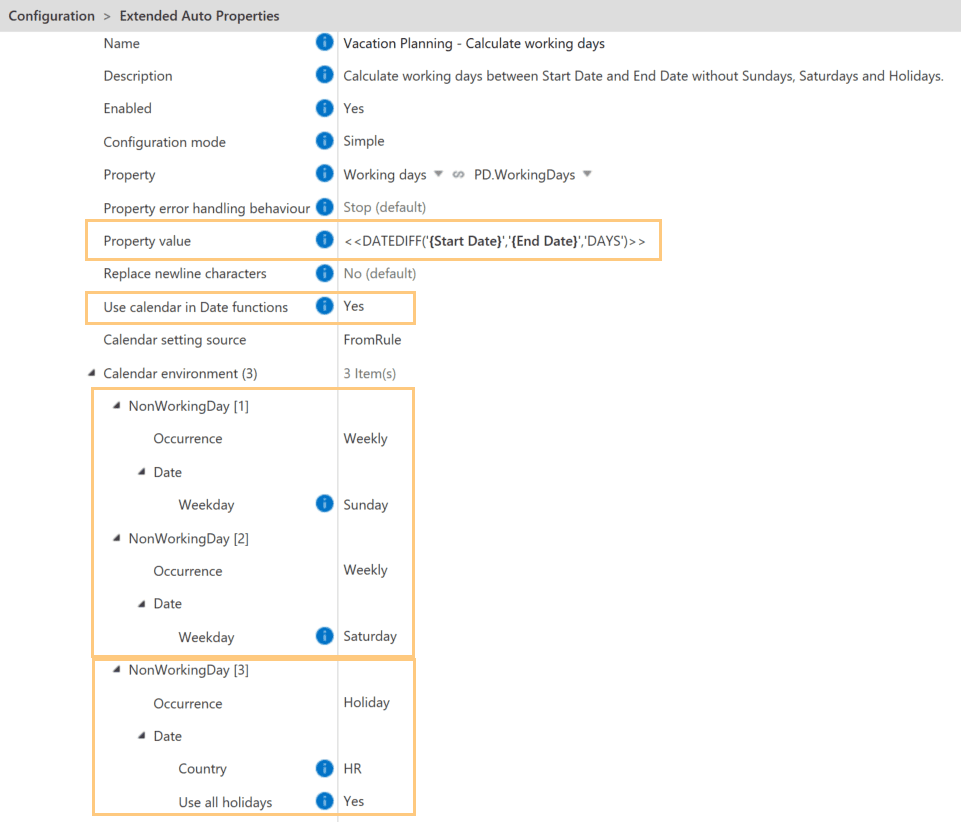
This setup ensures that the “Working Days” property accurately reflects the number of working days during the vacation, excluding weekends and holidays.
Instantly update values with Recalculate properties
Instantly update values with Recalculate properties #
The Extended Auto Properties, Auto Numbering Properties, and Property Builder modules in Extension Kit Core don’t rely on triggers like state changes or user actions. Rules in these modules run automatically when a used property changes, and can be orchestrated if needed.
But what if you update the logic in your rule and want that change to apply to existing objects?
That’s where the Recalculate properties option on the Dashboard comes in.
When and how to use Recalculate properties
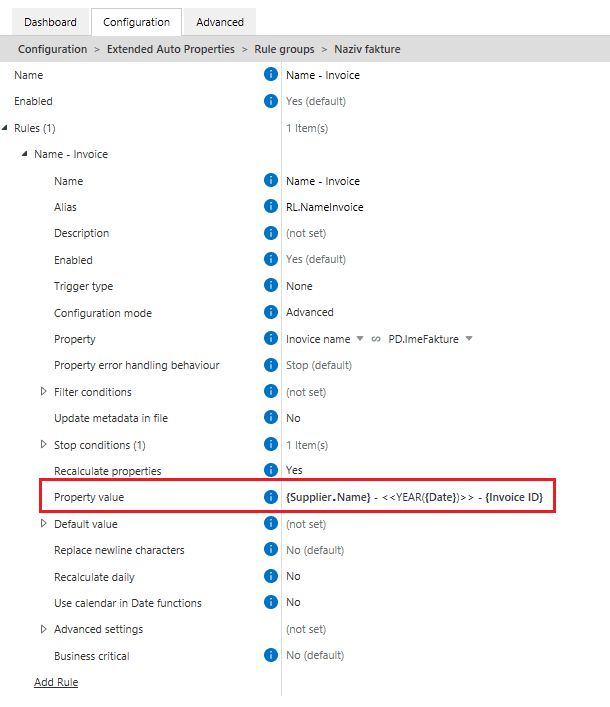
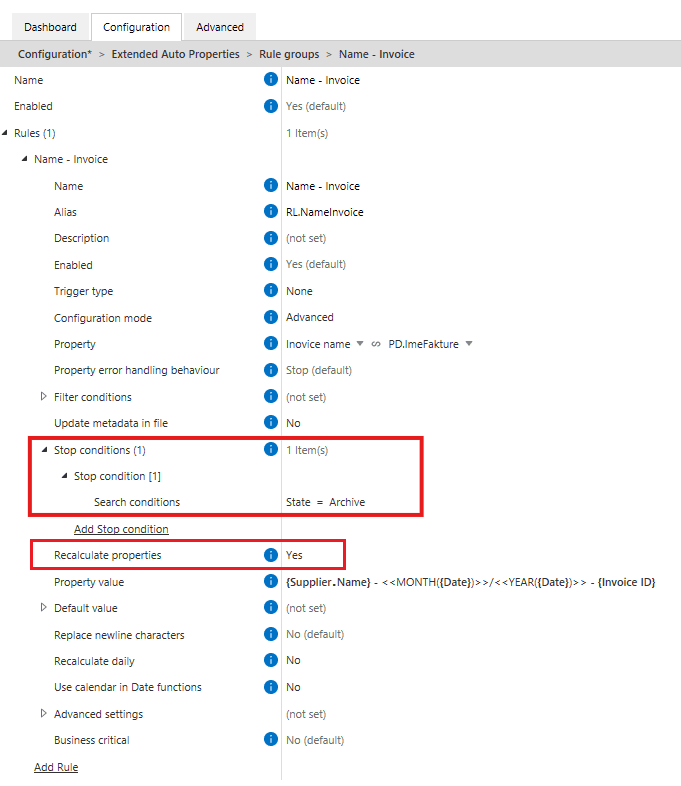
Let’s say you’re using Extended Auto Properties to generate the name of an invoice in this format: Supplier – Year – Invoice ID (Picture 1). The rule creates a name like Supplier_2025_12345.
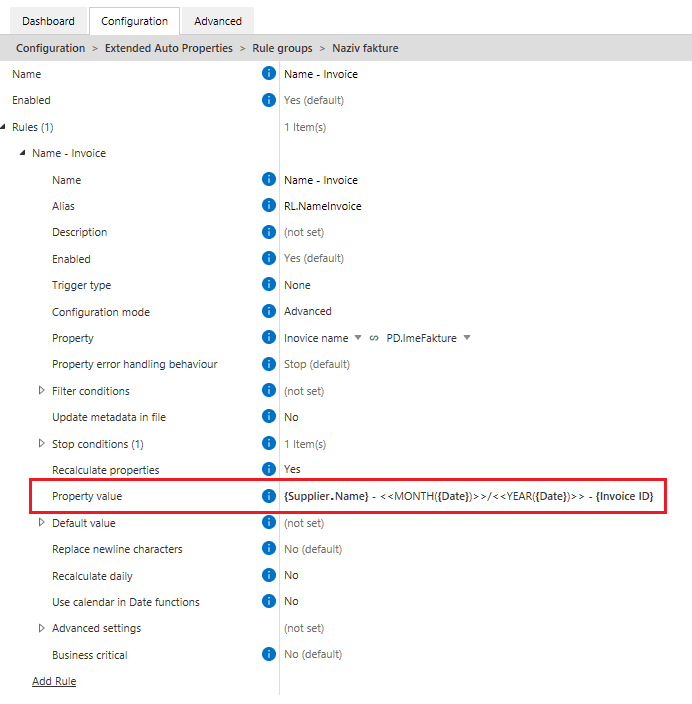
But later, the client asks to modify the naming convention to include the month, so you update the rule with this format: Supplier – Month/Year – Invoice ID (Picture 2).
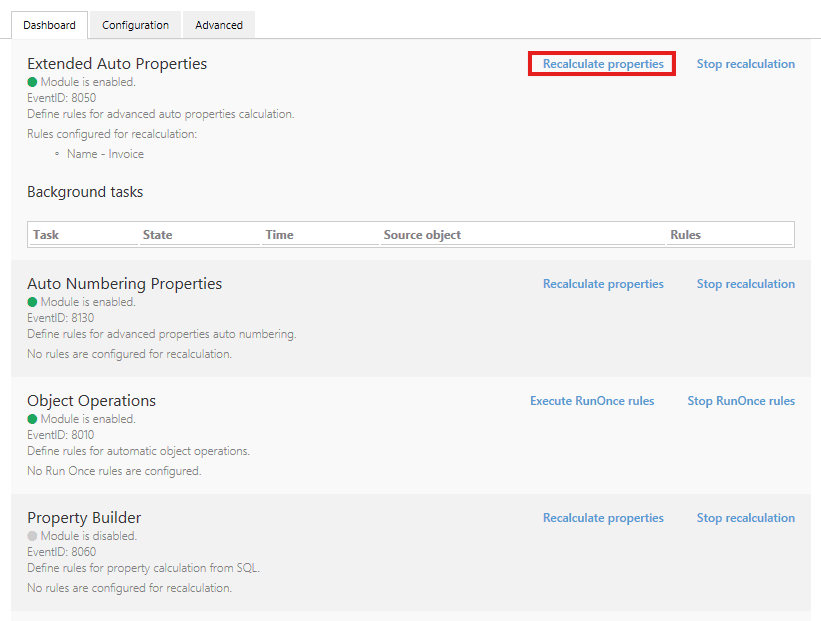
Now, to apply this change to all existing invoices that were named using the old format, go to the Dashboard and click Recalculate properties (Picture 3). All matching documents will be renamed according to the updated rule.
A few things to keep in mind
- The Recalculate properties setting in the rule configuration Within the rule configuration, the Recalculate Properties option is enabled by default (Picture 4), meaning property values will be updated when you click Recalculate properties on the Dashboard. If you set it to No, the values won’t be recalculated even if you click the button.
- Stop conditions You can also define Stop conditions to prevent rule execution once certain criteria are met. For example, you may not want the invoice name to change once the invoice is archived. In this case, setting a condition like
State = Archiveensures the rule will not run and the values will not be recalculated for those objects (Picture 4).
Recalculate properties is a quick and reliable way to apply rule changes across your vault, without relying on triggers or manual edits. It keeps your data aligned with your latest configuration in just a few clicks.
How to build error-free nested expressions
How to build error-free nested expressions #
Expressions in the Extended Auto Properties module of Extension Kit Core can range from very simple to complex, especially when combining functions.
This tip shows you how to build expressions step by step and avoid the most common mistakes.
Simple expressions: one value, one function
Expressions based on a single property are straightforward and don’t require quotation marks. Just wrap the property in curly braces.
In Picture 1, the MONTH expression extracts the month from the Start Date property. For example, if Start Date = 1.7.2025, the result is 7.

Expressions with multiple values or properties
When using functions with multiple variables (like DATEADD), make sure to wrap each variable in single quotes, whether it’s a fixed value or a property reference.
In Picture 2, the DATEADD expression calculates a new date by adding 7 days to the Start Date. For example, if Start Date = 1.7.2025, the result is 8.7.2025.

Nested expressions: Build them step by step
When using expressions within expressions — especially with conditional logic — it’s easy to miss a quote or bracket. One small typo can cause the entire expression to fail.
Let’s say:
If the invoice amount is over €10,000, set the payment due in 60 days. Otherwise, set it in 30 days.
To create this, follow a structured approach:
- Start with the Ternary expression parser:
<<'text' operator 'text' ? 'text' : 'text'>> - Insert the
DATEADDexpressions. To make sure quotes are in place, carefully select the word “text” and replace it with the new expression:<<'text' operator 'text' ? '<<DATEADD('date','value','units')>>' : '<<DATEADD('date','value','units')>>'>> - Insert actual values and properties, keeping the quotes:
<<'{Amount Due}' < '10000' ? '<<DATEADD('{Start Date}','30','DAYS')>>' : '<<DATEADD('{Start Date}','60','DAYS')>>'>>
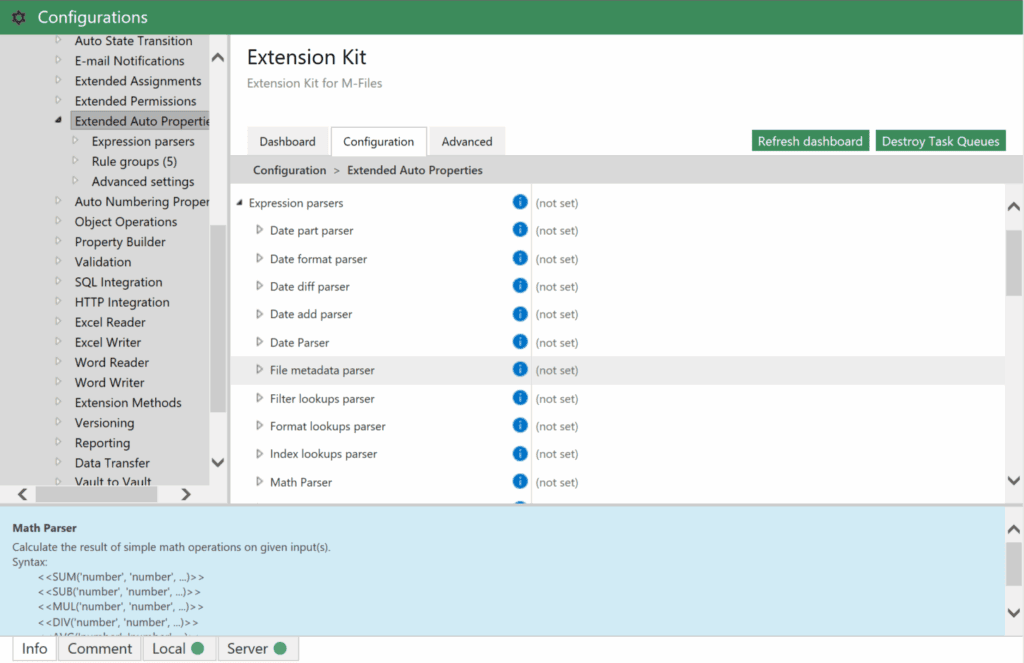
Bonus tip: Use the Expression Parsers section
The Expression parsers section in the Extended Auto Properties module contains all available parsers and their syntax (Picture 3). Use it as a reference to copy expressions until you’re familiar with them.
Nesting expressions in Extended Auto Properties
Nesting expressions in Extended Auto Properties #
We’re diving into a useful feature within the Extended Auto Properties module: nesting expressions. Nesting expressions allows you to simplify processes by reducing the need for additional properties, rules, or actions, making your configurations cleaner and more efficient.
Scenario
Consider a customer who needs to create a Case object with a name that combines the Address and City fields. The challenge arises when the external system receiving the Case object has a name field limited to 50 characters. Often, the concatenated string exceeds this limit, requiring you to extract the first 50 characters from the combined Address and City.
Solution
Instead of creating multiple properties or rules, you can achieve the desired outcome in a single step by nesting expressions within the Extended Auto Properties module.
For example, let’s say you have the following fields:
- Address: 123 Main St
- City: Springfield
You need to create a property that combines these fields but ensures the final result does not exceed 50 characters. Here’s how to do it:
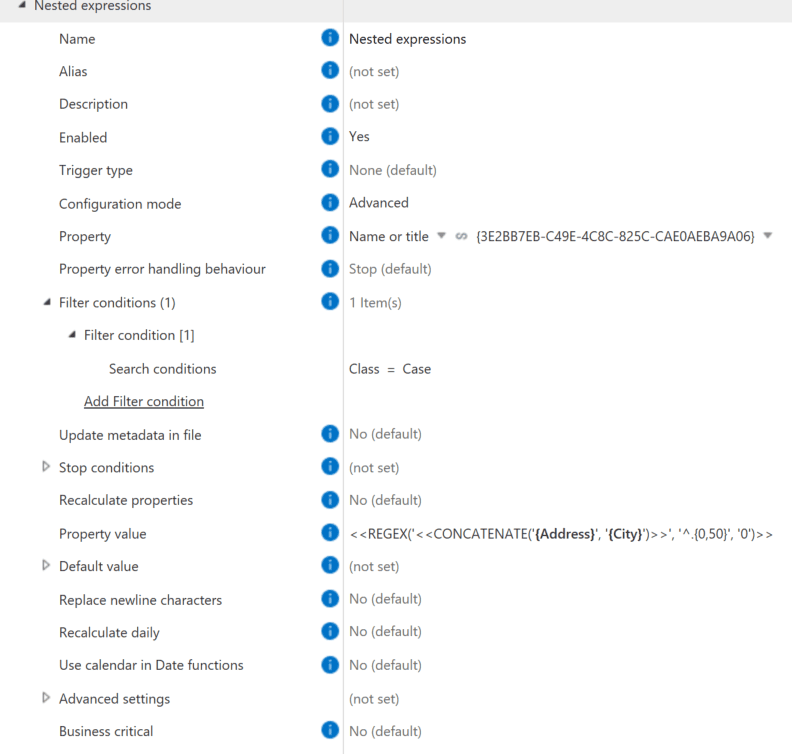
- In the Extended Auto Properties module, configure a rule to fill the Name or title property on the class Case with concatenated Address and City fields, truncated to the first 50 characters.
- Enter the following expression as the property value:
<<REGEX('<<CONCATENATE('{Address}','{City}')>>', '^.{0,50}', '0')>>
And here’s how this configuration looks like in Extension Kit Core (Picture 1):
Using Expression Type in Extended Auto Properties
Using Expression Type in Extended Auto Properties #
When configuring property values using the Extended Auto Properties module, you can make use both of any of our parser expressions and regular M-Files expressions.
When doing that, adjust the Expression Type setting to further control expression capabilities and optimize expression expansion performance.
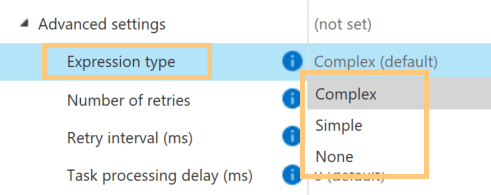
You can find the Expression Type setting under Advanced Settings when a rule is configured in the advanced configuration mode. Each option offers specific benefits depending on your expression needs. Here are the options:
- Complex: Choose this option if your expression uses advanced placeholder editor functionality, such as transitive referencing, properties from the object’s history, or keywords other than ObjID and ObjVer.
- Simple: This option improves performance when your expression involves only top-level properties and uses keywords like ObjID or ObjVer.
- None: Use this option to improve performance further when the expression contains only static values and no properties or placeholders.
Replacing elements in Object Lookup properties
Replacing elements in Object Lookup properties #
Situation
There are many use cases where an object lookup needs to stay in sync with other properties. For example:
Employees create OT Hour Logging Events (HLEs) and select the related project. Once an HLE is created, the employee should automatically appear in the Team Members property on the corresponding Project object.
At first glance, this looks simple to configure with a Property Operation rule that appends the employee from the HLE to the Team Members property on the Project.
But here’s the problem: If a user makes a mistake (e.g., selects the wrong employee), the wrong person gets added to the Project Team. Fixing this by removing and replacing the employee would normally require multiple rules.
Solution
Instead of juggling multiple rules, you can configure it with just one rule:
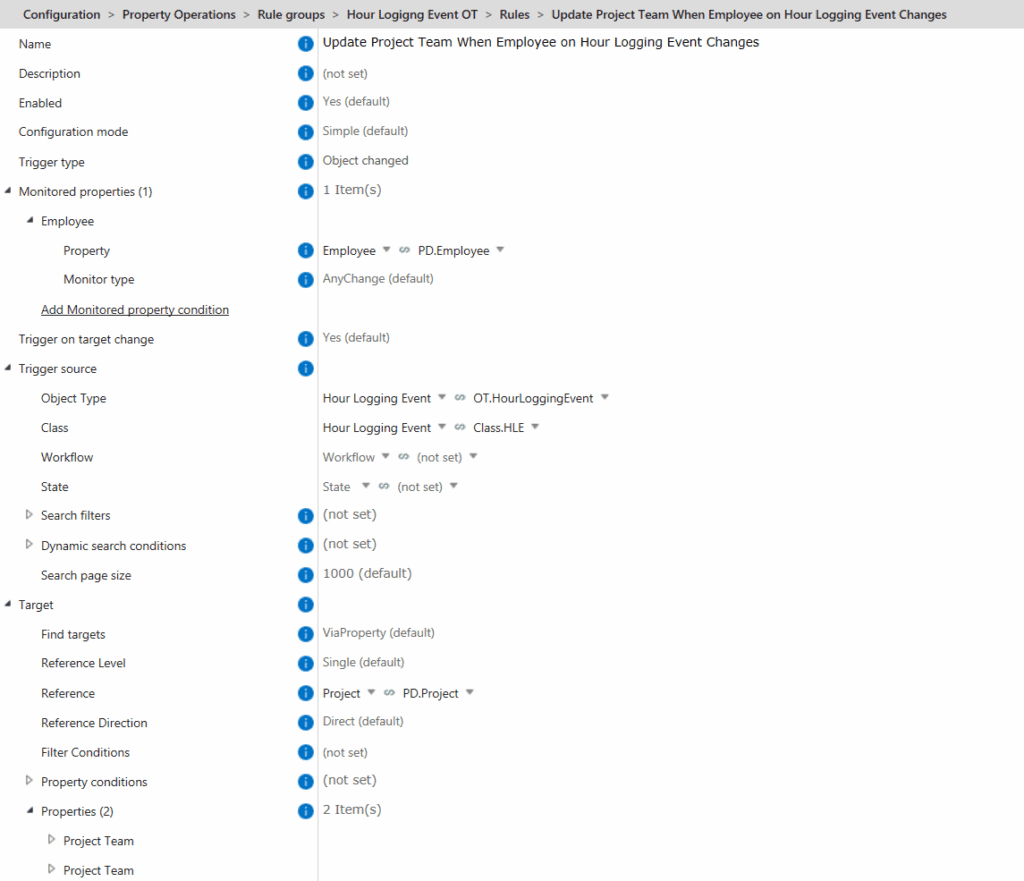
- A change to the Employee property on the Hour Logging Event triggers a Property Operation rule that updates the Project Team property (Picture 1).
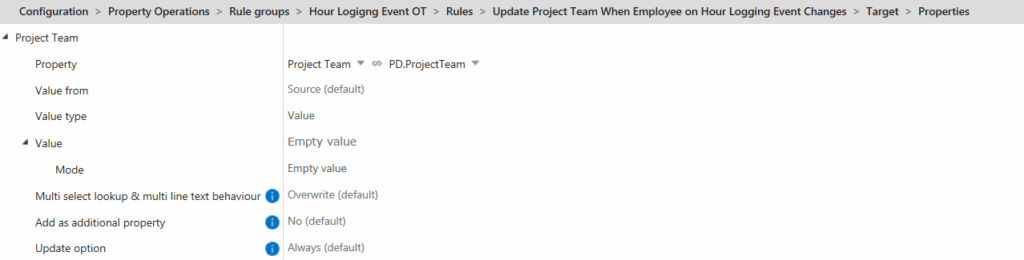
- This rule first clears the Project Team property (Picture 2).
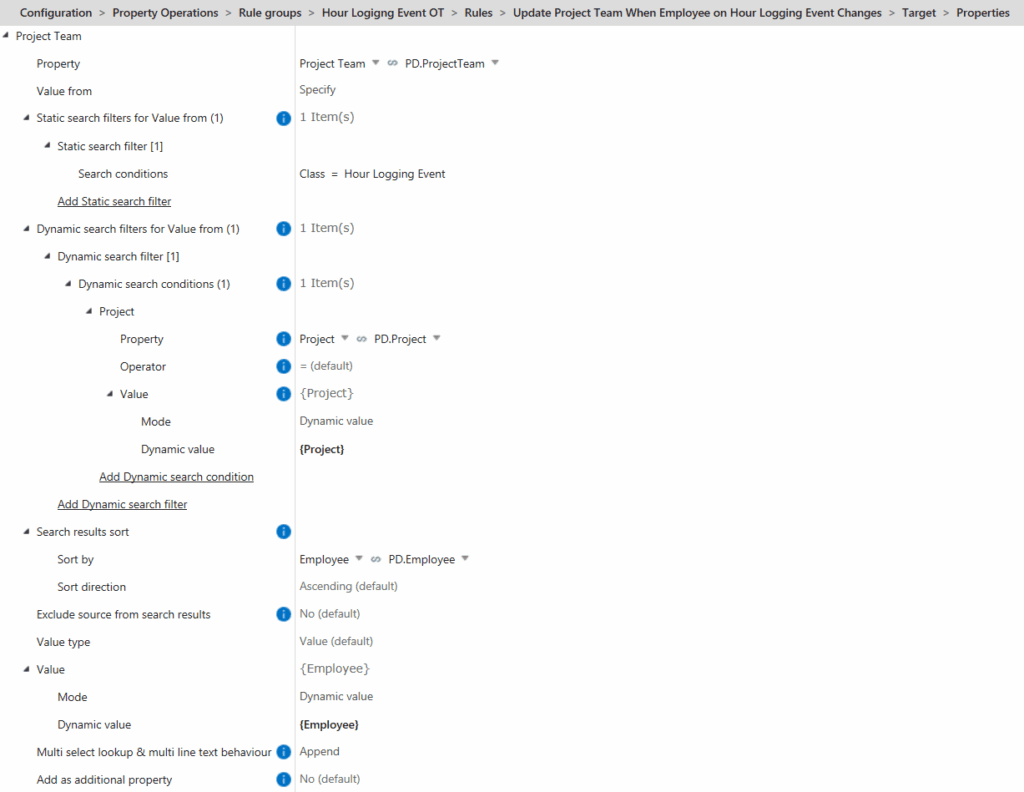
- Then, it searches all Hour Logging Events for that project and re-adds the employees from scratch (Picture 3).
This way, the Project Team is always accurate and up to date, resistant to user errors, and maintained with just a single rule.