Welcome to Expert Tips — a growing collection of practical tips and real-world examples to help you get the most out of Extension Kit Core.
This page focuses on the Content Operations module group, which includes the following modules: Document Processing, Data Transfer, Vault to Vault, and Archiving.
To get a new expert tip delivered to your inbox every week, subscribe to the Tip of the Week newsletter here.
How to add digital signatures to M-Files documents
How to add digital signatures to M-Files documents #
Let’s see how to automatically sign M-Files documents with Extension Kit Core using P12 digital certificates.
Digital certificates
P12 digital certificates are the standard for secure document signing. They’re issued by trusted providers, which vary by country (see the EU trusted list of providers for reference).
Each employee who needs to sign documents must obtain their own certificate from a local provider. The certificate is delivered as a .p12 file, protected with a password. This file can be uploaded to M-Files and assigned to the employee object.
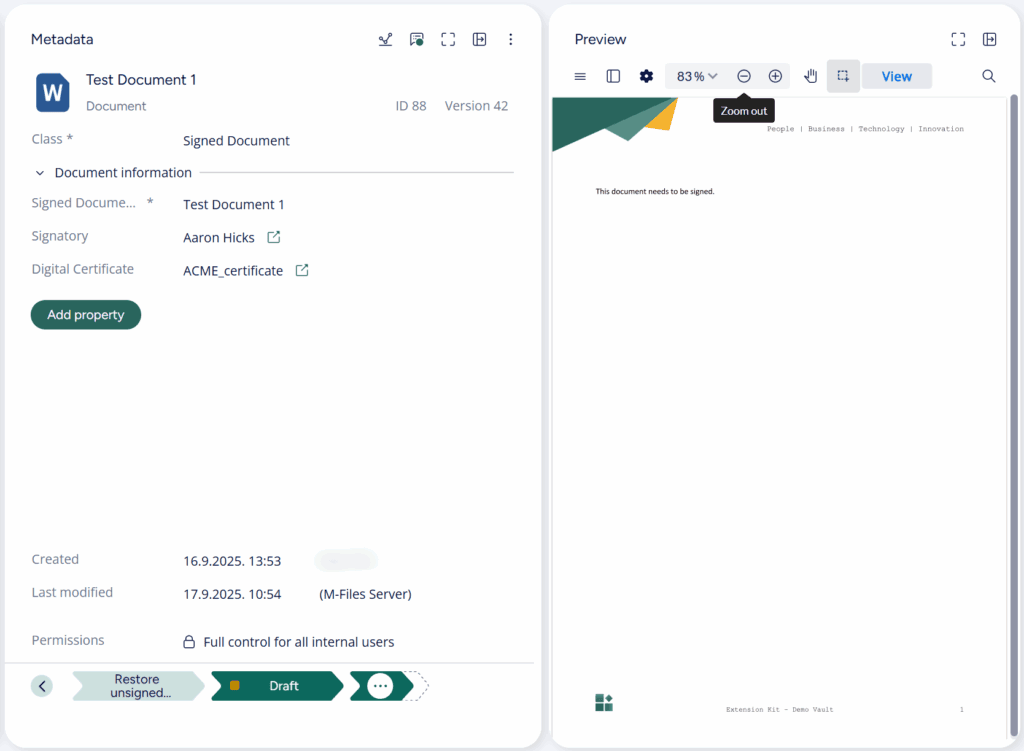
In our demo environment, we’ve stored the certificate in a dedicated class called Signed Document (Picture 1).
Picture 1
Adding the digital signature with Extension Kit Core
Once the certificate is available in M-Files, the signing process is straightforward:
- Reference the certificate – Reference the certificate property on the employee (e.g.,
{Employee.Digital Certificate}) or another object where it’s stored. - Enter the certificate password – Required to access and apply the certificate.
- Define the signature layout – Choose between three types of digital signatures: text, HTML, and image. Each option can be customized to fit your needs. In the example below, we demonstrate how to use HTML to customize the appearance of the signature in the document (Picture 2). You can use placeholders to pull in signer details, timestamps, and certificate data, such as:
@SignatureDateTime@– Date and time of signature@CertificateC@– Certificate country@CertificateCN@– Certificate common name@CertificateO@– Certificate organization
This allows you to design a signature block that matches the business needs.

Picture 2
Result
Here’s how the digitally signed document looks in practice (Picture 3).
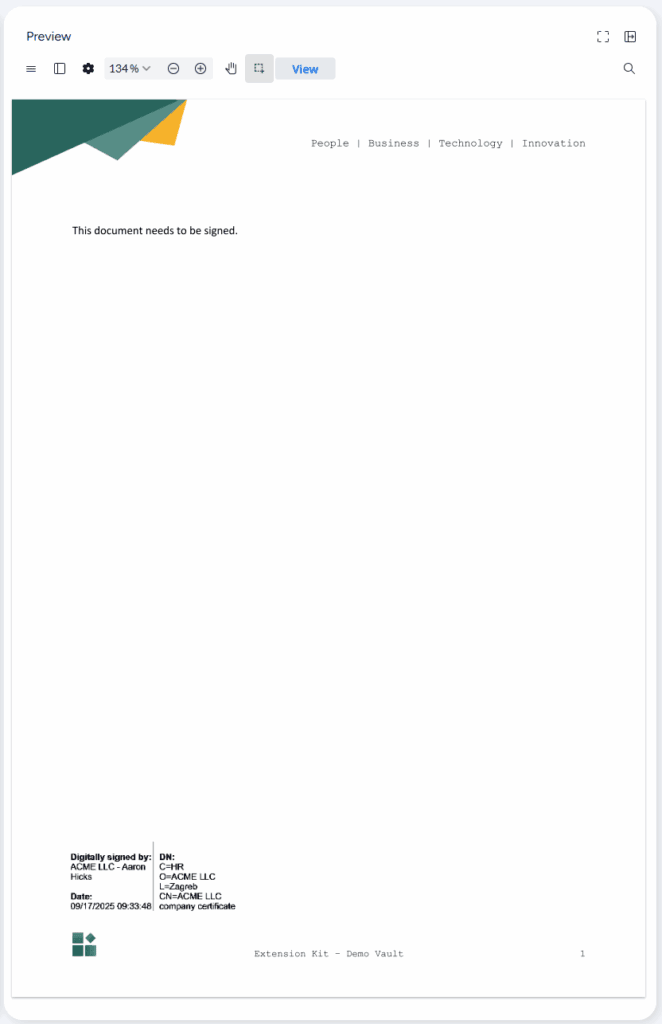
Picture 3
By combining trusted digital certificates with Extension Kit, you ensure that every signed document in M-Files is secure, verifiable, and legally compliant.
Automatically add or read barcodes in M-Files
Automatically add or read barcodes in M-Files #
In Extension Kit Core’s Document Processing module, you can configure various actions to modify documents when they enter a specific workflow state. One powerful functionality is adding and reading barcodes or QR codes within M-Files.
Let’s explore how you can enhance your document processing with barcodes.
Adding barcodes to documents
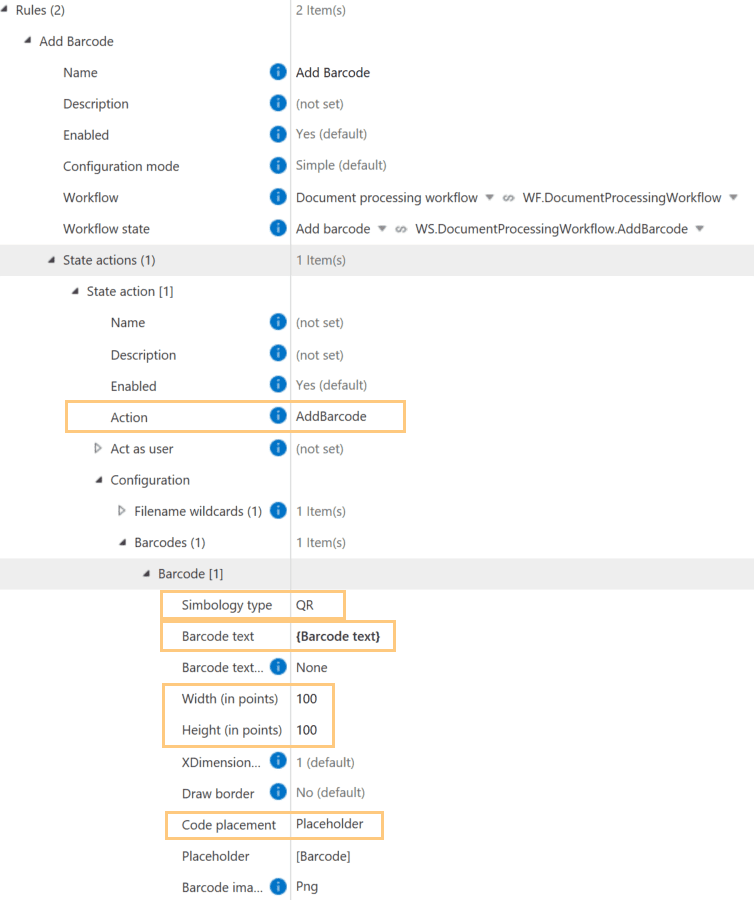
The AddBarcode action inserts barcodes into documents when they reach a designated workflow state (e.g., Add Barcode). Configuration is simple (Picture 1):
- Symbology type: Choose the barcode type (e.g., QR code).
- Barcode text: Define static or dynamic text to embed (e.g., {Barcode text}).
- Code placement: Specify a fixed location or use a placeholder to define barcode placement.
- Set the barcode’s Width and Height.
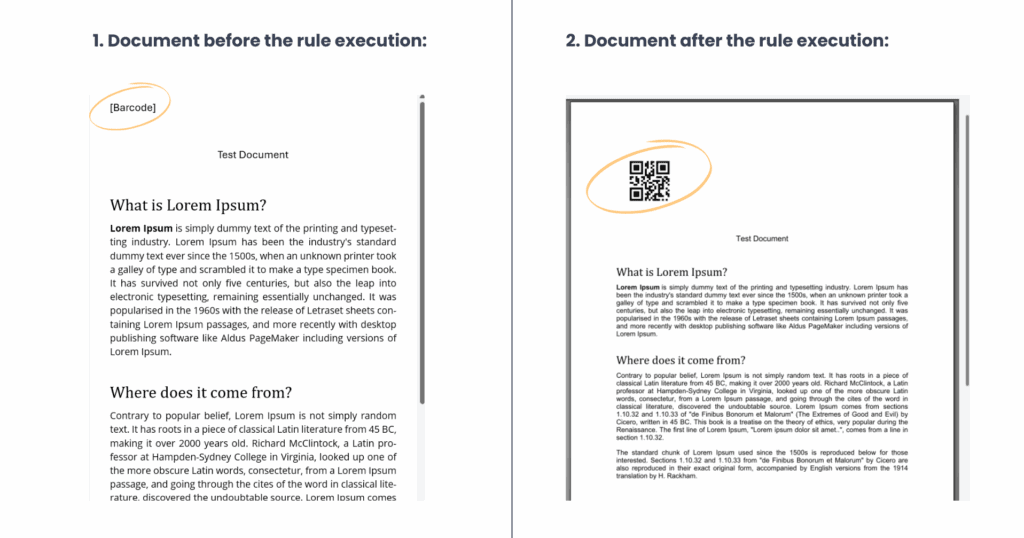
Once set up, the barcode is automatically added to the document after the rule execution (Picture 2).
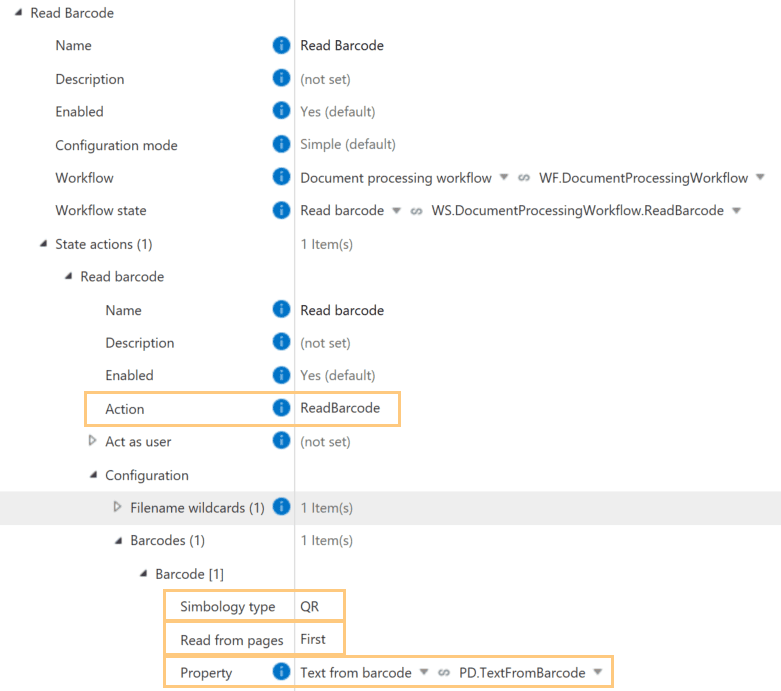
Reading barcode data from documents
The ReadBarcode action extracts barcode or QR code text and saves it to an M-Files property. Configuration steps include (Picture 3):
- Symbology type: Specify the barcode type (e.g., QR code).
- Read from pages: Define which pages to scan.
- Property: Choose the property where the extracted text should be saved.
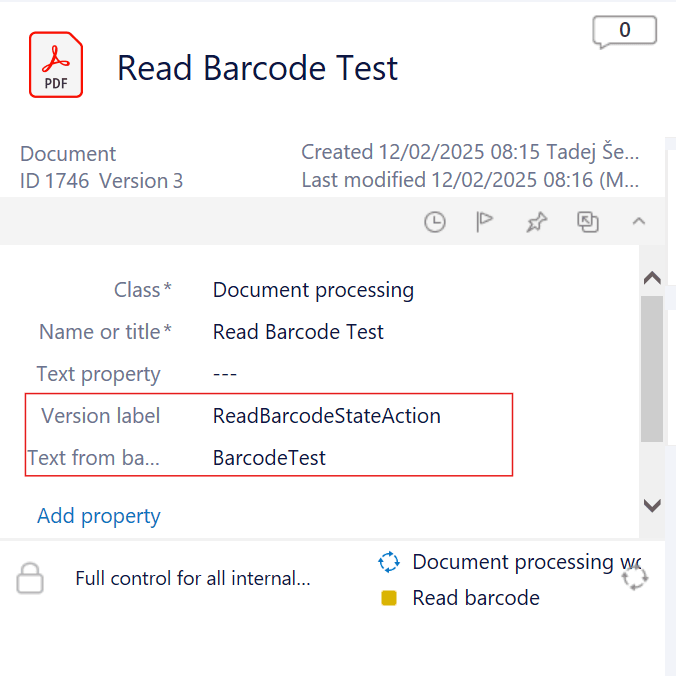
Once configured, barcode data is automatically extracted and stored in the specified property when the document enters the workflow state (e.g., Read Barcode). (Picture 4)
With these capabilities, you can automate barcode handling in M-Files to reduce manual data entry, improve accuracy, and enhance document workflows.
How to automatically compress files in M-Files
How to automatically compress files in M-Files #
One of Extension Kit Core’s latest modules, the Archiving module, lets you compress files into ZIP, 7Z, or TAR archives, or decompress them from ZIP, 7Z, TAR, or RAR formats. Rules can be trigger-based, scheduled, or run-once.
This tip shows how to automatically archive documents on a schedule, and what to watch out for in your configuration.
Compress documents using a scheduled rule
In our example, we created a scheduled rule that runs daily at 23:00, collects all Travel Orders in the state ‘Completed Travel Orders’, and compresses them into a single ZIP archive. The resulting archive is stored in M-Files, serving as a historical record of the completed Travel Orders.
Important: Trigger sources in scheduled rules
For scheduled or run-once rules, a trigger source must still be defined. This does not define which documents will be archived — it simply provides the object on which the rule will execute, without affecting that object in any way.
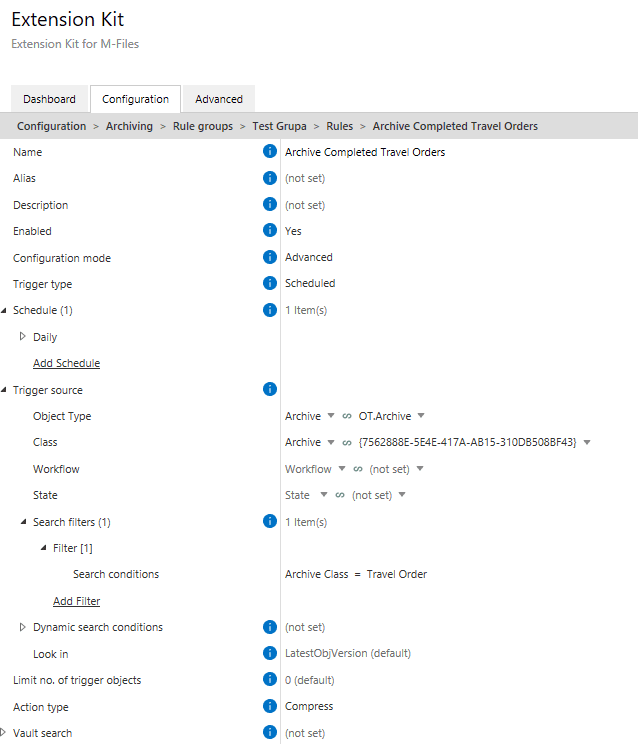
For this purpose, we created a new object type called Archive, with a class Archive that will serve as a trigger source and a container for ZIP files (Picture 1).
Setting up the rule
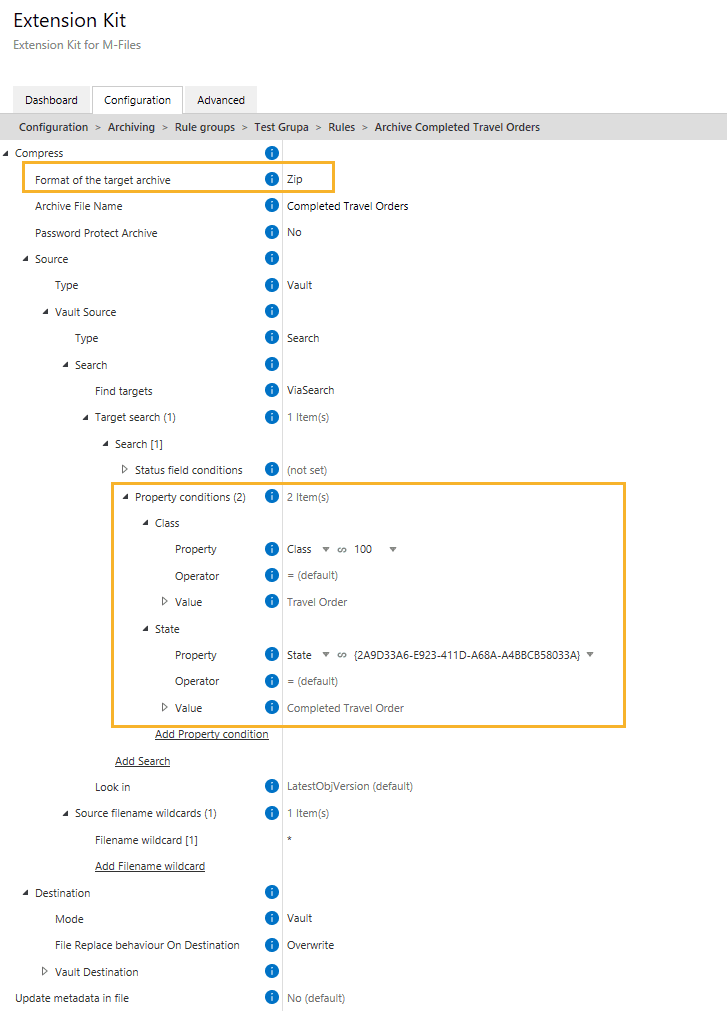
Using the Compress action in the Archive module, configure what will be archived. Define a search filter to find all objects of class Travel Orders with the state Completed Travel Order (Picture 2).
Result
The resulting ZIP archive containing all matching Travel Orders is stored in M-Files (Picture 3).
Alternative setup: No Archive class needed?
In our example, we used the Archive object both to store the ZIP file and to act as the trigger source for the rule.
However, if you don’t need a dedicated object to store the archive, you can use any object as the trigger source for scheduled or run-once rules. The object’s content doesn’t matter — the rule simply needs something to execute on.
Just make sure to set Limit number of trigger objects to 1 (Picture 4). Otherwise, the rule could execute on multiple objects, resulting in multiple ZIP files instead of a single archive.

The Archive module is a powerful tool for packaging files in M-Files, but scheduled rules require careful setup. Use a dedicated object as a safe trigger, or limit your triggers to avoid unwanted ZIPs.
Assigning new workflows to objects transferred between vaults
Assigning new workflows to objects transferred between vaults #
This tip addresses a recent question from our Extension Kit Community: How can you ensure that objects transferred from a source vault enter a new workflow in the target vault? Here’s how to set this up using Extension Kit Core’s Vault to Vault module.
Use case
Imagine you have an Archive vault for completed projects. When an object in the source vault reaches a specific workflow state (e.g., “Completed”), it needs to be transferred to the Archive vault. Once transferred, the object should start a new workflow in the Archive vault, rather than retaining its workflow state from the source vault.
Solution
To achieve this, follow these steps in the Vault to Vault module:
- Under Create settings, add property mapping to specify the workflow:
- Source Type: Set to
Expression. - Source: Enter the name of the workflow in the target vault (e.g.,
[Archive Workflow]). - Target ID: Specify the workflow ID:
38. - Target Property Type: Set to
SimpleValue.
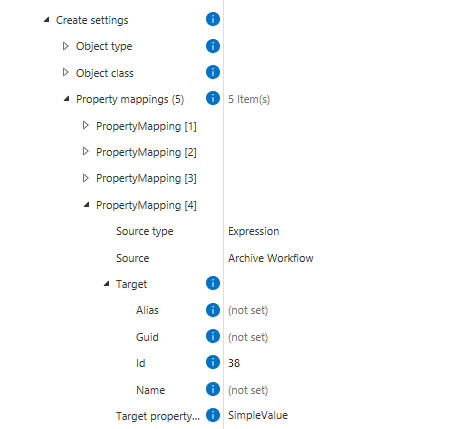
2. Next, add another mapping to specify the workflow state:
- Source Type: Set to
Expression. - Source: Enter the name of the workflow state in the target vault (e.g.,
[Archived]). - Target ID: Specify the workflow state ID:
39. - Target Property Type: Set to
SimpleValue.
This configuration ensures the object transferred to the Archive vault is placed in the correct workflow and state, independent of its workflow status in the source vault.
How filename wildcards work in restore actions
How filename wildcards work in restore actions #
In Extension Kit Core, filename wildcards are commonly used to locate the file on which the rule should act. For example, when working with Document Processing actions like ConvertToPDF, you would use *.docx to find and convert Word documents into PDFs.
However, when using restoring state actions like UndoPDFConversion, UndoMergeDocuments, or RestoreOriginal, the logic is reversed. Here, the filename wildcard doesn’t select the current file — instead, it tells the rule which previous version from the object’s history you want to restore.
How it works
Let’s say you want to undo the PDF conversion and return the document to its original .docx format.
If you specify *.pdf **in the filename wildcard, the rule execution will fail to locate a matching version – because the wildcard is used to identify the previous version to restore from history, not the currently active one. Since that version is not a PDF, the rule won’t apply.
To correctly revert the file, use *.docx as the wildcard (Picture 1). This instructs the rule to search the object’s version history and restore the most recent matching DOCX file.

When restoring or reverting a file, always ensure the wildcard matches the format you’re reverting to, and not the active version.
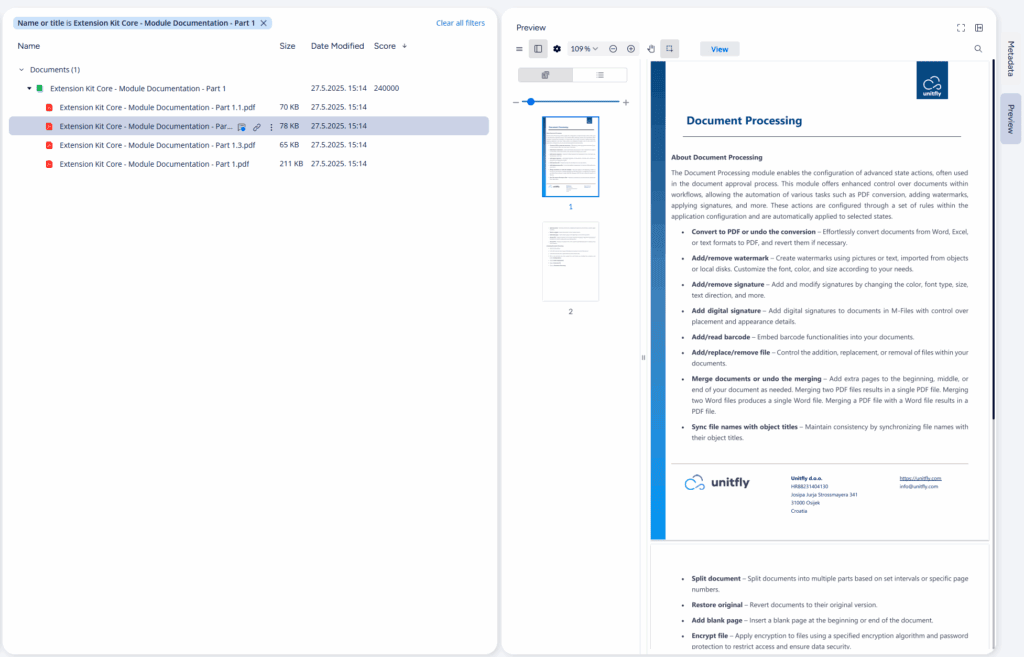
How to split PDFs into separate files in M-Files
How to split PDFs into separate files in M-Files #
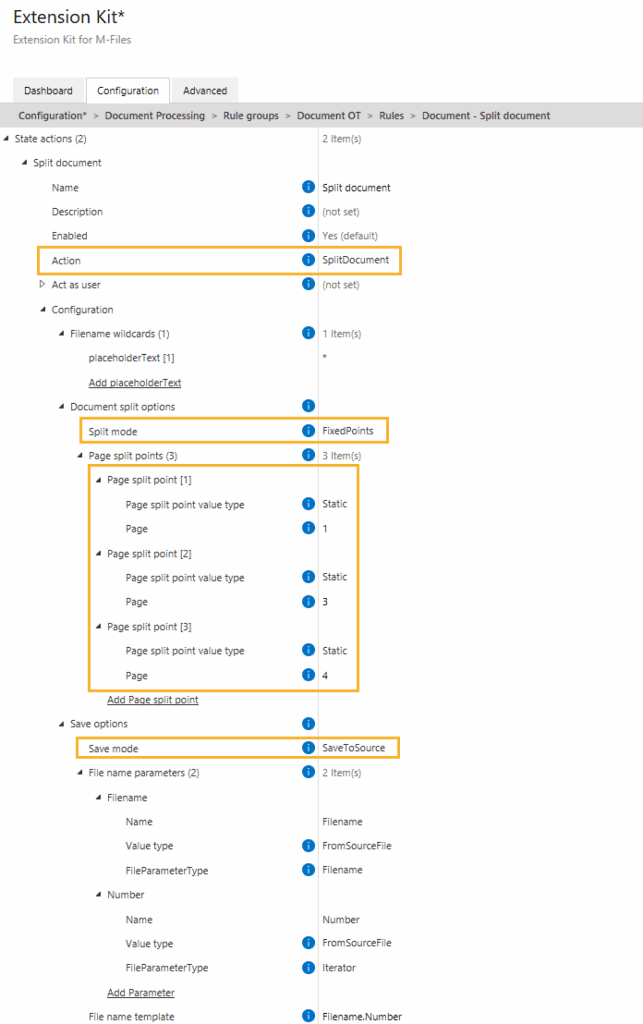
Need to split a multi-page PDF into separate files based on content structure? With the SplitDocument action in the Document Processing module, you can easily break down a document into new objects, either at fixed intervals or specific page breaks.
Split documents
The SplitDocument state action lets you control how a document is divided:
- Interval: Split the document every N pages. For example, setting this to 2 will create a new file for every two pages.
- FixedPoints: Define exact page numbers to split on. Perfect when each section starts on a known page.
You can choose whether the resulting files are saved as new objects or added to the source object.
Example use case
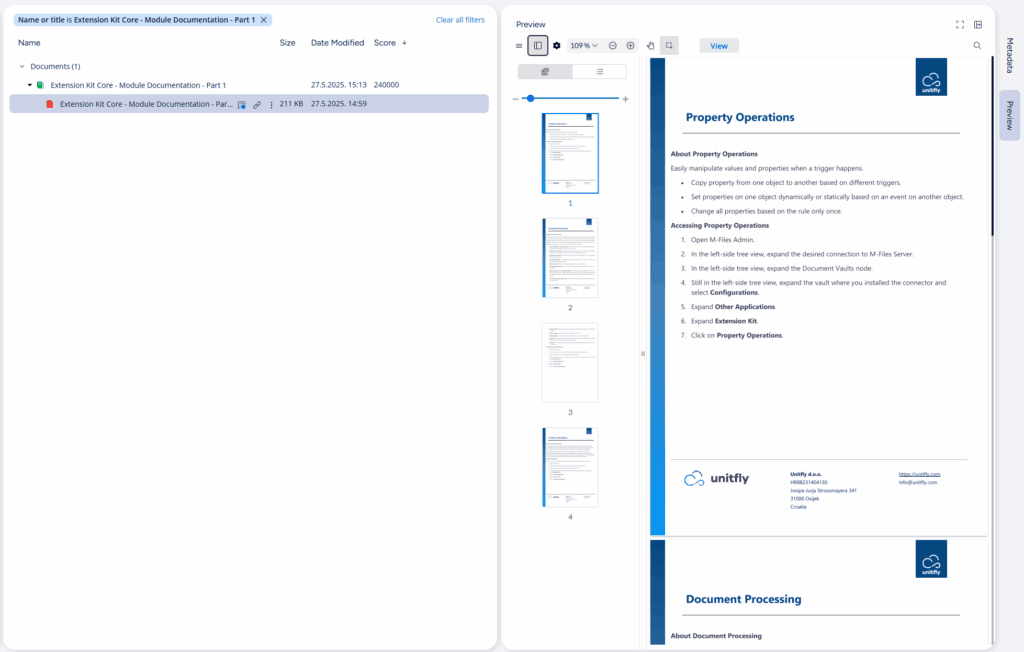
We have a single PDF containing part of the documentation for three Extension Kit Core modules (Picture 1):
- Property Operations (1 page)
- Document Processing (2 pages)
- Property Calculations (1 page)
To split this into three separate documents — one for each module — we configured SplitDocument using the FixedPoints split mode and specified the pages where the splits should occur (Picture 2).
Result
Each module becomes its own file, saved as part of the source multi-file document in M-Files (Picture 3):
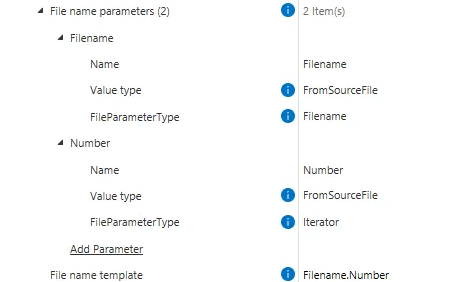
Additional: Naming options
Customize how the resulting documents are named using a File name template and File name parameters.
File name parameters provide the actual values used in the template. Each parameter supports a Value type to control how its value is resolved (Expression, Property, or FromSourceFile).
File name template defines the naming structure.
- If File name parameters are defined, they can be referenced directly in the template. Example: with parameters
FilenameandNumber, and the templateFilename.Number(Picture 4), the resulting files will be named like this:- Extension Kit Core – Module Documentation – Part 1.1
- Extension Kit Core – Module Documentation – Part 1.2
- Extension Kit Core – Module Documentation – Part 1.3
- If no parameters are set, the default name becomes
FileNameTemplate-Iterator(Picture 5):- Split document-1
- Split document-2
- Split document-3
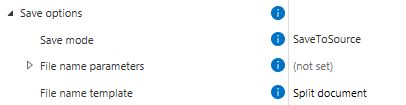
FileNameTemplate-Iterator.
Sharing documents across vaults
Sharing documents across vaults #
Sometimes, documents need to be shared between vaults. For example, a file from the Project Management vault may need to be available in the Marketing vault, or a Shared Vault that both departments can access.
With Extension Kit Core’s Vault to Vault module, you can automate these transfers.
Scenario
A company has separate vaults for Project Management, Marketing, Procurement, and Accounting, plus a Shared Vault for cross-department collaboration.
If Marketing and Project Management have a joint meeting, they might want to store their meeting notes in the Shared Vault.
Configuration
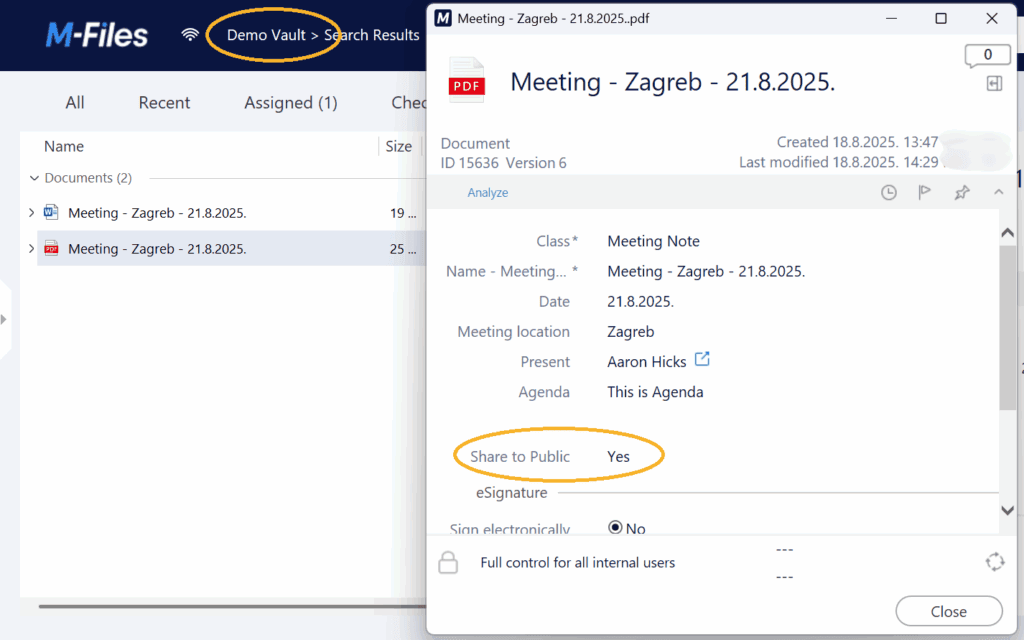
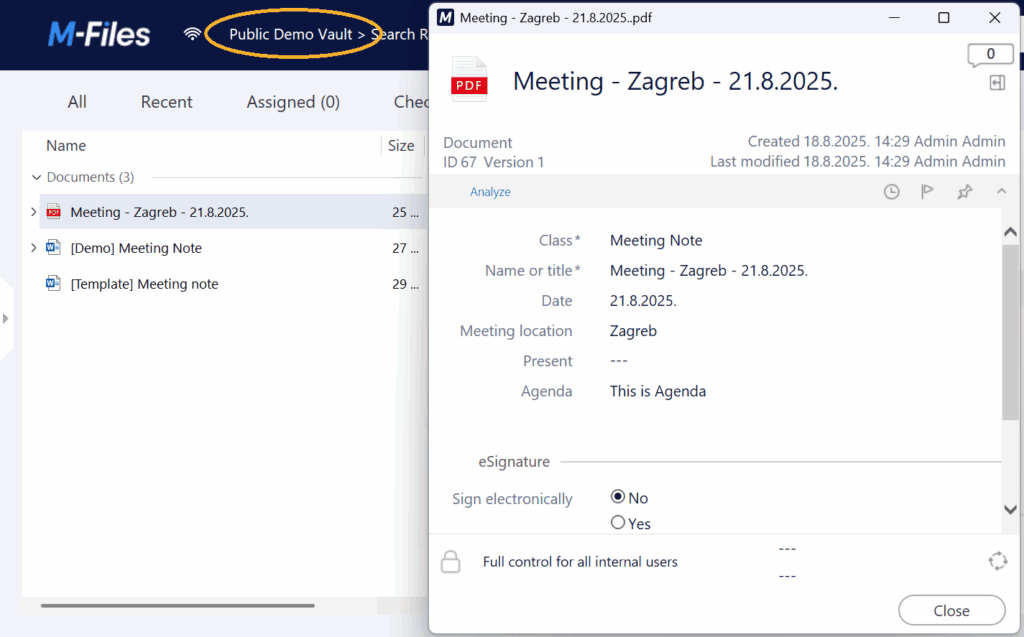
In our Demo Vault, we configured the following rule: when the document’s Share to Public property is set to Yes, it is automatically copied to the Public Demo Vault. (Picture 1)
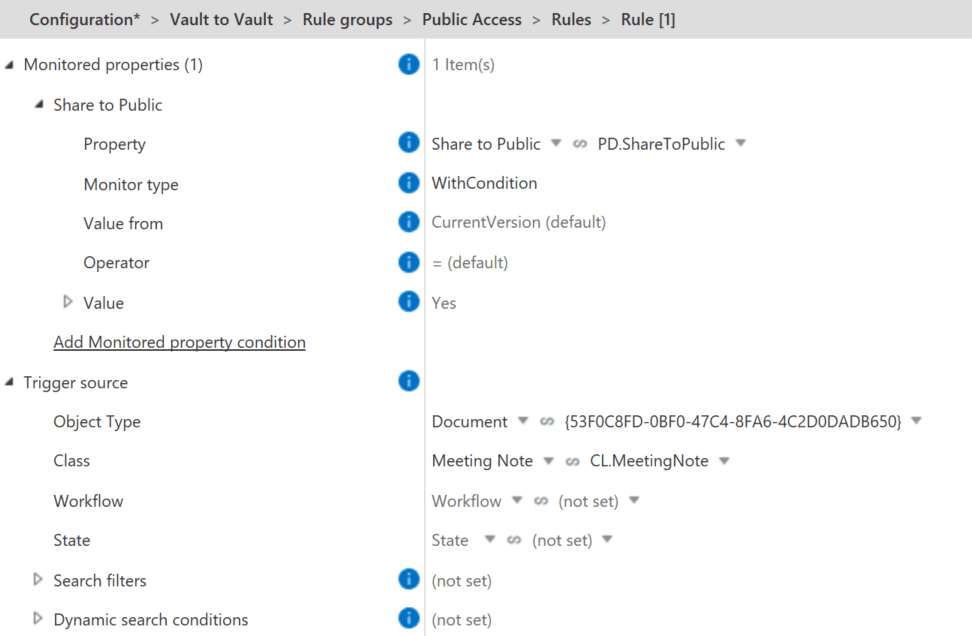
Here are the next steps for setting up the transfer successfully:
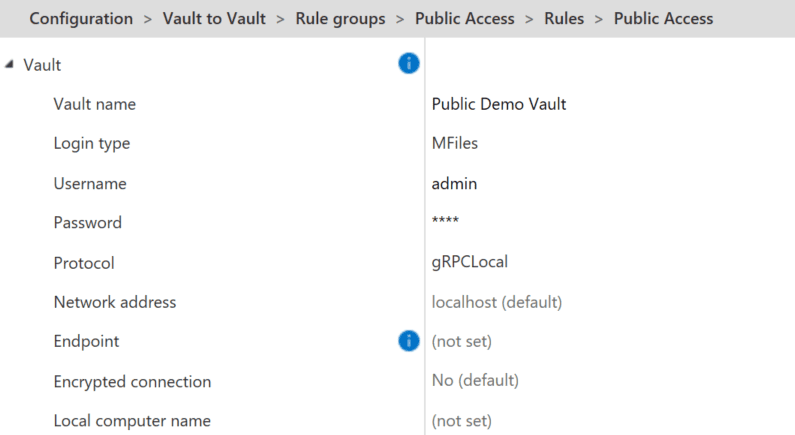
- Define which vault is involved and which user sends the data. Usually, an admin user is used, as they have access to multiple vaults. (Picture 2)
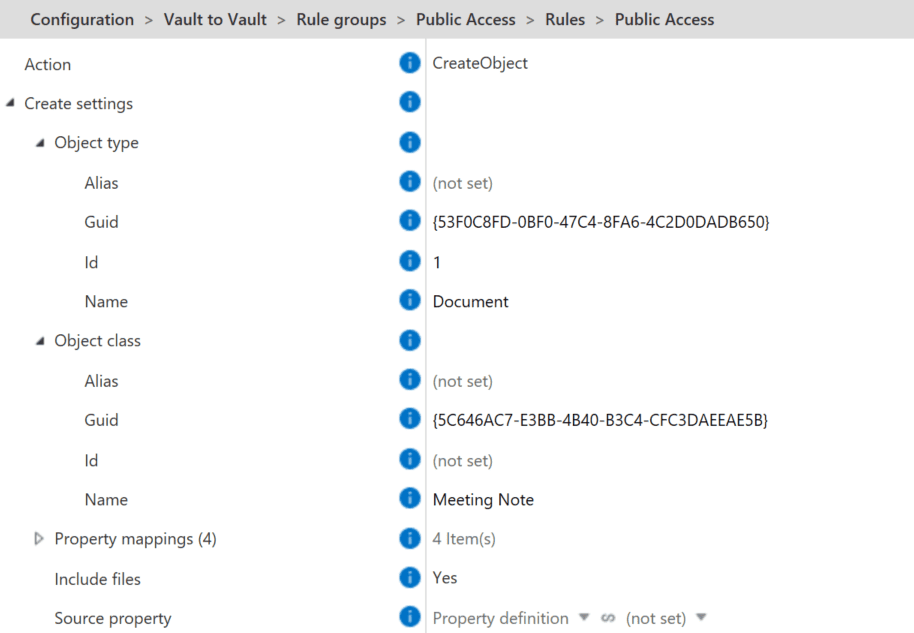
- Choose the action (Create, Update, Read, Delete) and define the object and its class that you want to transfer. This ensures an identical copy is created in the target vault. (Picture 3)
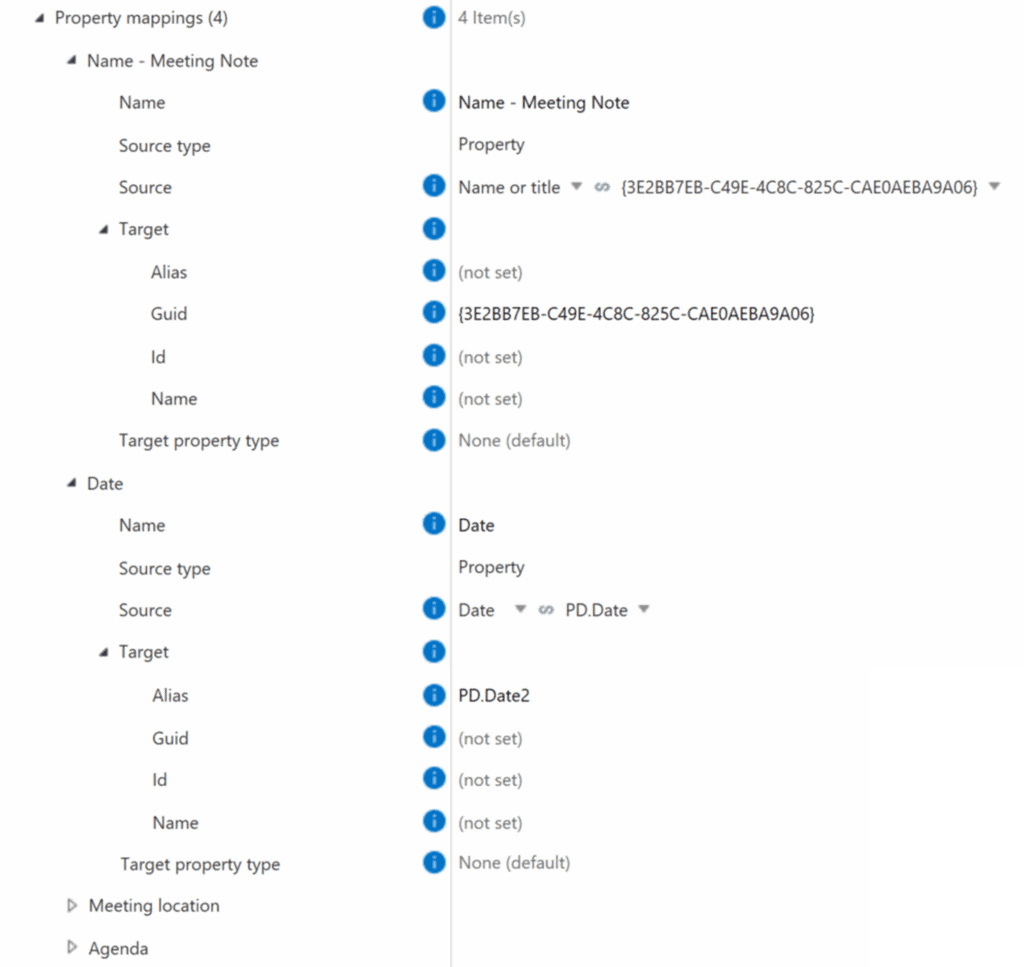
- You can update properties of the newly created document in the Public Demo Vault to match them to the original file’s properties using ID, GUID, name or alias — we recommend using alias wherever possible. (Picture 4)
Result
The document is created in the Demo Vault (Picture 5). Once Share to Public is set to Yes, the same document is automatically created in the Public Demo Vault (Picture 6).
This setup allows multiple departments to share key documents efficiently while maintaining control over departmental vaults.
Flexible watermarks in Document Processing
Flexible watermarks in Document Processing #
The Document Processing module allows you to add watermarks to documents, with flexibility over their appearance and configuration.
Let’s take a look at the options.
Adding watermarks
You have two basic options when adding watermarks:
1. Choose if the document should be converted to PDF or stay in Word format after applying the watermark (Picture 1).
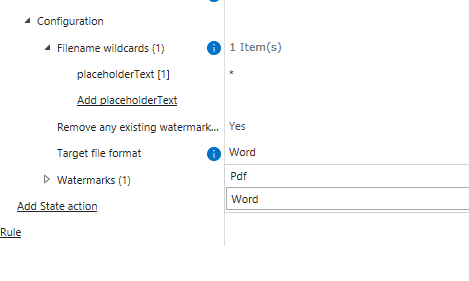
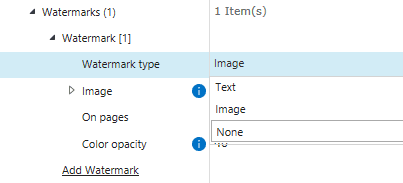
2. Choose whether to apply a text watermark or an image watermark. For image watermarks, the image can be sourced from a local disk path, a source object, or a vault search. Additionally, you can apply the watermark to all pages or only specific pages, and configure the opacity of the watermark (Picture 2).
Example
Below is an example of a rule configuration where an image watermark is pulled from a search (Picture 3).

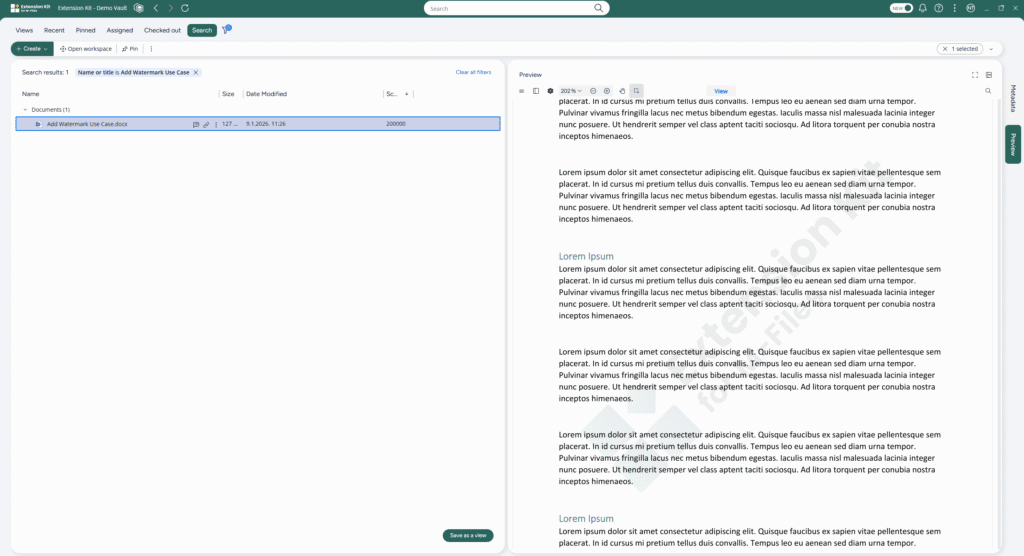
And here is the result after the rule is executed: the document remains in Word format and is not converted to PDF, making this feature ideal for scenarios where documents must stay editable while still being visually marked (Picture 4).
Importing and exporting data in M-Files
Importing and exporting data in M-Files #
Extension Kit Core enables users to import and export data from shared folders and SFTP servers in a simple, flexible, and easy-to-manage way.
Data Transfer options
In the Data Transfer module, you can choose the Data Transfer Mode:
- Import data from the file system into M-Files, or
- Export data from M-Files to the file system.
Each mode offers additional configuration options for the data transfer process.
The first step in the configuration is selecting the Transport Type, which defines where the data is transferred from or to:
- FileShare: Use for transferring data to and from a local disk or local/network shared folders.
- SFTP: Use for transferring data to and from SFTP servers.
Example: Import from a folder
Here’s an example configuration for an Import from a folder on disk (Picture 1).
You can define the Import Type, which controls what data will be imported:
- Files only
- Metadata only
- Both files and metadata
During the import, properties can be set in two ways:
- File attribute properties: Set dynamically, directly from the file, with options such as HostName, FilePath, FilePathRegex, Filename, FilenameRegex, and ImportPrefix (Picture 2).
- Static object properties: Define fixed property values that will be applied to all imported objects.
Reporting
Once the import or export is completed, you can configure whether to generate a report with action details. The report can be saved in CSV format to disk or sent via email.
Here’s an example configuration for an email report that is sent directly to a selected recipient’s mailbox (Picture 3). The report contains detailed information about which documents were imported from the folder.
With flexible transfer modes, multiple transport options, and built-in reporting, the Data Transfer module makes importing and exporting data into M-Files both reliable and transparent.