Welcome to Expert Tips — a growing collection of practical tips and real-world examples to help you get the most out of Extension Kit Core.
This page focuses on the Integrations module group, which includes the following modules: HTTP Integration, SQL Integration, Excel Reader, Excel Writer, Word Reader, and Word Writer.
To get a new expert tip delivered to your inbox every week, subscribe to the Tip of the Week newsletter here.
Excel Reader: Rollback action when error occurs
Excel Reader: Rollback action when error occurs #
When importing data from Excel to M-Files using the Excel Reader module, data errors can interrupt the process and result in incomplete imports. To prevent this and maintain data integrity, you can configure M-Files to roll back the entire action if an error occurs.
Here’s how to do it. Within the rule in Extension Kit’s Excel Reader module:
- Set Execution Mode to Background Transaction.
- Set Error Handling Behavior to Stop.

This setup ensures that if any errors are encountered during the import, no updates or creations will take place. For instance, if you are importing 10 rows from Excel and one row contains an error (like missing or incorrect data), the entire action will roll back, preventing the creation of any of the 10 rows.
Without this configuration, encountering an error at row 6 would result in only the first five rows being created, leaving the import process incomplete.
By following these steps, you can ensure a smooth and error-free data import from Excel to M-Files.
Dynamically inserting property values into URLs with HTTP Integration
Dynamically inserting property values into URLs with HTTP Integration #
In the HTTP settings of Extension Kit Core’s HTTP Integration module, URLs are typically set in a static text editor. However, did you know that you can enrich URLs dynamically with property expressions that will be resolved during rule execution?
How does it work?
When configuring an HTTP request, you can use property expressions to format the URL so that property values from M-Files are automatically inserted before making the request.
Example
Let’s say you are using the HTTP Integration module to update Contacts from an external CRM system. When making a request, you need to set the URL under the HTTP settings.
The CRM system is using a URL structure like this:
www.crmsystem.com/contact/<ID OF CONTACT>.The rule must periodically update the contact information in the CRM system, creating a request to the URL with the dynamically inserted Contact ID value.
In M-Files, each contact has a unique ID stored in the Contact ID property with an ID 2392 and an Alias PD.ContactId . To make a request with the contact’s ID, you can set the URL dynamically in one of the following ways:
www.crmsystem.com/contact/**%PROPERTY_2392%**OR
www.crmsystem.com/contact/**%PROPERTY_{PD.ContactId}%**
Format URLs with property expressions to dynamically insert property values.
In both cases, the contact’s unique ID will be pulled from M-Files and inserted into the URL.
Dynamically set properties using SQL Integration
Dynamically set properties using SQL Integration #
Did you know that the SQL Integration module in Extension Kit Core allows you to set properties based on SQL responses not only on the source object but also on related objects, and even assign additional properties unrelated to SQL responses, all within the same rule? This flexibility enables you to automate data updates in M-Files based on external database values, ensuring consistency and reducing manual effort.
Example use case
Imagine managing a Project object in M-Files that needs regular updates from an external database. You might need to:
- Retrieve and set project details like status, start and end dates, or budget.
- Dynamically update related objects with data from an external database (e.g., marking a linked Activity as “Active”).
- Set additional properties (unrelated to SQL query results) on the same object, such as automatically updating the Workflow state based on predefined conditions.
With SQL Integration, all of this can be handled within a single rule.
How to configure
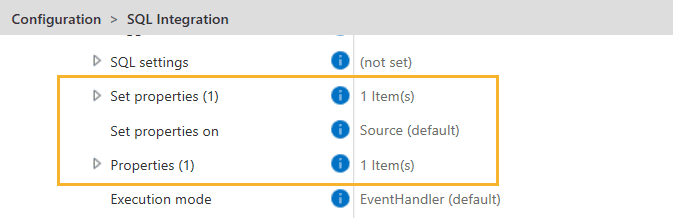
1. Set properties on the source object based on SQL response
- Configure Set properties on to Source (default).
- Use Set properties to define which properties should be updated with SQL query results.
2. Dynamically update related objects based on SQL response
- Configure Set properties on to Specify.
- Define Static or Dynamic search filters to locate related objects (e.g., Status = Active).
- Optionally, enable Exclude source from search results to avoid duplication.
- Use Set properties to define which properties should be updated with SQL query results.
3. Assign additional properties to the same object (unrelated to SQL response)
- Ensure that Set properties on targets the correct object.
- Use Properties → Property setter to define additional properties (e.g., Workflow state).
- Configure Value from to determine how the value is assigned (from the source object, a vault search, or specified search results for multiple objects).
With this configuration, you can automate data enrichment across multiple objects, ensuring your M-Files data stays accurate.
Creating tables with Word Writer
Creating tables with Word Writer #
In this tip, we’ll guide you through creating tables in Word documents that automatically display data from a specified source. With the Word Writer module in Extension Kit Core, there are two ways to create tables, depending on whether your data source is M-Files or an Excel range.
1. Using data from M-Files
First, let’s cover how to create tables using M-Files data as the source.
Example scenario
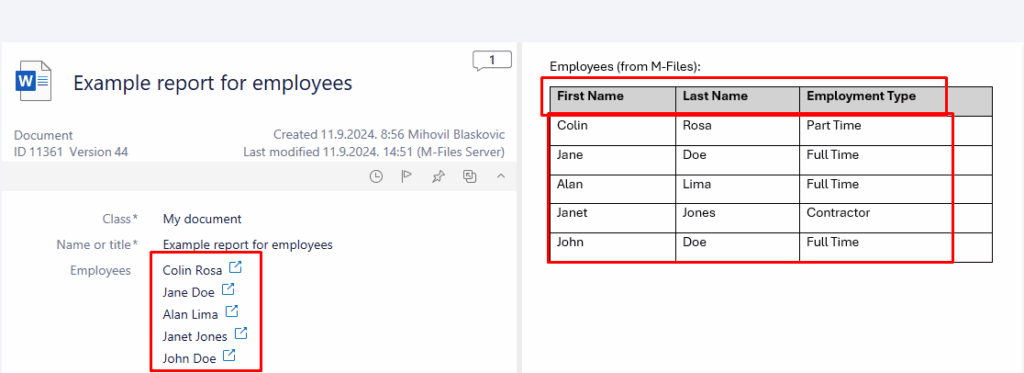
Imagine you need to generate Word reports that automatically pull data stored in M-Files upon a trigger. You need a table that is dynamically populated with employees’ first names, last names, and employment types, all extracted from an M-Files object.
How to create tables using M-Files as the data source
To create a table in a Word document that will be automatically populated with M-Files property values upon a trigger, follow these steps:
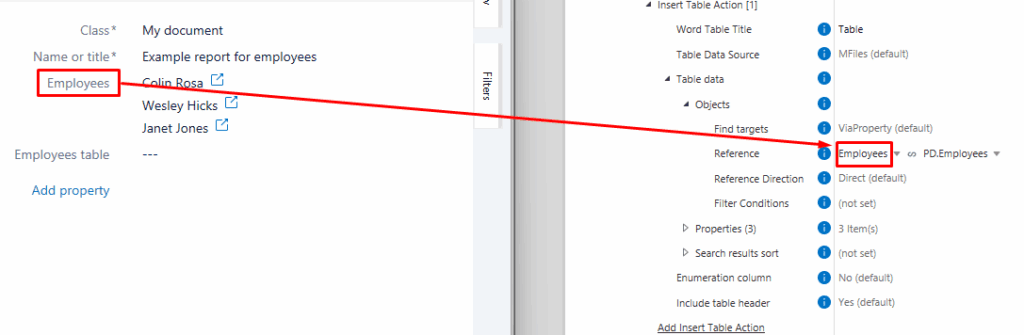
- In the Word Writer module, select the class to use as your data source. In this example, we’re using the My document class, which has a property Employees.
- In the Filename wildcards field, specify the name of the document where you want to insert the table.
- In the Action field under the File actions section, select the InsertTable action.
- Configure the table in Word:
- Insert a placeholder table so the system knows where to populate the data. A simple 1×1 table will suffice, as it will be dynamically filled with rows and columns based on your configuration. Note that custom table formatting is not supported, so the default style will be applied.
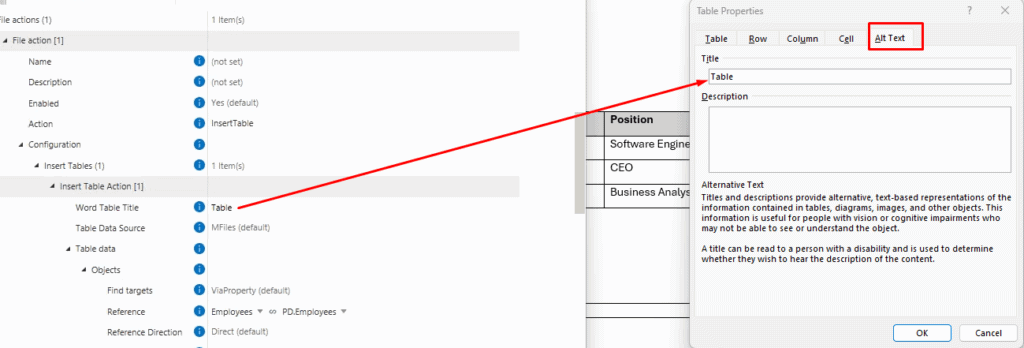
- Set the table title: right-click on the table in Word, select Table properties, then go to Alt Text and enter a title (e.g. “Table”). This step is essential as the system uses the title as a reference point.
- Configure the Insert Table Action in the Word Writer module:
- Enter the same table title in the Word Table Title field. Ensure the title matches exactly, or the rule will not execute.
- Select M-Files as the Table Data Source, and define which objects (e.g. Employees) and properties (e.g. First Name, Last Name, etc.) to include in the table. These properties will become the headers of your table.
Note: Modifying the document content won’t trigger the Word Writer action. The rule is triggered by a change in metadata, such as an update to properties, state, or comments.
2. Using Excel data
Here’s how to create tables using data from an Excel range.
Example scenario
Imagine you need to generate Word reports automatically pulling data stored in an Excel table upon a trigger. You need a Word table that is dynamically populated with employees’ first names, last names, and employment types, all extracted from an Excel range.
How to create tables using Excel as the data source
To create a table in a Word document that will be automatically populated with values from a specified Excel range upon a trigger, follow these steps:
- In the Word Writer module, select the class to use as your trigger source. In this example, we’re using the My document class.
- In the Filename wildcards field, specify the name of the document where you want to insert the table. Make sure to specify the correct file name, or if you want to insert a table into multiple files inside an object, use a * wildcard.
- In the Action field under the File actions section, select the InsertTable action.
- Configure the table in Word:
- Insert a placeholder table so the system knows where to populate the data. A simple 1×1 table will suffice, as it will be dynamically filled with rows and columns based on your configuration. Note that custom table formatting is not supported, so the default style will be applied.
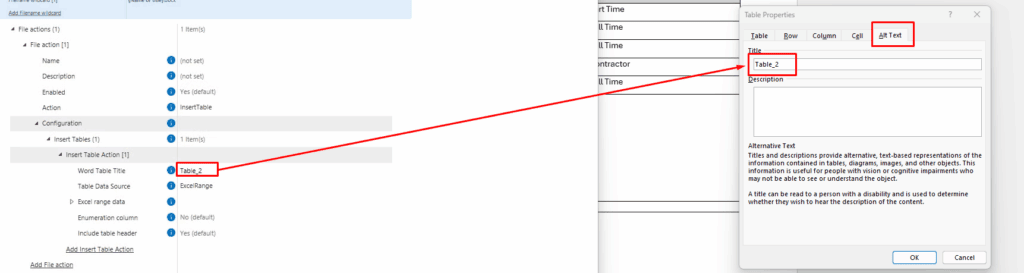
- Set the table title: right-click on the table in Word, select Table properties, then go to Alt Text and enter a title (e.g. “Table2”). This step is essential as the system uses the title as a reference point.
- Configure the Insert Table Action in the Word Writer module:
- Enter the same table title in the Word Table Title field. Ensure the title matches exactly, or the rule will not execute. If there are multiple tables in the document, the titles must be unique. If they are not, the first table will be used for all changes, and the others will be skipped.
- Select ExcelRange as the Table Data Source.
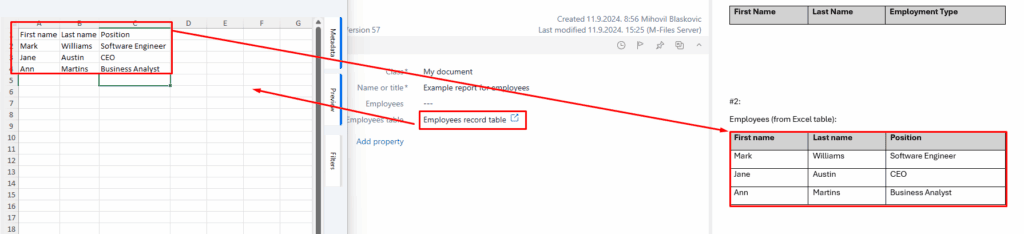
- Under the Excel sheet name section, define the Resource type and a Property. The Excel table can be either an object in M-Files or stored locally on the computer (e.g. C:/path/to/table.xlsx). In our example, the Excel table is located in M-Files and directly referenced from the source object.
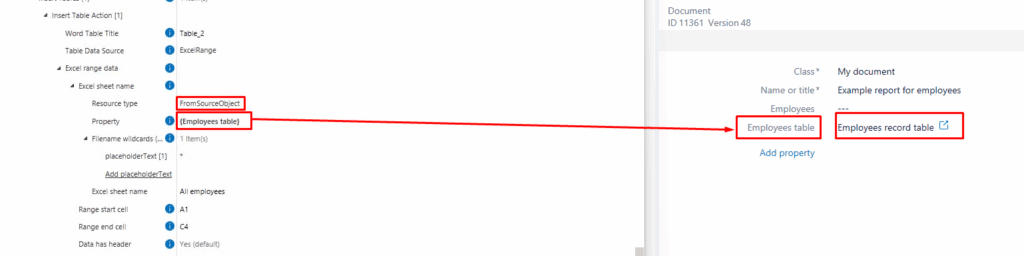
- Specify the range under the Excel range data section. Here, the range starts at A1 and ends at C4. The system will pull exactly what is defined, including empty cells if they fall within the range.
- Ensure the Excel sheet name is accurate (e.g. All employees).
This is the final result. The Excel data is pulled into the Word table.
Mapping Excel data to M-Files
Mapping Excel data to M-Files #
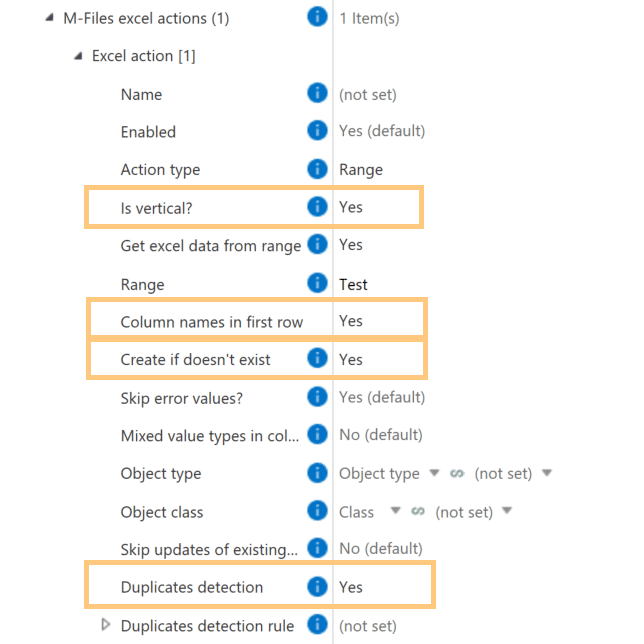
The Excel Reader module in Extension Kit Core allows you to easily map data from an Excel sheet to M-Files properties. You can configure the rule to either read a specific cell or an entire range of data, offering flexibility based on your needs.
Choosing Action type: Property or Range
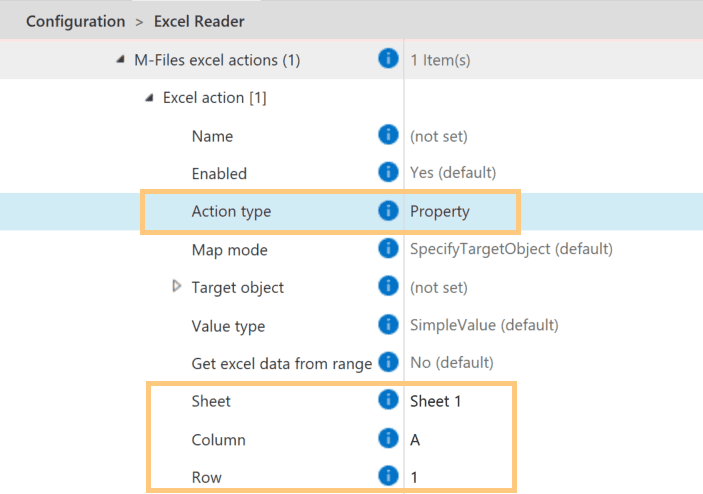
In the M-Files Excel actions section, you can choose the Action type:
- Property: Reads a specific cell from the Excel sheet and maps it to a defined property in M-Files. The exact cell is determined by specifying the column (letter) and row (number).
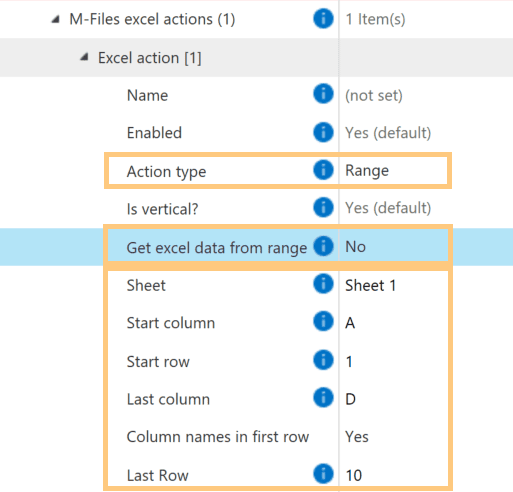
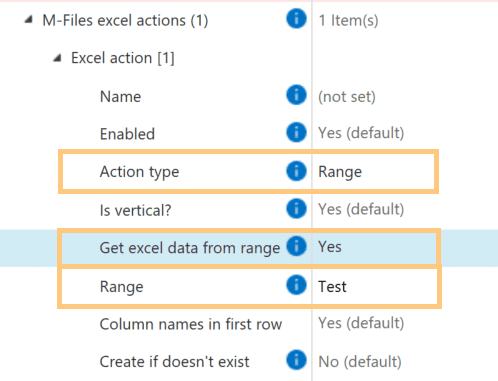
- Range: Reads a range of data from the Excel sheet, allowing you to map multiple cells to M-Files properties. There are two options for defining this range:
Static or Named Range Definition
When the Action type is set to Range, the Get Excel data from range option provides two ways to define the range:
- Static definition: If Get Excel Data from Range = No, define the range using the start and end column/row coordinates. This option is ideal when the data is fixed or predictable.
2. Named range definition: If Get Excel Data from Range = Yes, use a named range from the Excel sheet. This option works best for flexible or dynamically changing data, as the range name is predefined in Excel.
Additional key settings
- Is vertical?: Excel Reader supports both horizontal and vertical table formats, making it adaptable for different data layouts.
- Column names in first row: Specify whether the first row in the Excel range contains column headers.
- Create if doesn’t exist: When using the Range option, you can choose to create or update objects in M-Files based on the Excel data. With the Duplicates detection feature, you can prevent duplicate object creation.
Setting properties based on HTTP call errors
Setting properties based on HTTP call errors #
When integrating M-Files with an external API, you may encounter situations where the API is offline, a resource is deleted, or a request fails. Instead of manually tracking these failures, you can configure a rule in Extension Kit Core’s HTTP Integration module to automatically set properties on M-Files objects based on HTTP call errors.
Example
Let’s say you want to add a comment to the object, and your API returns the following error response:
{
	...
	"error" : "This is an example error message",
	...
}
Any HTTP response outside the 200-299 range (e.g., 404, 500, 429) classifies as an error.
How it works
To set a property when an HTTP call fails, set the Set property based on response property in HTTP Integration to value “OnError”. This allows you to automatically store the message in a designated property, making it immediately visible to users and helping them quickly identify issues.
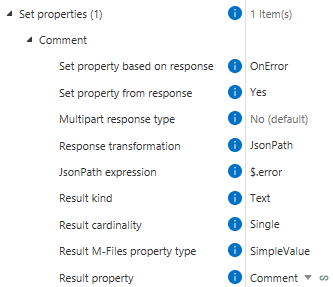
Instead of spending time figuring out why something isn’t working, you can see the error message directly in M-Files. Since the system can react dynamically based on the error, you don’t have to handle everything manually. This helps you diagnose and respond to issues more efficiently.
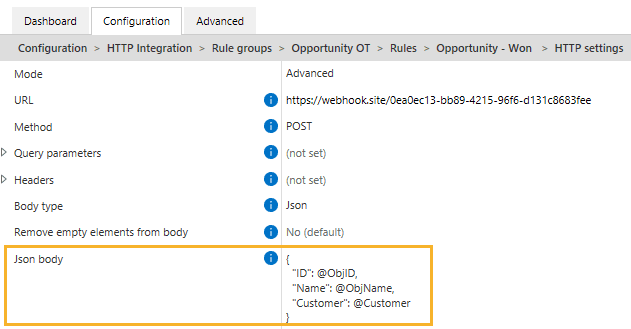
How to format JSON correctly in API calls
How to format JSON correctly in API calls #
With the HTTP Integration module in Extension Kit Core, you can easily connect M-Files to other systems via API.
When using the POST method to send data, the request body is usually written in JSON format, and proper formatting is essential for your integration to work as expected.
When referencing property variables in JSON, users are sometimes unsure when and how to use quotation marks.
Let’s walk through how to format your JSON correctly.
Using quotation marks in JSON
When defining a key-value pair in the JSON body:
- The key must always be enclosed in double quotes.
- The value should not be in quotes because you’re using a variable (i.e., a dynamic value from an M-Files property). Instead, use the @ symbol followed by the property alias. This tells the system to insert the value dynamically. (Picture 1)
Important: Define all variables
Once the body is configured, make sure every variable you’ve referenced (e.g., @ObjID, @ObjName) is defined in the Body variables section of the rule (Picture 2). If any variable is missing, the API call could fail or produce incorrect results.

Quotation marks are never added automatically. Always double-check your JSON formatting to avoid errors in your API requests.
Sending files from M-Files to an API
Sending files from M-Files to an API #
Need to send documents to an external system through an API? With the HTTP Integration module in Extension Kit Core, it’s easier than you think.
Here’s how to do it.
The scenario
In this example, we’re working with a Project object (Picture 1). It includes project metadata, with a Project Manager and Project Documents as lookup properties.
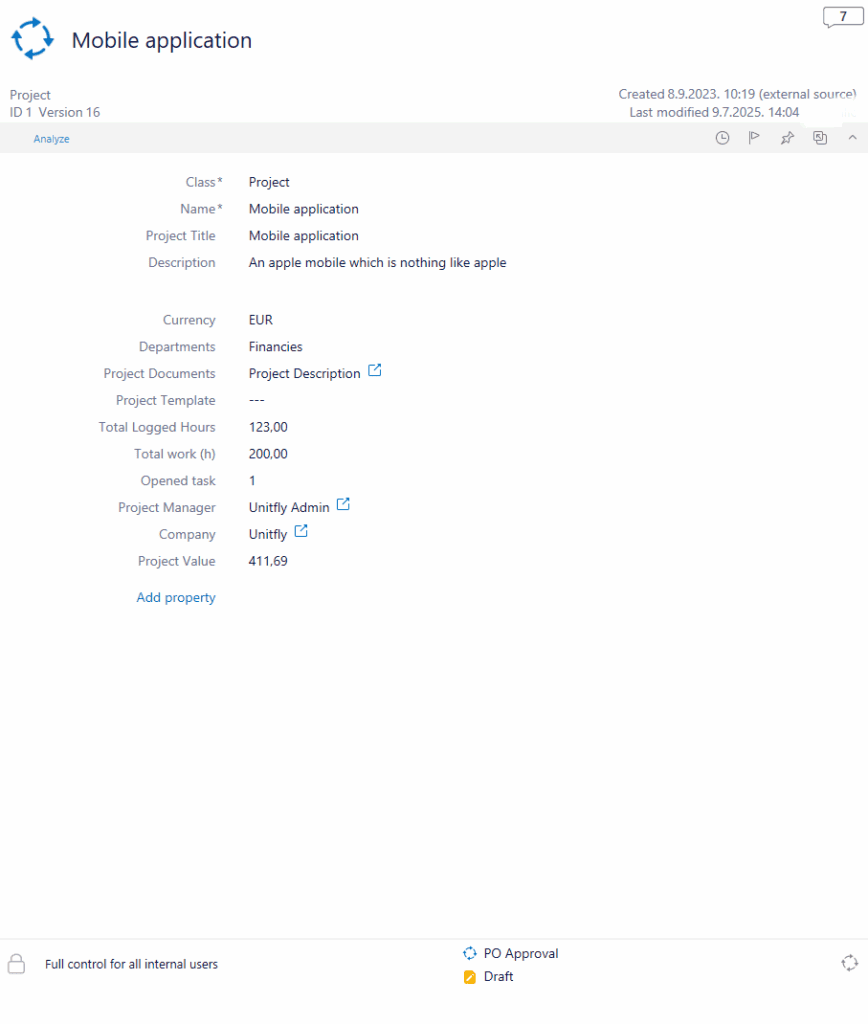
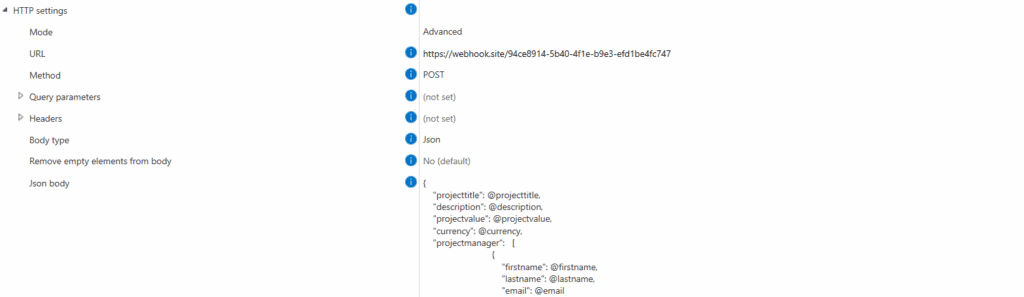
The goal is to send project details, project manager information, and related documents to a remote project management system using an HTTP POST request. In our case, we’re sending the data to a test webhook endpoint.
Define the JSON structure
In the HTTP Integration module, we define the JSON body that will be sent via API (Picture 2). Our JSON includes:
- Project title, description, value, and currency
- Project manager’s first name, last name, and email
- Document metadata (name) and content (file)
Map M-Files properties to JSON variables
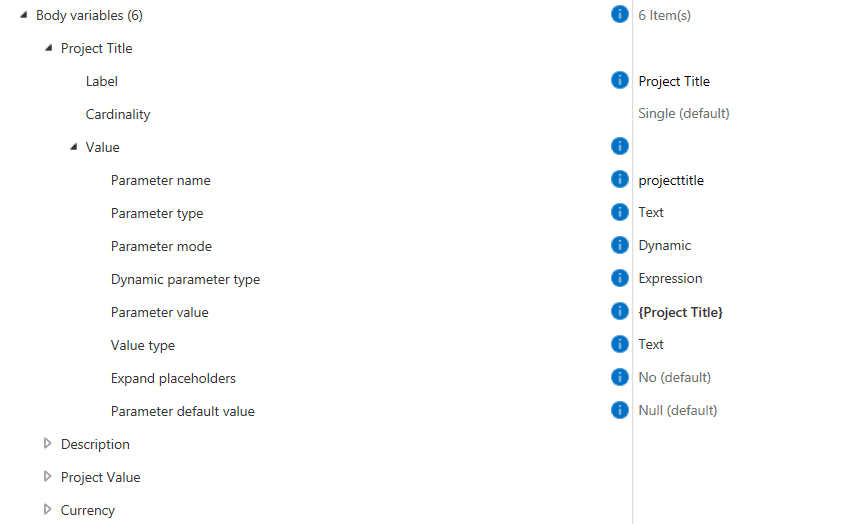
Each placeholder in the JSON (e.g., @projecttitle) must be mapped to a specific M-Files property. This is configured in the Body variables section. The setup depends on whether the variable is a single value or an array.
1. Single variables
The Project Title, Project Value, Currency, and Description properties are defined as single variables (Picture 3):
- Parameter name
- Parameter value (the property)
- Value type (e.g., Text, Number)
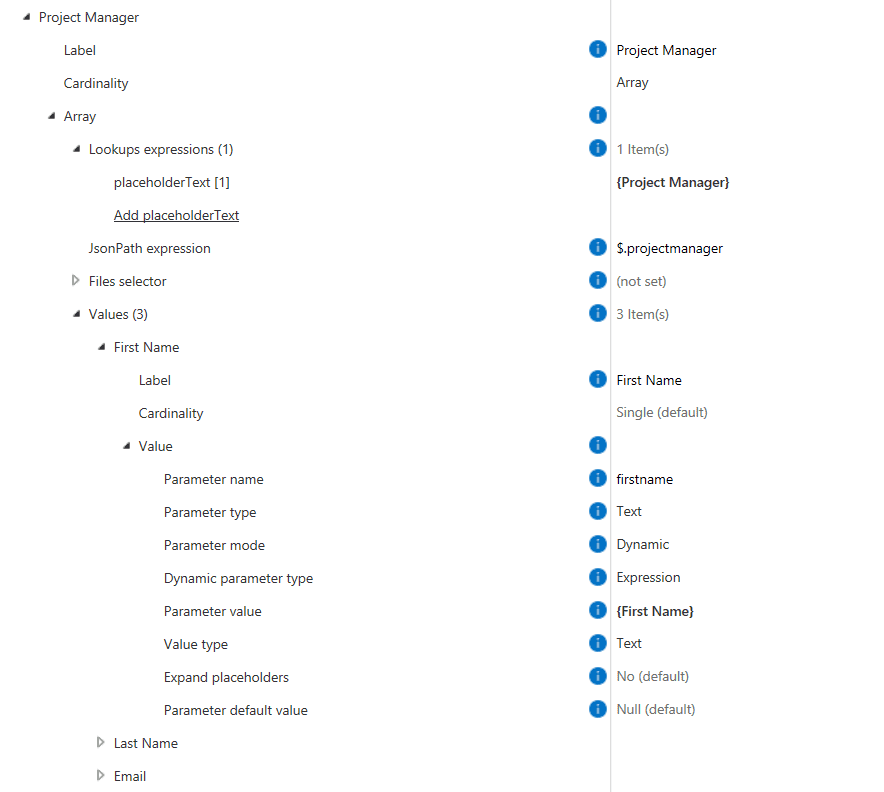
2. Arrays
For lookup properties like Project Manager, we define them as arrays (Picture 4):
- A Lookup expression to target the related object
- A JSONPath expression to define the position in the JSON
- Single variables for each related property (e.g., First Name, Last Name, Email)
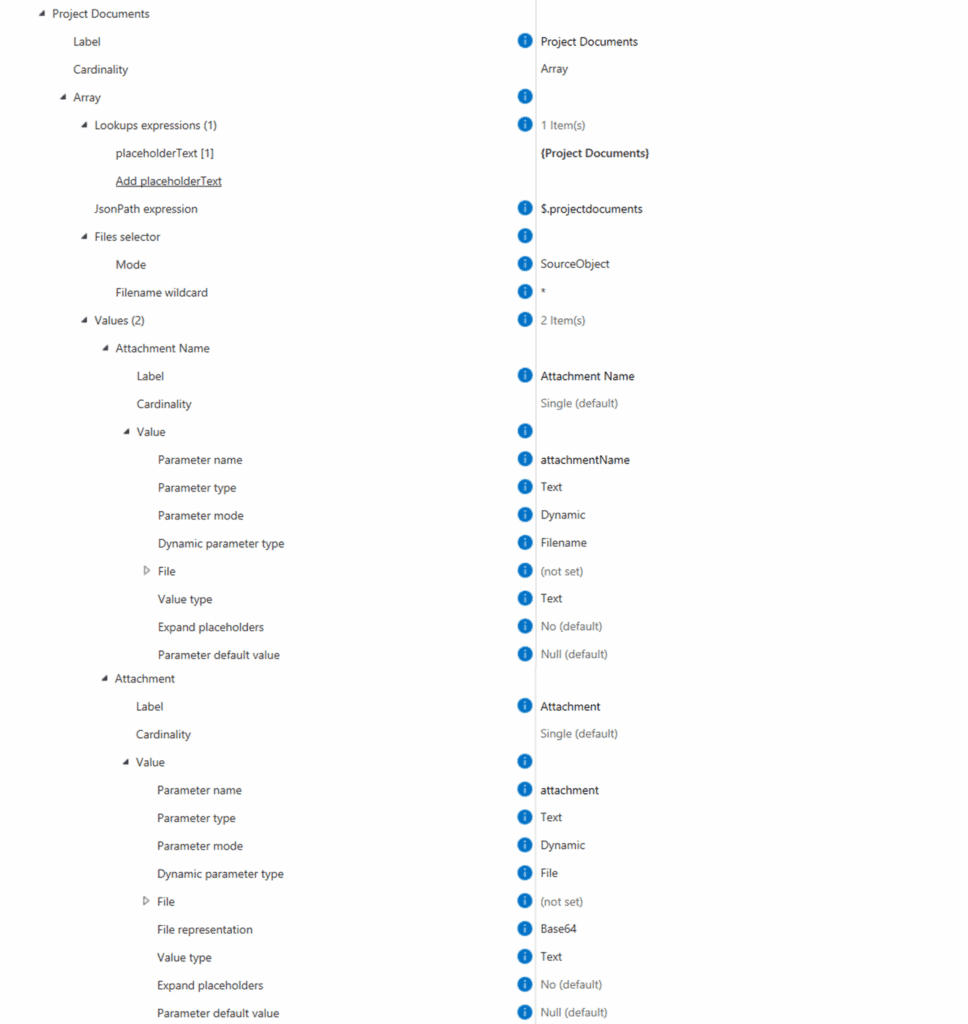
Sending documents
To include documents in the request (Picture 5), we follow a similar approach. Since Project Documents is a lookup, we define:
- A Lookup expression for the related documents
- A JSONPath expression to place the data correctly in the JSON
Then, configure:
- File selector: Since we’re already within the reference to Project Documents (which is part of the trigger source), we choose SourceObject as the mode.
- Two single variables:
- Attachment Name: Use
Filenameas the dynamic parameter type - Attachment: Use
Fileas the parameter type. Then set File representation toBase64
- Attachment Name: Use
By following these tips, you can easily configure rules to send data and documents to any API.
Rollback query in SQL Integration
Rollback query in SQL Integration #
In Extension Kit’s SQL Integration module, you can set up SQL rules as either Queries or Stored Procedures. But what happens if an error occurs during rule execution? This week, we’re focusing on how to handle errors effectively using the Rollback Query on Transaction Stop feature.
Rollback Query on Transaction Stop
When an error or interruption occurs during a transaction, this feature automatically triggers a rollback query, ensuring that any partial or incomplete changes are undone.
Here’s how to set it up:
- In the SQL settings, define the rollback query that will execute when a transaction fails.
- Make sure the Rule error handling behavior is set to Stop. This allows the rollback to occur and notifies you of the error.
Example scenario
Imagine you’re processing an AP invoice, which involves updating multiple tables, such as the AP Invoice table, the Vendor Payments table, and the General Ledger. You might define a rollback query like this:
DELETE FROM [dbo].[AP_Invoice] WHERE [ID] = {ID()}

If an error occurs (e.g., due to an invalid payment method), the system will execute this query, deleting the corresponding record and ensuring no incomplete data is left in the system.
Creating objects from Excel documents
Creating objects from Excel documents #
Extension Kit Core allows you to create objects automatically in several ways — one of them is by using an Excel document as the source. This automation is configured in the Excel Reader module.
This tip takes you through a detailed, step-by-step example of how to set it up — and it’s worth diving into.
Scenario
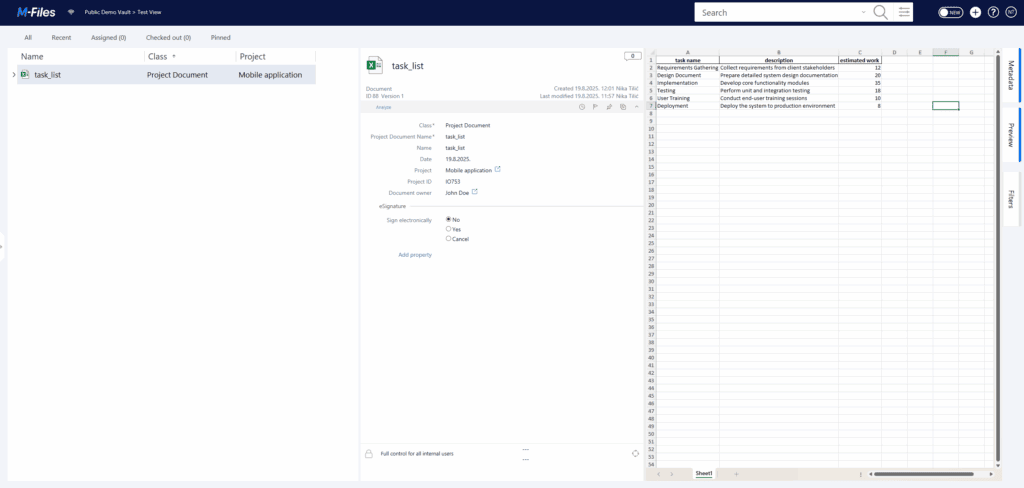
During project planning, a Project Document called task_list.xlsx is created. It contains a list of tasks for the project, including their description and estimated work time. The Project Document is referenced to the corresponding Project object, which in turn is linked to the Customer.
Using Excel Reader and these property relationships, we can automatically create Task objects for each task listed in the Excel table.
How it works
The goal of this rule is to read the Excel table row by row and create new tasks or update existing ones.
Here’s how it’s configured:
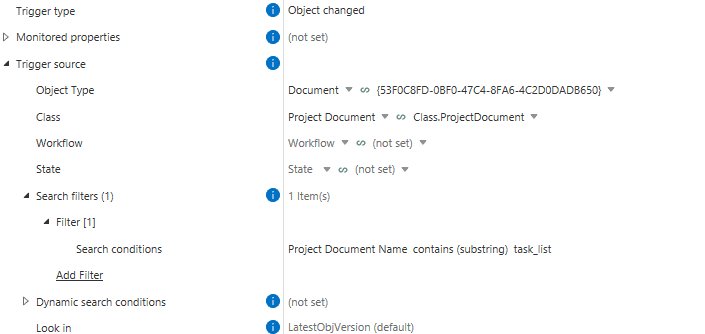
1. Trigger – The rule is triggered when a Project Document named task_list.xlsx is added or modified (Picture 1).
2. Excel action – You can choose whether to map only specific properties or the entire range of the table. In this case, we need the entire range to create objects (Picture 2).
- Get Excel data from range defines whether data will be read from a predefined Excel range, or by specifying the sheet, start column, and start row.
- Last column and Last row are optional — if left blank, the rule will read until the first empty row/column. However, if the file may contain empty rows, it’s best to define these explicitly.
3. Duplicate detection – To update existing objects instead of creating duplicates, duplicate detection must be configured. This tells Extension Kit which objects already exist and should be updated, and which ones are new.
- In this case, the unique value is Task Name, ensuring that within a single project, no two tasks share the same name.
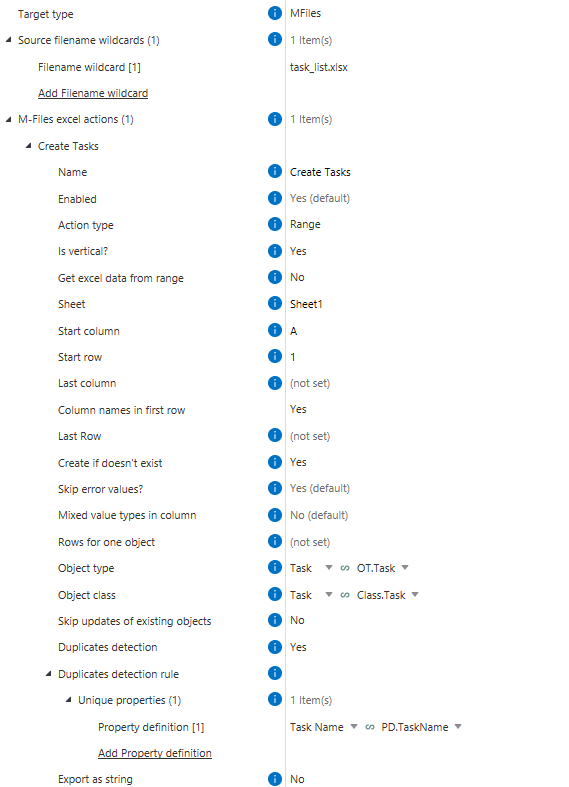
4. Property mapping – Properties like Task Name, Description, and Estimated Work are read from Excel. The Project (and, through it, the Customer) is taken from the metadata of the Project Document (Picture 3).

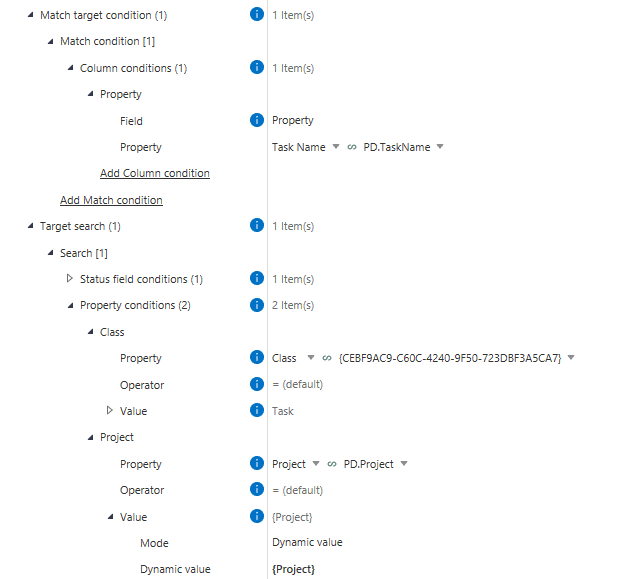
5. Match conditions – Match target condition and Target search ensure tasks stay linked to the right project, so identical task names in different projects aren’t mixed up (Picture 4).
- Adding a condition like Project = {Project} ensures tasks are only matched within the correct project.Without it, the rule could mistakenly update a task with the same name in a different project. For example, if Project A and Project B both have a task Write Documentation, the rule might incorrectly update the task from Project A and reassign it to Project B.
Result
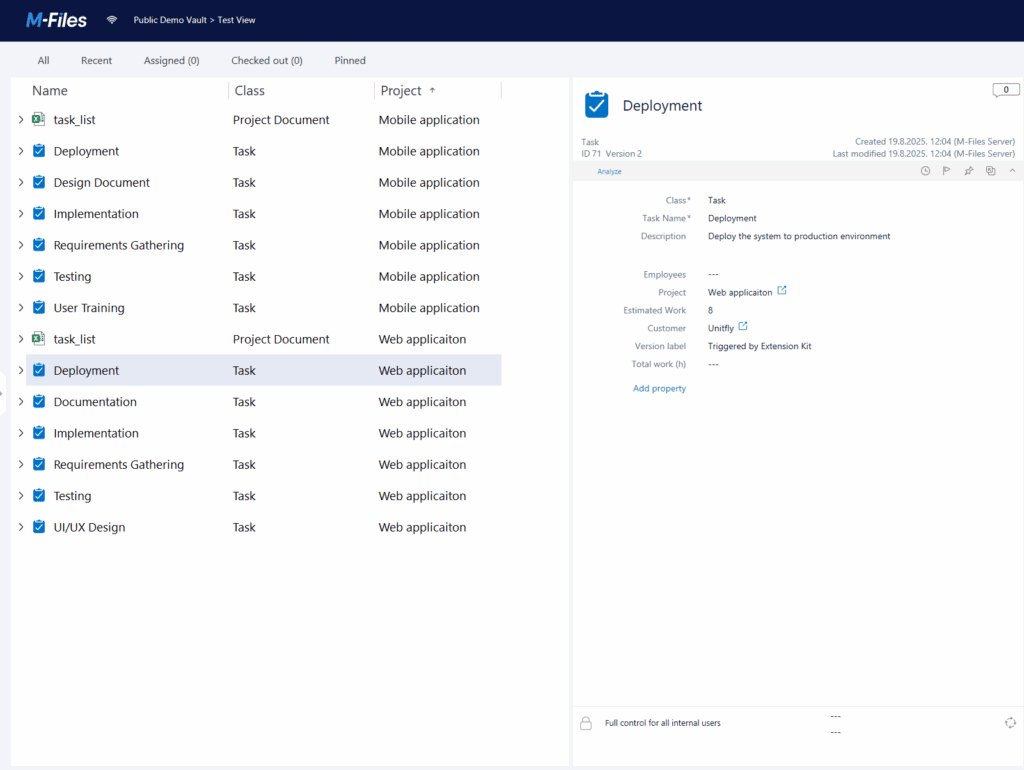
When the document for the first project is created (Picture 5), all related Task objects are automatically generated (Picture 6).
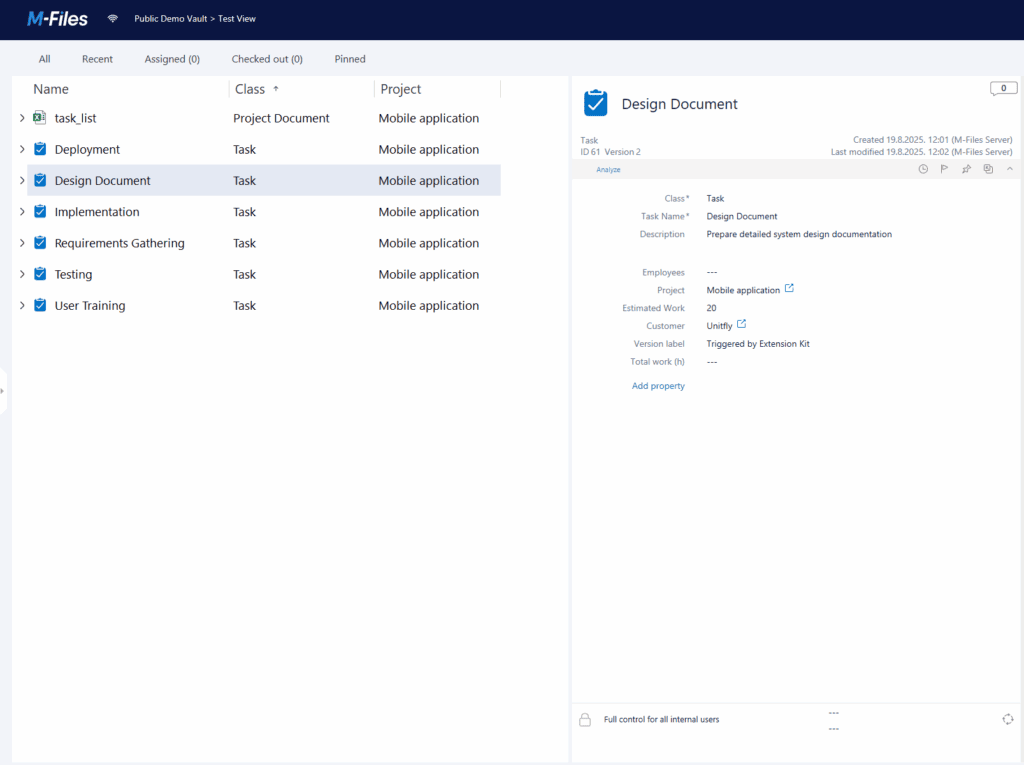
If a second project has some tasks with the same names, new Task objects are still created because they belong to a different project (Picture 7).
Note: When the Excel sheet is later updated, the system:
- Updates existing tasks if values have changed
- Creates new tasks if new rows are added
- Leaves deleted rows untouched (existing tasks remain)
How to insert images from M-Files objects to Word documents
How to insert images from M-Files objects to Word documents #
One of the many functionalities of Extension Kit is the ability to insert objects or values from M-Files into MS Word documents. With the Word Writer module, you can insert images, Excel sheets, or tables, and map values from M-Files objects into Word documents.
In previous tips, we covered creating tables in Word using this module. Here, we’ll show you how to insert images from M-Files objects into Word documents.
Example
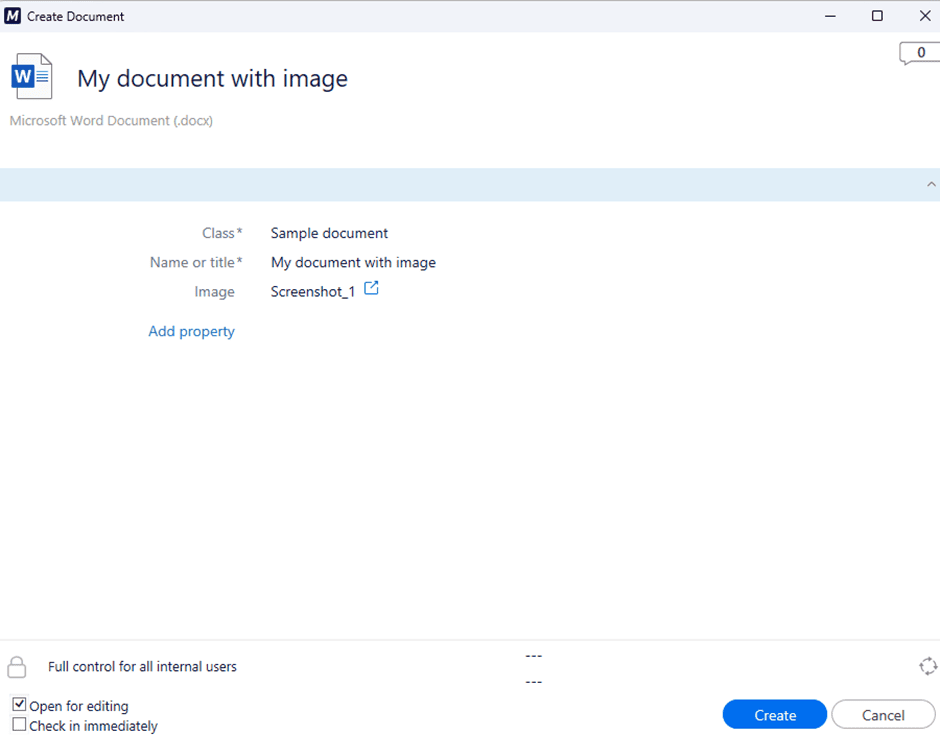
Let’s say we want to automatically insert an image from M-Files into a Word document whenever metadata changes. We can achieve this by using a bookmark in Word.
- The Word document (Sample document) is the source object.
- The image (Picture 1) is stored on the source object under the property Image (Picture 2).

Step-by-step configuration
- Set up a bookmark in MS Word Before inserting the image, define a bookmark in the Word document as a placeholder:
- Open the Word document.
- Go to Insert → Bookmark.
- Enter a bookmark name and click Add (Picture 3).

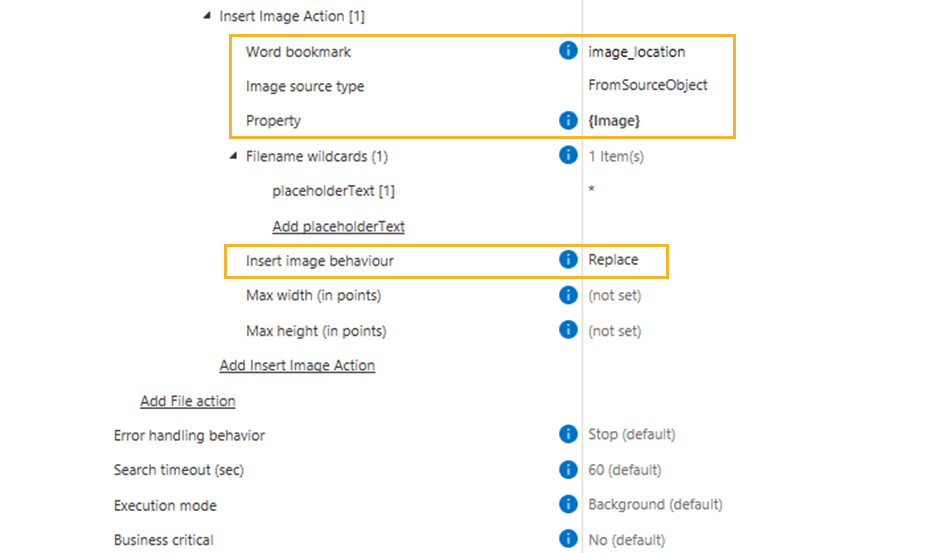
2. Configure the Word Writer rule in Extension Kit
- Choose the action: Under File actions, select InsertImage to insert the image into a specified bookmark in the Word document (Picture 4).
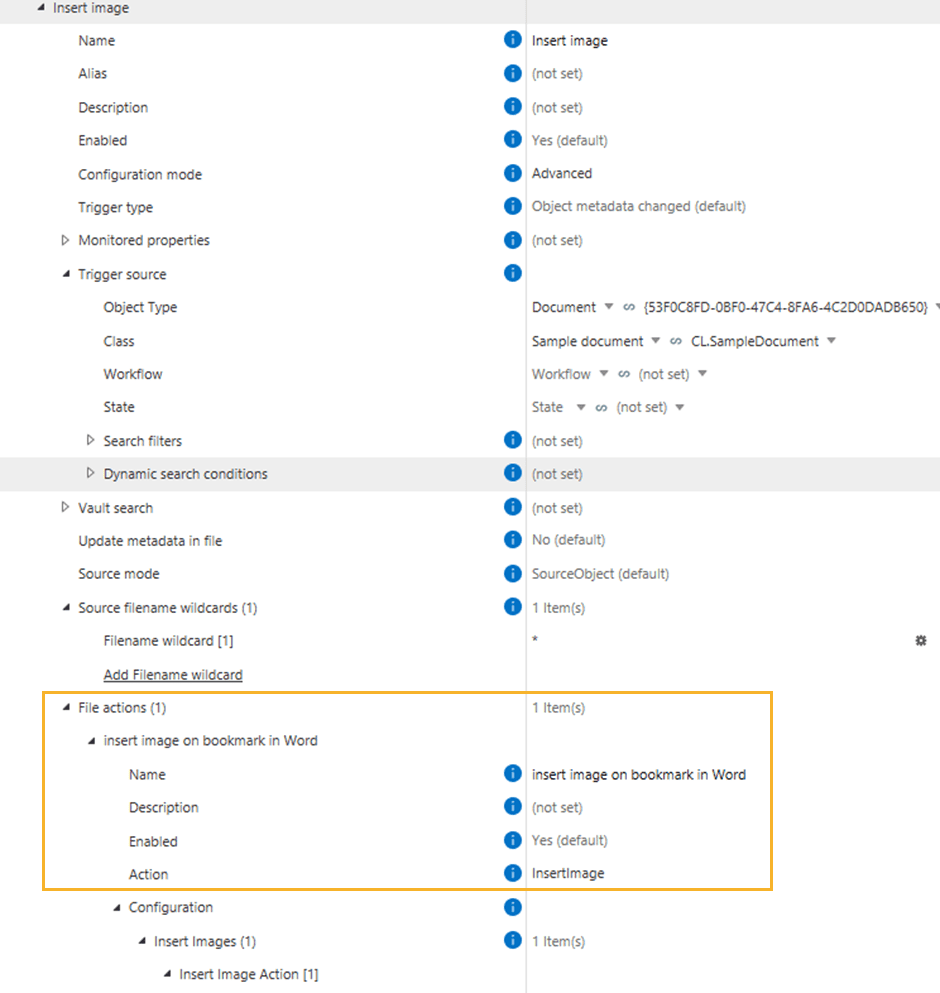
- Define the Word bookmark: Enter the exact bookmark name where the image will be inserted.
- Select the Image source type: Choose whether to insert images from a file path, source object, or vault search. Since we’re inserting the image from the source object, we need to use a property expression to reference it.
- Specify the image Property: If the image is stored as a property of the source object, define the corresponding property expression. The property we’re referencing is {Image}. Leave this field empty if the image file is directly attached to the source object.
- Set Insert image behavior: Choose whether to replace an existing image at the bookmark or append the new image to it (Picture 5).
Final result
Once configured, the image will be automatically inserted into the Word document at the defined bookmark (Picture 6). If any issues arise, check that the source object, image path, and bookmark name are correctly defined and that the bookmark exists in the Word document.