Welcome to Expert Tips — a growing collection of practical tips and real-world examples to help you get the most out of Extension Kit Core.
This page focuses on the Object Operations module group, which includes the following modules: Object Operations, Object Templates, Extended Assignments, Validation, Versioning, and Extended Permissions.
To get a new expert tip delivered to your inbox every week, subscribe to the Tip of the Week newsletter here.
Automate object creation from multi-select properties
Automate object creation from multi-select properties #
This tip explores how to automatically create objects in M-Files based on values selected in a multi-select property. It’s a great way to streamline your workflows and eliminate repetitive manual work.
Example
Let’s say you have a Project object with these properties: Name, Budget, Deadline, and a multi-select Task list template for creating objects.
Each project may include several tasks – and you want each of them to be managed as a separate object. Instead of creating those task objects manually, you can automate this process with Extension Kit Core.
Configuration steps
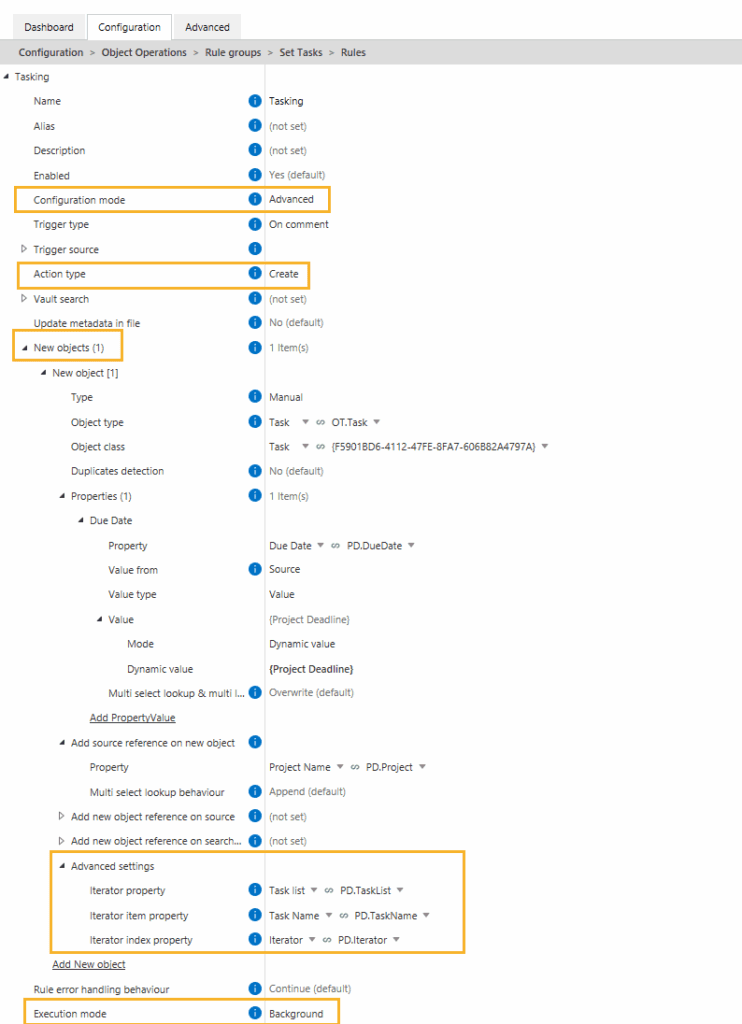
Use advanced configuration mode in the Object Operations module to set up a rule that creates a new object for every selected task in the Task list (Picture 1).
- Action type: Set the action type to Create to generate new objects.
- New object setup: In the New objects section, define the Object type, Object class, and any relevant properties for the new object.
- Advanced settings: Under New objects → Advanced settings, you must specify the following to ensure each task is processed individually:
- Iterator property: Specify the property on the source object that serves as an iterator. In this case, the Task list property acts as the iterator, as new objects need to be created for each selected task.
- Iterator item property: Specify the property where the current task value should be stored in the new object, e.g. a Task Name.
- Iterator index property: Specify the property on the new object that will store an index of the current iterator item. In this example, the index is stored in the Iterator property on the OT Task.
- Execution mode: Set it to Background or BackgroundTransaction to ensure the rule runs smoothly in the background.
The result in M-Files
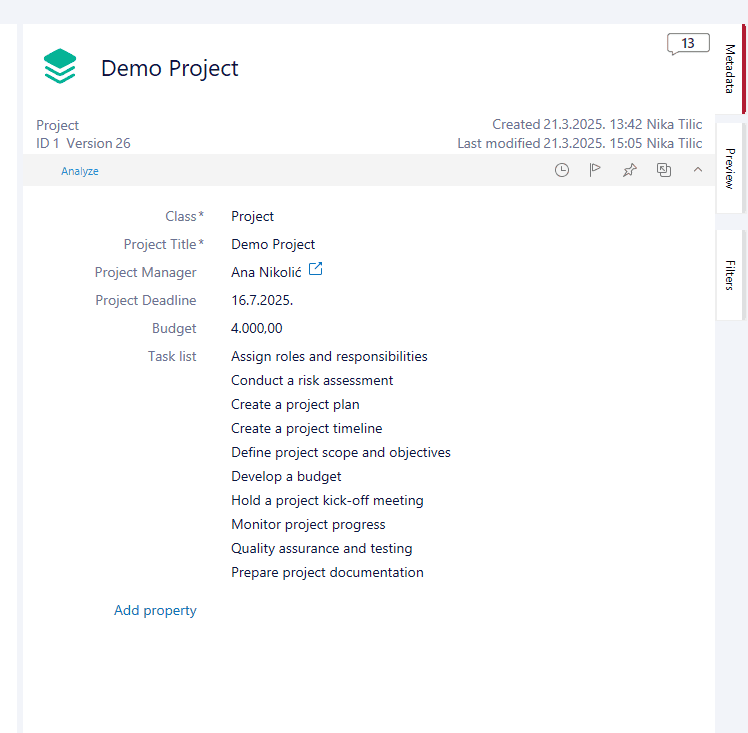
Let’s say you select ten tasks in the Task list of your Demo Project (see Picture 2).
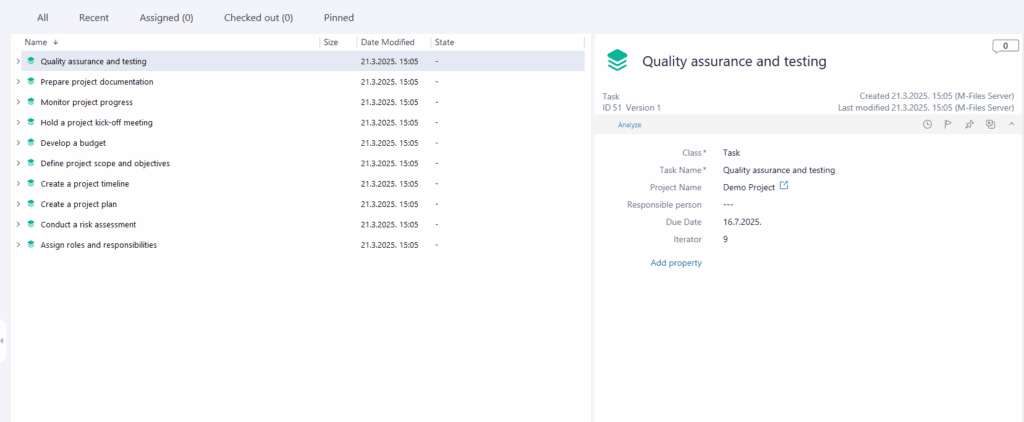
Once the rule is triggered, 10 individual Task objects are automatically created – one for each selected task (see Picture 3). This setup saves time, reduces errors, and ensures every task is properly tracked in M-Files.
Automating object creation based on a multi-select property is a simple but powerful way to reduce manual effort and enhance overall efficiency in M-Files.
Creating error messages in the Validation module
Creating error messages in the Validation module #
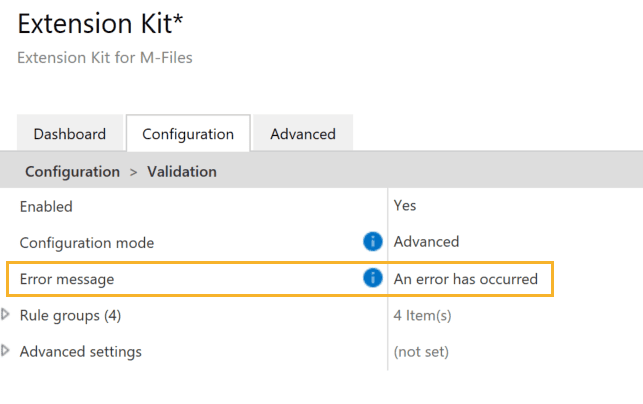
In the Validation module, error messages can be defined in two places, and it’s helpful to understand how they work together.
1. The general error message
This message is set at the module level and will appear whenever any condition in a Validation rule is not met for an object. The default text is Validation failed, but you can customize it as needed (Picture 1).
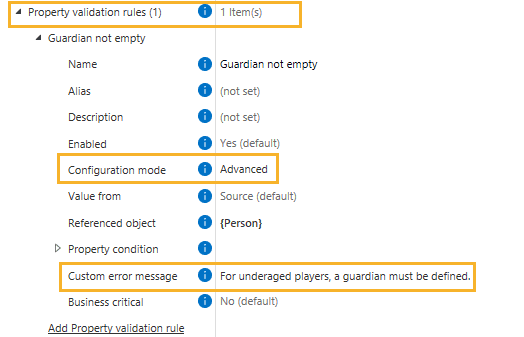
2. The custom rule-specific message
Optionally, within each Validation rule, you can specify a custom error message that appears below the general error. Note: The configuration mode within the Property validation rules section needs to be set to Advanced (Picture 2).
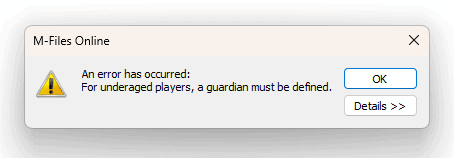
The result
As a result, the error message will provide both a general alert and a rule-specific explanation for the user (Picture 3).
Summary: How these messages appear together
- The first message (e.g., An error has occurred) comes from the module-level default message and shows for every validation error.
- The second message is specific to the individual rule that failed and explains what exactly went wrong.
To make validation error messages clearer, remember to customize both the default message and the rule-specific messages.
Enforce document creation from templates only
Enforce document creation from templates only #
Sometimes, you may want to ensure that certain documents are created only from templates in M-Files. This helps prevent assigning them to the wrong class, triggering the wrong workflow, or causing execution errors or incorrect assignments.
For example, let’s say you want documents of a specific class, like Report, to be created only through templates. The idea is simple: validate whether a document was created from a template or not.
Here’s how.
Step 1: Add a property to control creation
We’ll use a dedicated property to drive the validation rule.
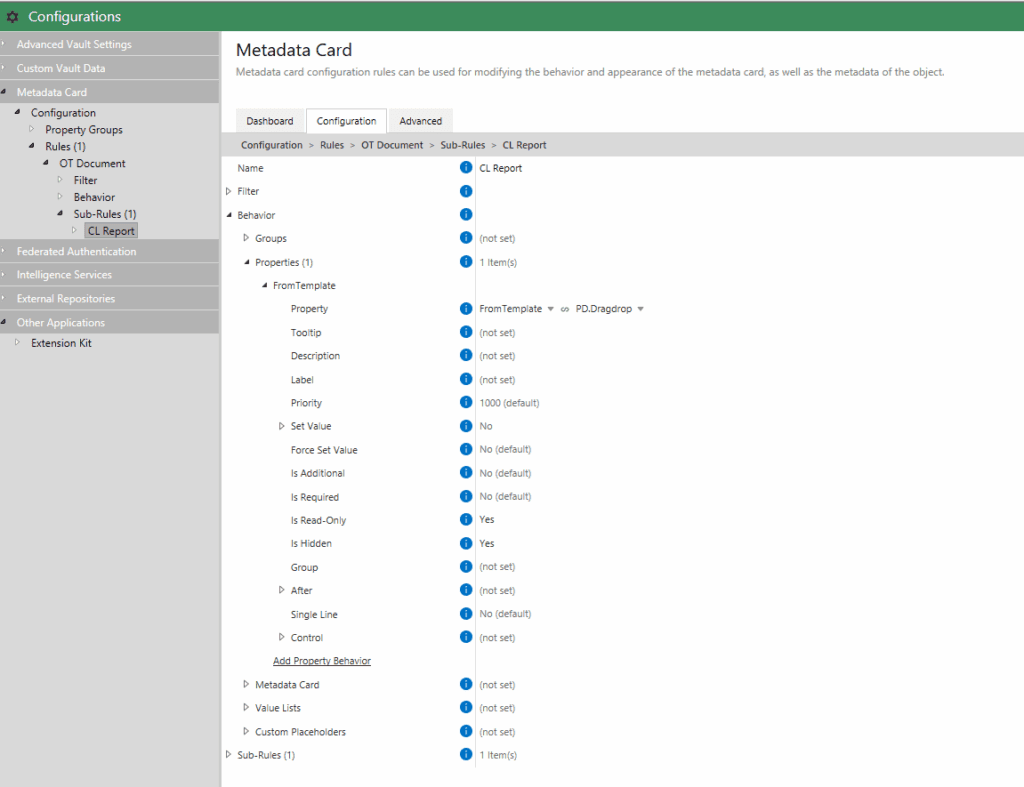
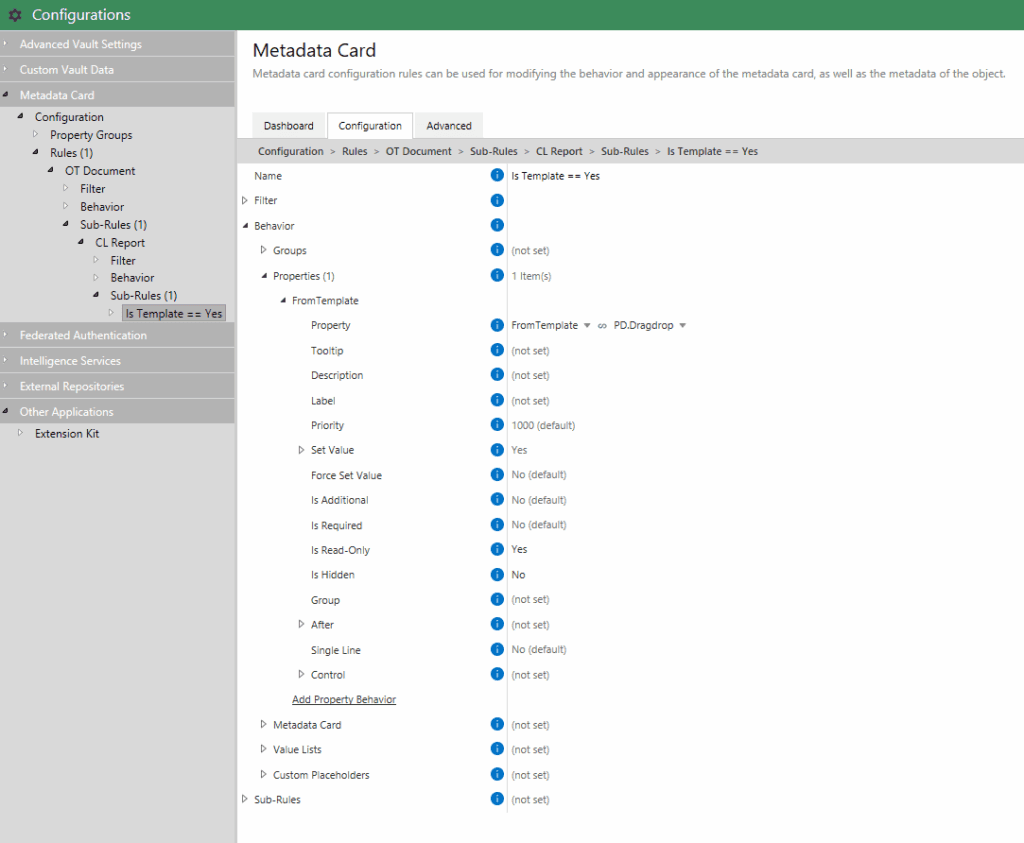
In the Metadata Card Configuration:
- Add a new property to the class (e.g.,
FromTemplate). - Set its default value to
No. - Hide the property and make it read-only.
With this setup (Picture 1), every new Report document will automatically get FromTemplate = No whenever it’s created via any standard create action in M-Files (and not Create from template).
Next, create a template for the Report class with this property set to Yes (Picture 2).
This means:
- Documents created from a template will have
FromTemplate = Yes. - All other creation methods will result in
FromTemplate = No.
Step 2: Restrict creation to templates
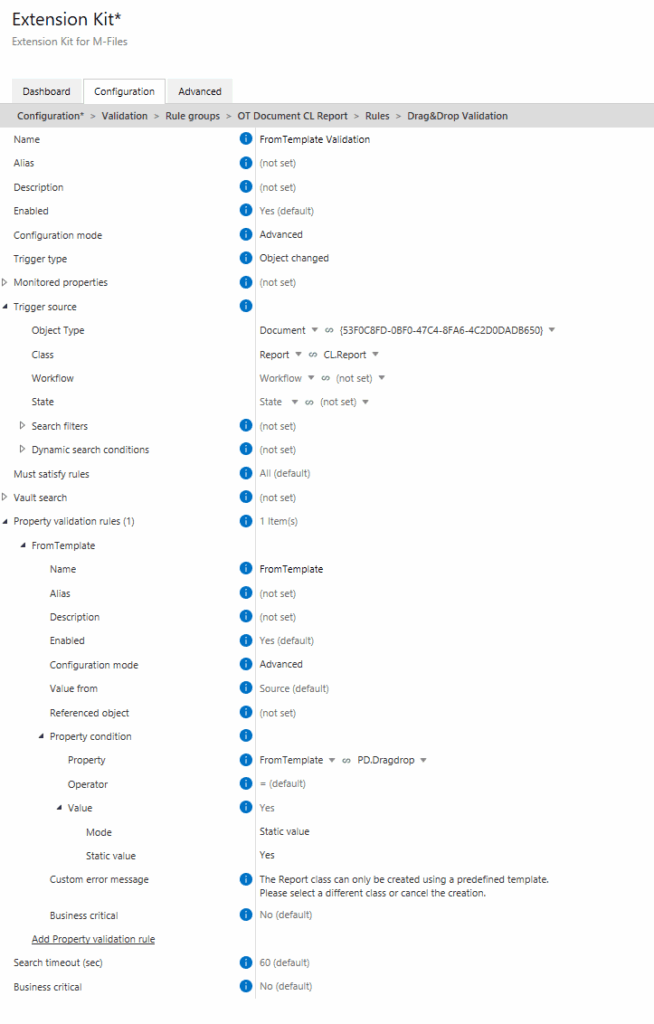
Finally, configure a validation rule (Picture 3) in the Validation module of Extension Kit Core:
- Rule checks if
FromTemplate = Yesfor the Report class. - If not, display an error message and prevent creation.
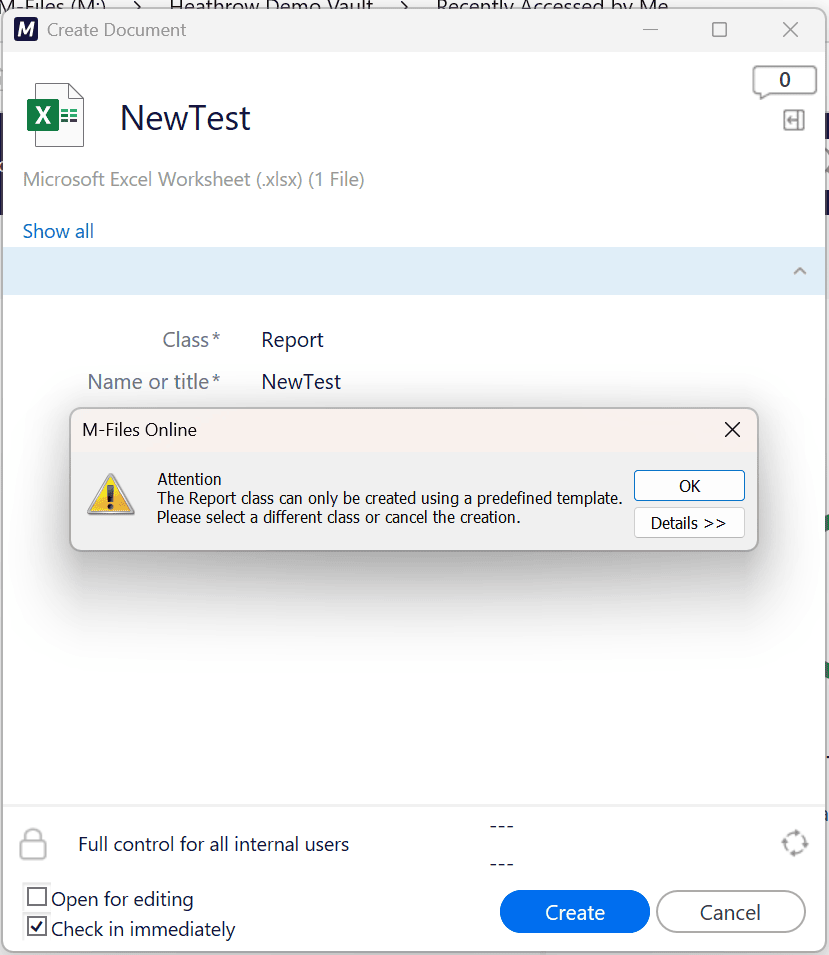
The result
Users can only create documents of that class through templates. If they try another way, a validation message prevents creation (Picture 4).
Duplicates Detection in Extension Kit Core
Duplicates Detection in Extension Kit Core #
When importing or creating objects in M-Files, you may need to prevent the creation of duplicate objects. With Extension Kit Core’s Duplicate detection, you can automatically check if an object with the same property value already exists, and decide whether to create, skip, or update it.
What is Duplicates detection?
Duplicates detection lets you define which properties determine if an object is a duplicate. In other words, you can specify a set of properties that must be unique for objects of a specific type.
This feature is available in the following modules: Data Transfer, Object Operations, Excel Reader, and HTTP Integration.
Example
Let’s say you’re importing conference participants from an Excel file.
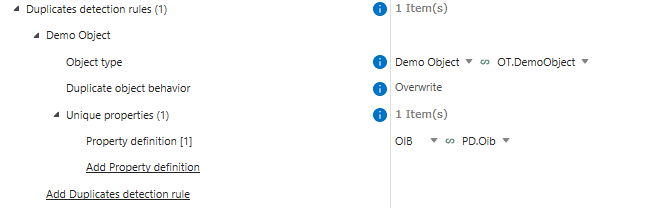
In M-Files, there’s a class called Participant, with properties such as Name, Address, and OIB (Personal ID). Since the OIB must be unique for every person, it’s perfect for duplicate detection.
When the rule runs, Extension Kit Core will:
- Read the OIB from each Excel row.
- Check if an object with that OIB already exists in M-Files.
- If it doesn’t, create a new object.
- If it does, skip the row to avoid creating a duplicate.
Configuration by module
Each module has its own configuration options for handling duplicates, but the logic is the same: detect, compare, and decide what to do.
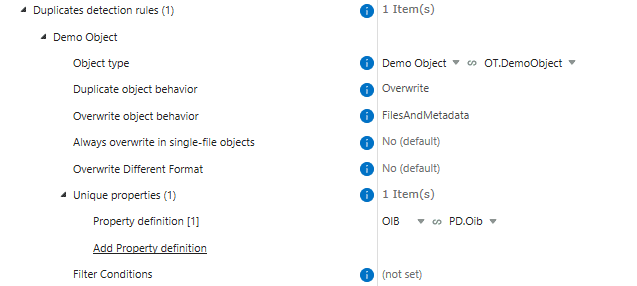
a) Object Operations
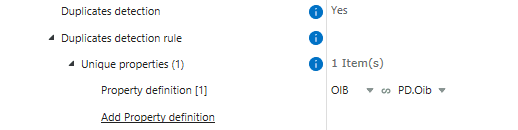
When creating objects, you can define properties that must be unique and choose how duplicates are handled (Duplicate object behavior):
- Overwrite: Update existing objects.
- Skip: Ignore duplicates.
- CreateNew: Always create new objects.
If you choose Overwrite, you can specify whether to overwrite only metadata, only files, or both. (Picture 1)
b) Data Transfer
When importing data from a file system to M-Files, you can enable Duplicates detection to ensure objects are unique. Define the unique properties, and choose how to handle duplicates: skip, overwrite, or create new objects (Picture 2).
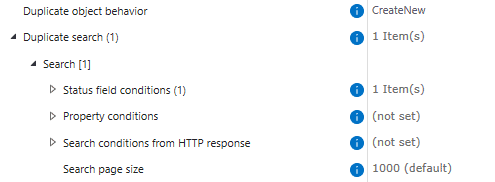
c) HTTP Integration
Duplicates detection defines how duplicate objects from an HTTP response are handled. In addition to skipping, overwriting, or creating new objects, you can also choose Upsert (creating new objects and overwriting existing ones).
In this module, duplicates are detected using a Duplicate search , where you define search filters to find existing objects, unlike other modules where duplicates are detected based on properties (Picture 3).
d) Excel Reader
When mapping a range from an Excel file to M-Files, you can create objects from that range and prevent duplicates. Set properties that must be unique in the Excel data, and Extension Kit Core will skip duplicate rows or columns during import (Picture 4).