Welcome to Expert Tips — a growing collection of practical tips and real-world examples to help you get the most out of Extension Kit Core.
This page focuses on the general features of Extension Kit Core, found throughout modules.
To get a new expert tip delivered to your inbox every week, subscribe to the Tip of the Week newsletter here.
Run rules with a Button Click
Run rules with a Button Click #
The Button Click trigger in Extension Kit Core lets you execute rules directly from the M-Files UI, without waiting for a workflow or property change. Send documents to ERP, run OCR, ZIP files, and more — exactly when you need it.
The trigger works across all trigger-based modules, as well as modules that normally run automatically, such as Extended Auto Properties.
Configuration options
Here’s a closer look at the button action configuration options (Picture 1).

First, you can define if the rule should apply to:
- Selected Objects in Current View
- All Objects in Current View
- Objects Set in Rule
Next, choose where the button appears in the M-Files UI:
- Three dots menu on the document’s action bar
- Right-click menu on a document (or an empty space in a view)
Then, use the Button label field to set custom text displayed on the button.
To guide users, configure messages that appear during execution:
- Confirmation message – displayed in a pop-up before running the rule (Picture 2)

- Success message – displayed when the rule executes successfully (Picture 3)

- Error message – displayed if the rule fails.
Finally, use Order to define where the rule appears in the dropdown list.
Example
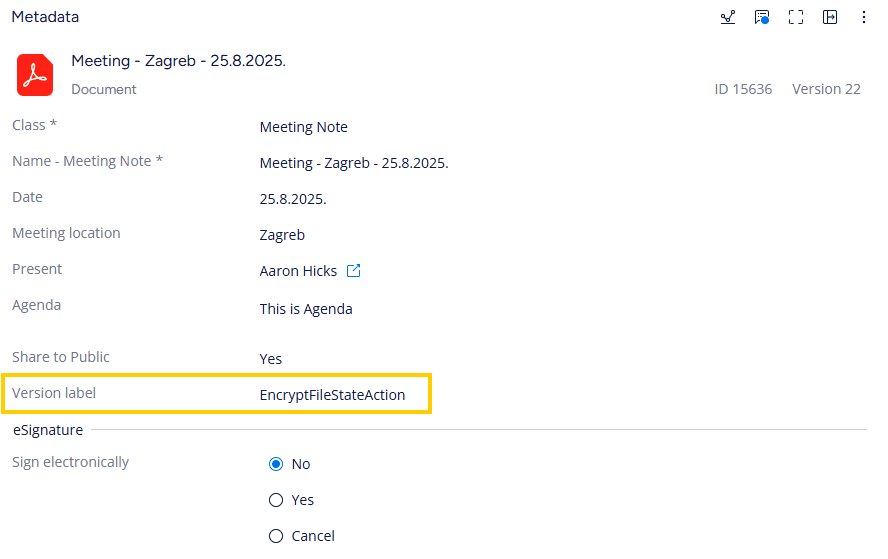
Let’s say you have a rule that applies encryption to selected documents with a button click (Picture 4).

In M-Files, open the three dots menu of the document and select the rule (Picture 5). The document is encrypted instantly (Picture 6).

Syncing related properties between object types
Syncing related properties between object types #
In this week’s tip, we’re tackling a common scenario – asked recently in our community – where related properties need to
The Challenge
You have an Employee object type with a multi-select property called Customers, containing a list of customers. Meanwhile, your Customer object type has a single-select property Employee, indicating the assigned employee. Since each customer can have only one project leader, but an employee can manage multiple customers, you want changes made in one object type to be automatically reflected in the other.
The Solution
Here’s how to set up synchronization using an orchestrated rule that automatically updates properties between two object types:
- Create an Orchestrated Rule within Property Operations where Customer is the trigger source.
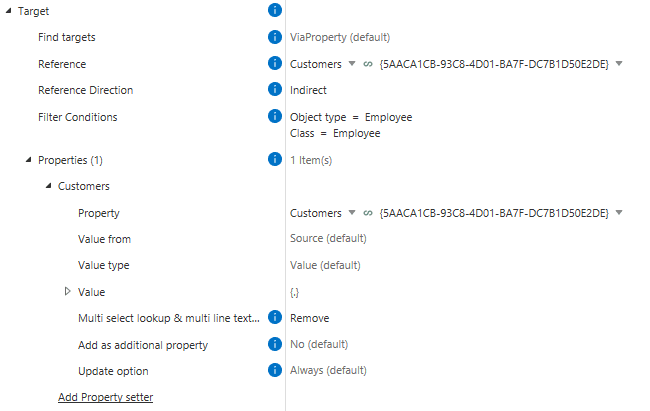
- Rule 1: Search for Employee using an indirect reference and remove self (%.%).
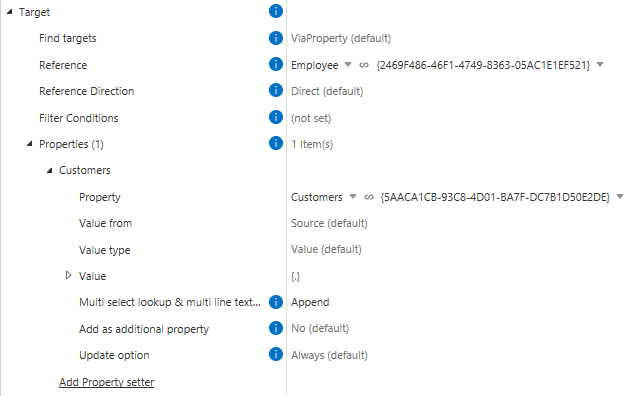
3. Rule 2: Directly search for the same Employee and append self (%.%).
This setup ensures that whenever a customer is added or removed from an employee, the changes are automatically reflected in both the Employee and Customer object types.
Important: Make the Customers property on the Employee object Read-Only to ensure that the Customer object remains your single source of truth.
By automating the synchronization of these properties, you’ll save time, reduce errors, and keep your data consistent across your organization.
Using regular expressions in Extension Kit Core
Using regular expressions in Extension Kit Core #
Regular expressions (regex) are a powerful way to extract, transform, or validate text — and you can use them in multiple modules in Extension Kit Core to automate and streamline your M-Files processes. In this week’s tip, we’ll show you:
- Examples of what you can do with regex in Extension Kit
- Where regex is supported in Extension Kit
- A practical use case with the Property Operations module
- Best practices for writing and testing regex patterns
Using regex in Extension Kit
With the regex operator, you can manipulate, validate, and extract data across multiple modules in Extension Kit. Regex can be used to split or format property values, create validation rules that ensure specific conditions are met, and extract values based on defined patterns — enabling dynamic property calculations from text input. It also helps identify files that belong to the same object during imports, improving data organization and accuracy. In more complex workflows, regex can play a key role in orchestrating data flows and calculations, supporting automation, and maintaining data integrity throughout your M-Files configuration.
Regex is currently supported in the following modules:
- Orchestrator
- Property Operations
- Email Notifications
- Extended Auto Properties
- Auto Numbering Properties
- Object Operations
- Validation
- SQL Integration
- HTTP Integration
- Excel Reader
- Word Reader
- Versioning
- Reporting
- Data Transfer
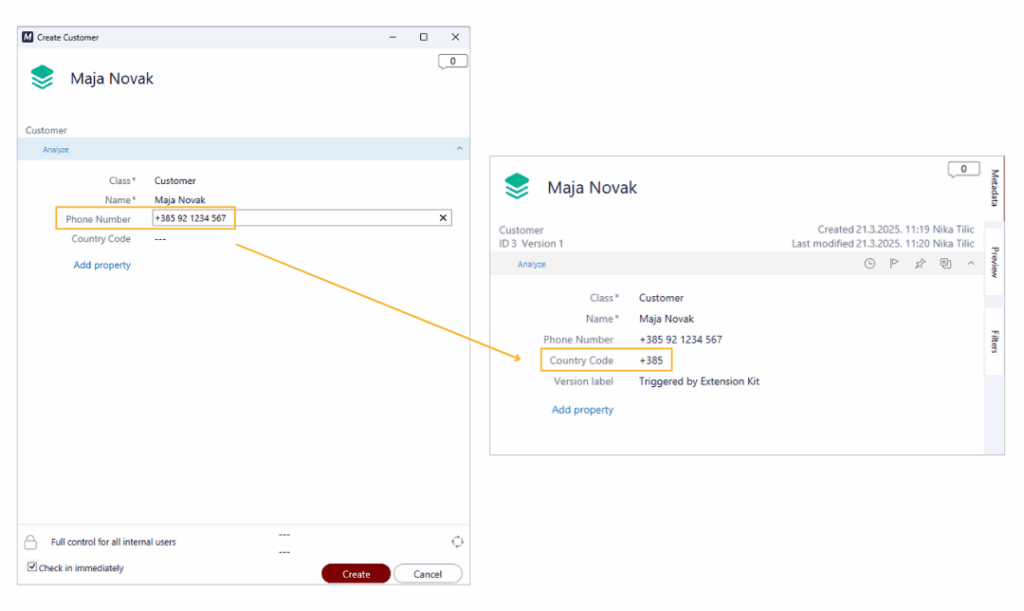
Example: Extracting a country code from a phone number
On a Customer object, we have a property storing phone numbers in this format:
+385 91 123 4567
When the object changes, we want to extract just the country code (e.g., +385) and store it in a separate property on the source object. To capture the + and 1–3 digits at the beginning of the string followed by a space, we’ll use this regex pattern:
^\\+?\\d{1,4}
Here’s how to configure this rule in Property Operations (Picture 1):

The result
When a phone number is entered, the rule extracts the country code and saves it to the target property (Picture 2).
Best practices when using Regex
- Use a dedicated site to build, test, and debug your regex patterns. For example, we like to use regex101.com, as it highlights matches and shows capturing groups – which is both useful when setting up Extension Kit rules.
- Start small and test your patterns on real data before deploying.
- Document your regex patterns in the rule descriptions for clarity.
Regex can help you clean and structure data automatically, adding flexibility and precision to your M-Files configuration.
Make rule testing easier with Run Once
Make rule testing easier with Run Once #
When testing Extension Kit Core rules, it’s common to rely on changing object states, adding comments, or creating objects to trigger rule execution. But doing those steps repeatedly just to check if your rule works can be time-consuming, not to mention a bit frustrating.
That’s where the Run Once feature on the Dashboard comes in.
What is Run Once and how it works
Run Once lets you manually trigger a rule once, executing it on all matching objects in the vault. It’s especially useful during testing and configuration.
Here’s how to use it:
- Set up your rule as usual.
- Set the trigger to Run Once.
- Go to the Dashboard tab.
- Click the Execute RunOnce rules button within the desired module.
All rules with the Run Once trigger in that module will run immediately, without the need to simulate a workflow or perform repetitive actions.
Example use case
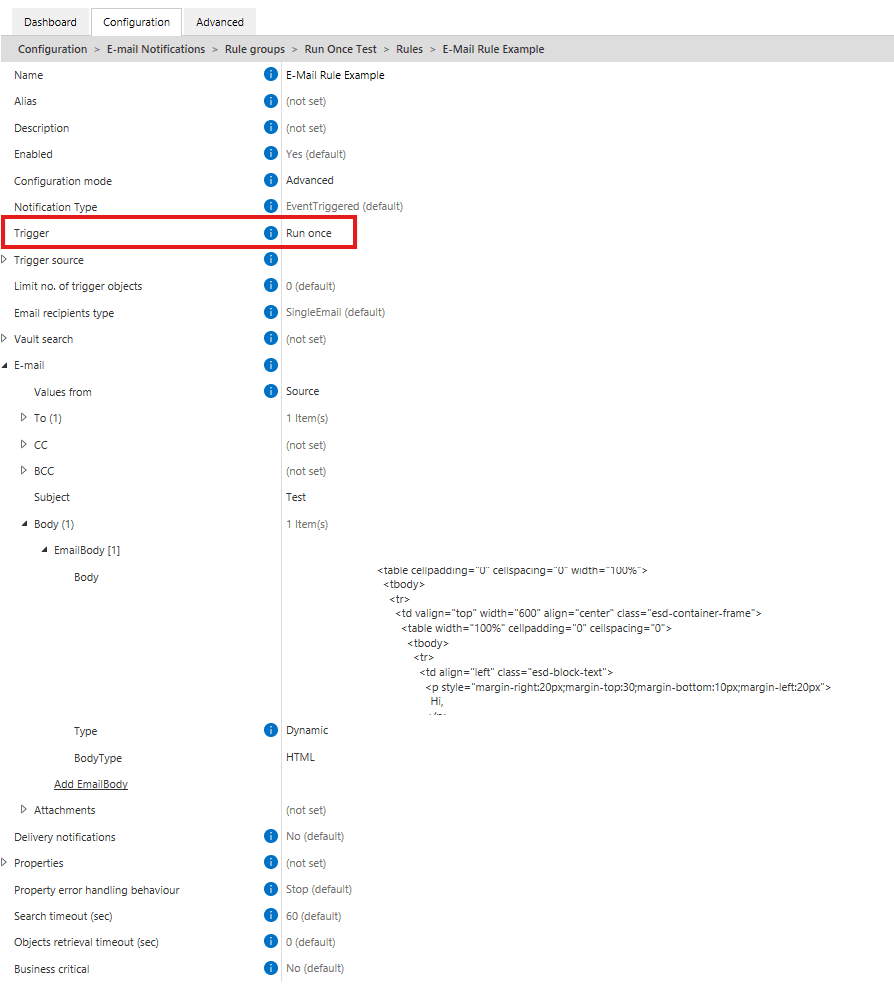
Let’s say you’re configuring an email notification and want to make sure everything looks right — clean formatting, no typos, and all the details in place. Instead of repeatedly adding comments or changing states on the same object, you can configure a rule like this (see Picture 1):
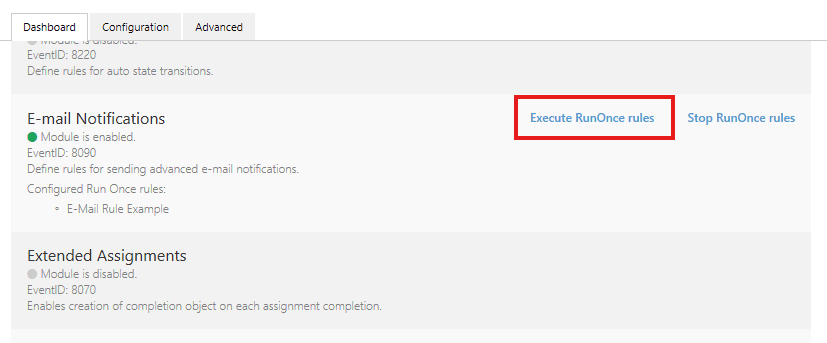
To test the rule, go to the Dashboard tab and click Execute RunOnce rules under the E-mail Notifications module (Picture 2). It’s a faster and cleaner way to test your configuration, without cluttering the vault or wasting time.
And if the rule takes a while to execute? You can stop it directly from the same screen using the Stop RunOnce rules button.
Run Once can be a great time-saver when you’re fine-tuning a rule and want to test the output multiple times. Next time you’re testing, use Run Once — it’s a simple feature that can make a big difference.
Advanced use of Vault Search
Advanced use of Vault Search #
In the Property Operations module, the Vault Search feature is typically used to find an object whose property value should be set based on a value from the Trigger Source, or vice versa — to retrieve metadata from a related object and apply it to the Trigger Source.
This tip starts with a quick introduction to Vault Search, then dives into advanced use cases showing how to use Vault Search to filter the Trigger Source based on data from multiple related objects in the vault.
Basic Vault Search functionality
Here’s a classic use case to illustrate how Vault Search works.
A rule in the Property Operations module (Picture 1) uses Vault Search to set the Invoice Owner property based on the Created by property of the Invoice object. Since Created by stores the Login Account of the user who created the object, and Invoice Owner expects an OT Employee, we can’t directly copy the value.
Instead, Vault Search helps by locating the Employee whose Login Account matches the Created by value. That Employee is then assigned to the Invoice Owner property.

Advanced filtering options
In addition to this intuitive usage, Vault Search can also serve as an advanced filtering step that extends your ability to filter objects across the vault. While Trigger Source filtering only allows filtering its own properties, Vault Search lets you define conditions the Trigger Source must satisfy based on information from other related objects in the vault.
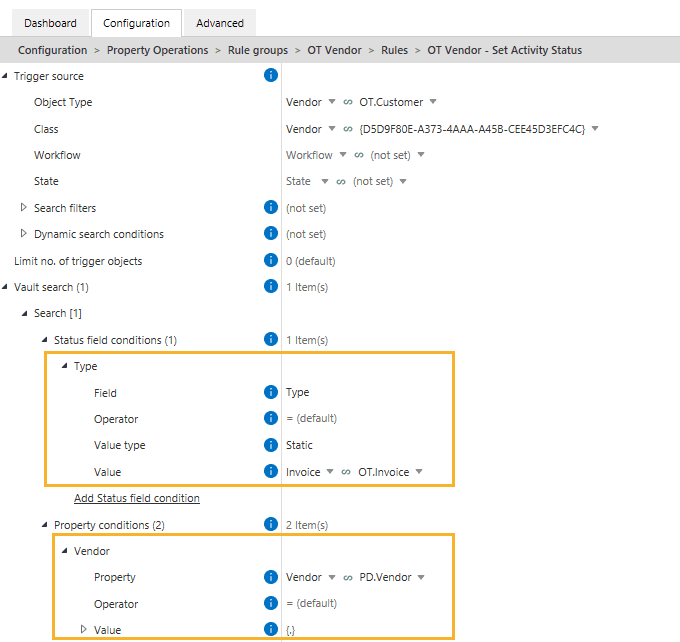
In an invoice processing scenario with Vendor and Invoice objects, you might want to evaluate a Vendor based on data from its related Invoices, such as:
- Have they issued an unusually high-value invoice?
- Do they have any unpaid invoices?
- How long has it been since their last invoice?
Vault Search checks related Invoices and determines whether the Vendor meets the specified criteria, executing the rule only when those conditions are met. You can configure it to:
- Execute the rule if at least one related object matches the criteria (Search Result Type = Any), or
- Execute the rule only if no related objects match the criteria (Search Result Type = None).
Important: If the rule is orchestrated, make sure to set the Use vault search option to Yes to retain this behavior.
Example 1: No invoices in the last year (Search Result Type = None)
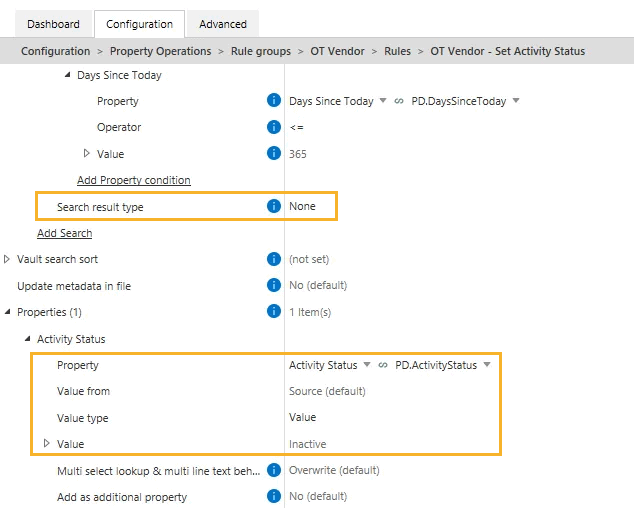
This rule sets the Activity Status of any Vendor to Inactive if they haven’t had any invoices in the past 12 months. If Vault Search returns no results, the condition is met, and the Activity Status property is updated (Pictures 2 and 3).
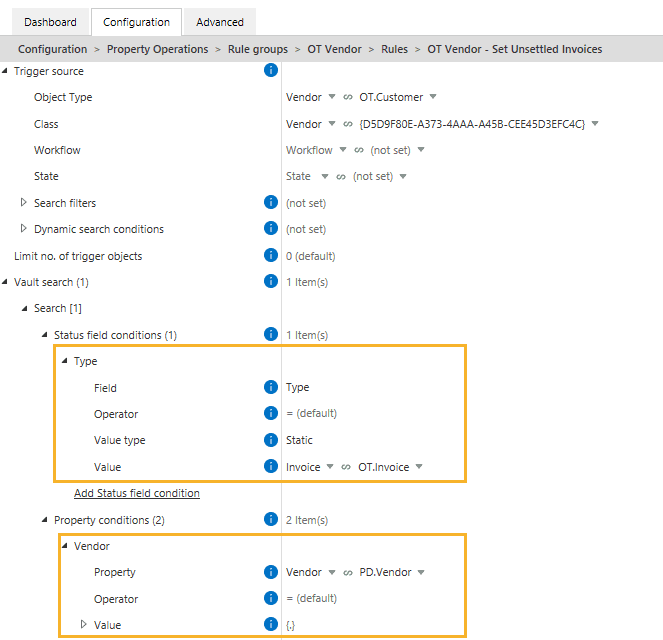
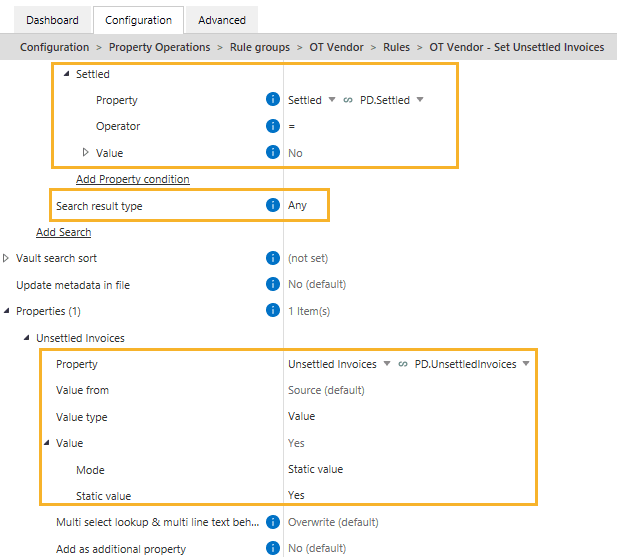
Example 2: Vendor has unsettled invoices (Search Result Type = Any)
In this case, the rule identifies each Vendor, finds all related Invoices using Vault Search, and checks if any invoice has the property Settled set to No. If even one such invoice exists, Vault Search returns a result, and the Unsettled Invoices property on the OT Vendor is set to Yes (Pictures 4 and 5).
Vault Search provides a powerful, flexible way to filter objects based on data spread across multiple objects in the vault. Along with the Orchestrator and Validation modules, Search filters, and Dynamic search conditions, Vault Search expands your ability to validate and automate processes on objects across the vault, increasing speed and efficiency in the configuration process.
Advanced scheduling with cron expressions
Advanced scheduling with cron expressions #
Need to run a rule every workday at a specific time, or just on the second Friday of each month?
The Scheduled trigger type in Extension Kit Core lets you define when rules should run. You can set basic frequencies like once, hourly, daily, etc. — but if you need more precision, you can create custom schedules using cron expressions.
What is a cron expression?
A cron expression is a five-part string that represents a schedule for executing tasks at specific times or intervals. Each part represents a unit of time:
- Minute (0-59)
- Hour (0-23)
- Day of Month (1-31)
- Month (1-12)
- Day of Week (0-6, where 0 = Sunday)
For example, a cron expression like 0 12 * * 1 would schedule a task to run at 12:00 PM every Monday.
Using cron in Extension Kit Core
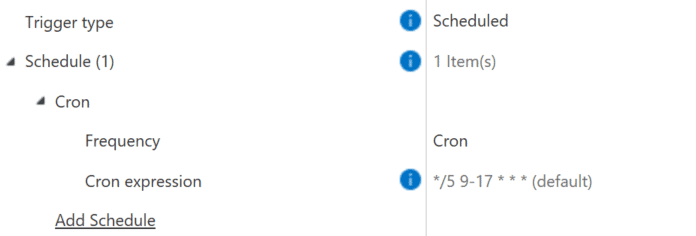
When scheduling with cron, Extension Kit uses this expression as a default value: */5 9-17 * * *
Which means: Every 5 minutes, from 9 AM to 5 PM, Monday through Friday (Picture 1).
Example use cases
Here are a couple of practical cron expression examples:
- Automated invoice syncing: Using the HTTP Integration module, fetch invoices from a service every 20 minutes during working hours:
*/20 9-17 * * * - Biweekly contract archiving: Using the Archiving module, archive contracts every second Friday at 5 PM:
0 17 */14 * 5
Not sure if your expression is correct? Use the cron helper to explore and test cron expressions easily.
If your process needs precise timing, cron expressions give you the flexibility to match your rules to real-world business schedules — down to the minute.
Use filename wildcards to target specific files
Use filename wildcards to target specific files #
When working with multi-file documents in M-Files, you often need to fetch or process only specific files within a multi-file document. That’s where filename wildcards in Extension Kit Core come in handy. They allow you to specify which documents to include or exclude.
What is a filename wildcard?
A filename wildcard is a special character (or set of characters) used to match filenames or patterns in file systems. It helps you filter and select the right document(s) when an object includes multiple files.
Example: Filtering specific files in a multi-file document
For example, let’s say you have a multi-file Contract document with the following files:
Annex_A.pdfAnnex_B.pdfContract.docxNDA.docx
You want to archive only the NDA documents for all employees using the Archive module. In this case, you would use the filename wildcard NDA, which will pick up all files containing “NDA” in their name, while ignoring Annex and Contract files (Picture 1).

Filename wildcards in EK Core
In Extension Kit Core, you mainly use two wildcard patterns:
- * that matches any number of characters Example:
file*matchesfile,file1,file_test.txt, etc. - File-type specific wildcards, like
*.pdf,*.docx,*.jpg
Example use case: Cleaning up multi-file email documents
Imagine your company receives invoices via email attachments in common formats like PDF, XLS, and DOC. In M-Files, you’ve configured the Connections to External Sources to import these emails with attachments into M-Files.
The resulting M-Files object is a multi-file document that may include:
- An image from the email signature (
.jpg) - The email body (
.html) - The actual invoice attachment in its original format
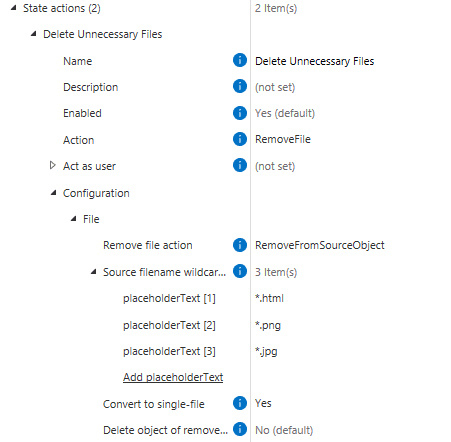
Since you only need the invoice, you can use the Document Processing module to create a rule that keeps only files matching *.pdf, *.xls, *.doc, and deletes the rest (like .html and .jpg) (Picture 2).
Using filename wildcards helps you easily target exactly the files you need from multi-file objects, keeping your objects clean and focused on the documents that matter.
Instantly update metadata within documents
Instantly update metadata within documents #
Keeping data in sync is even easier with Extension Kit Core. Did you know you can automatically update values within documents whenever metadata changes in M-Files, without the need for check-out?
Updating metadata in documents
When mapped properties are used in a document, they need to be updated each time a corresponding M-Files property changes. Typically, this would require checking out and checking in the document for the mapped properties to be updated.
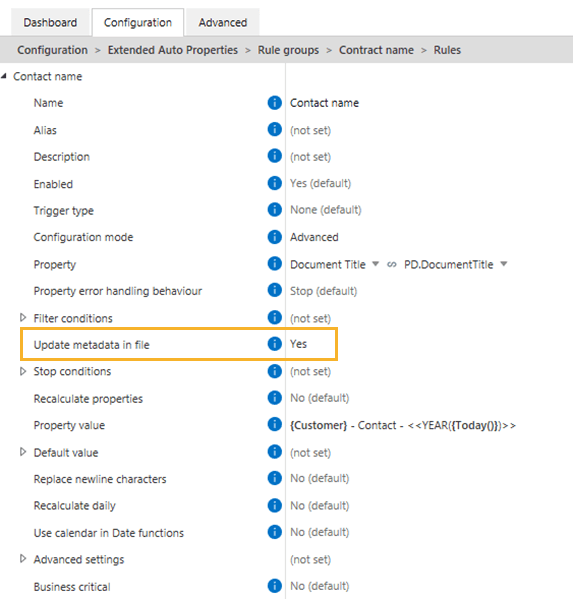
However, with the Update metadata in file setting, all changes are immediately visible in the preview section, even without checking out the document. This feature, available in advanced configuration mode, enables instant updates to any mapped properties whenever a corresponding M-Files property is modified by a rule in which this option is enabled.
Example
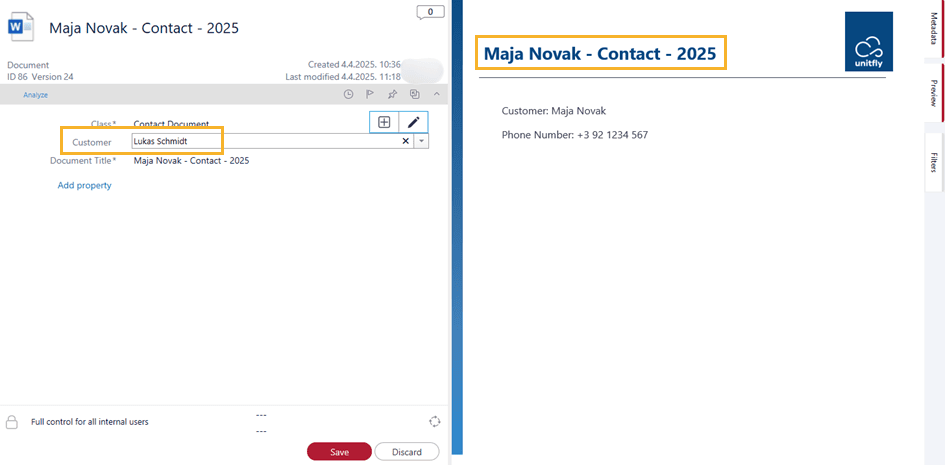
A Contact Document object has a Document Title property calculated via an Extension Kit rule (Picture 1). Every time the Customer changes in M-Files, all properties should be updated instantly within the associated document.

How it works
Instead of updating the value manually via document check-out and check-in, all you need to do is enable the Update metadata in file setting in the rule configuration of Extension Kit Core (Picture 2):
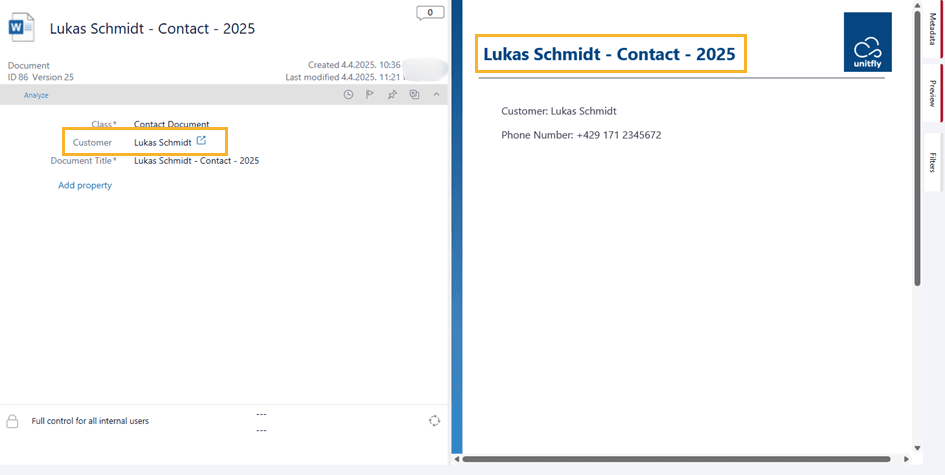
As a result, with any change of the property calculated by this rule, all mapped values within your document will update automatically. These modifications are instantly reflected in the preview card without the need for check-out (Pictures 3 and 4).
This feature ensures that your documents always reflect the latest metadata, reducing manual updates, unnecessary check-outs, and potential errors.
Optimizing rule execution with Monitored properties
Optimizing rule execution with Monitored properties #
When configuring rules in Extension Kit, it’s important to control how often they execute. By default, a rule is triggered by any change to the source object. However, not every change is relevant, and unnecessary executions can impact system performance.
To improve performance, use Monitored properties to specify which property changes should trigger the rule. This ensures that rules run only when needed, bringing several benefits:
- Reducing unnecessary executions: If no monitored properties are set, the rule runs on every object change, even when the modification is irrelevant. This can lead to excessive rule executions, consuming system resources unnecessarily.
- Optimizing system performance: Rules execute only when specified properties change, reducing the processing load on M-Files and Extension Kit, and improving overall system efficiency.
- Preventing workflow bottlenecks: Avoiding slowdowns caused by excessive rule executions.
- Enhancing precision and control: Ensuring rules respond only to meaningful metadata updates.
There is also a possibility of setting a condition under which a property would be monitored. If multiple Monitored property conditions are set, they are combined using the OR operator, meaning a change to any of them will trigger the rule.
Best practice: Always define Monitored properties when your rule only depends on specific metadata changes. This keeps your system efficient and responsive!
Keep your configuration safe with backups
Keep your configuration safe with backups #
Did you know you can backup configurations in Extension Kit Core?
When multiple people work on the same vault — adding rules or editing settings — unexpected errors can happen. In those moments, having access to an older configuration can save hours of troubleshooting.
Configuration backup settings
Under Advanced settings, the Configuration backup settings (Picture 1) let you automatically back up the configuration every time it’s updated.
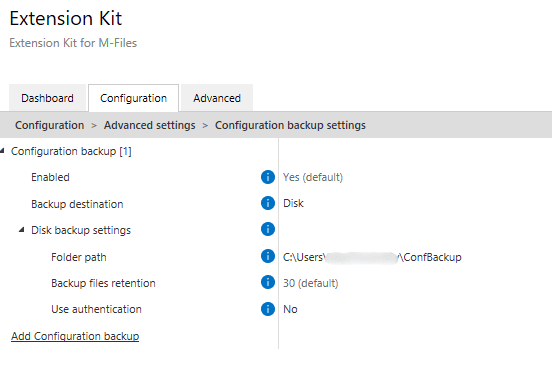
You can store backup to:
- Disk – specify a folder path.
- Vault – specify the object, class, and M-Files user.
- NVS – save directly to Named Value Storage.
For each destination, you can also set Backup files retention to determine how long to keep the backup files. If you set the value to 0, backups are never deleted based on age.
When to use backups
In test environments, frequent changes can generate many backup files, so you may want to disable Configuration backup there.
But in production, backups are a lifesaver. If an error appears, you can easily check whether a rule was added, something was deleted, or another change was made that could have caused the issue.
Choosing the right trigger: Object entered state vs Object left state
Choosing the right trigger: Object entered state vs Object left state #
Ever wondered whether to use Object entered state or Object left state in your rule? The difference may seem small, but choosing the right trigger is key to getting your workflow logic right.
In this tip, we’ll explore the same use case using both options to show how each one behaves.
Object entered state vs Object left state
- Object entered state: Executes the rule when the source object enters a specific workflow state.
- Object left state: Executes the rule when the source object leaves a specific workflow state.
Use case
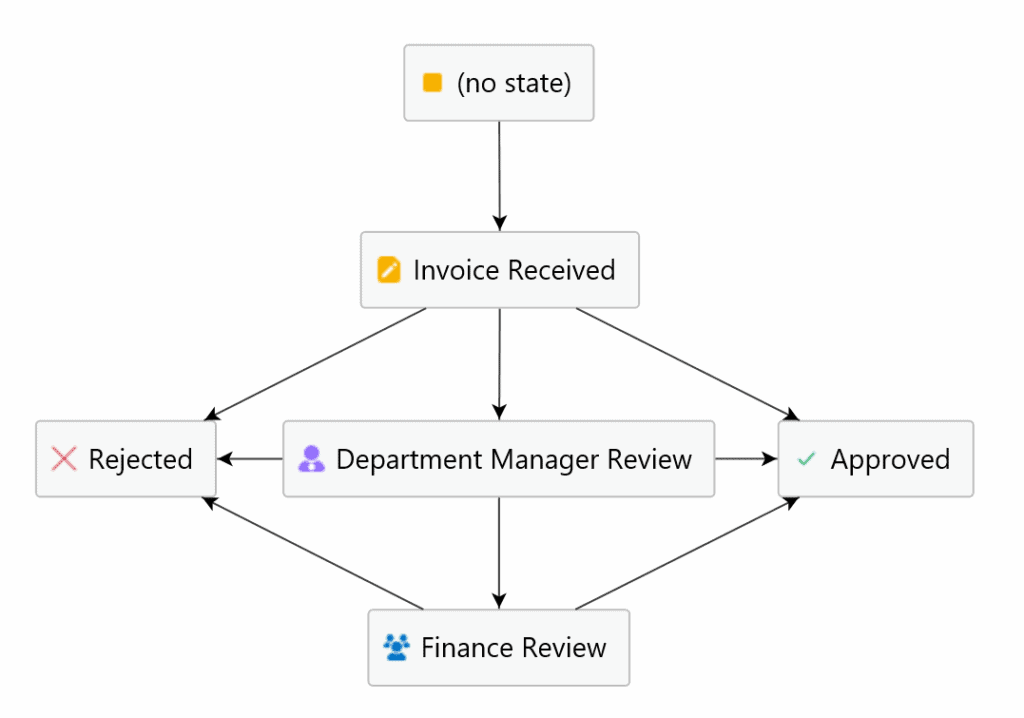
Let’s say an office manager receives invoices in the state Invoice Received. They can either approve or reject an invoice, but in some cases, the invoice must be reviewed by the Department Manager or the Finance team, who will then decide whether to approve or reject it (see the workflow in Picture 1).
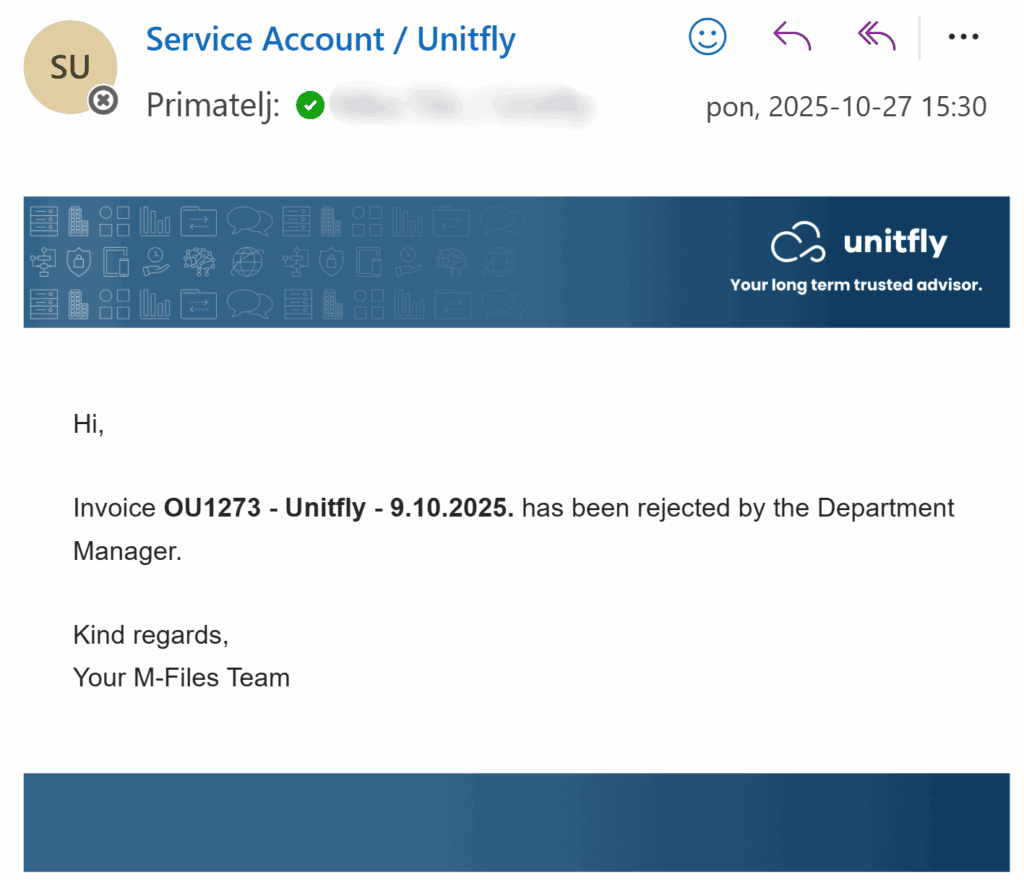
When an invoice is rejected, you want to send an email notification to the person listed in the Responsible Person property.
However, the right trigger depends on how detailed you want the information to be.
Example #1: When you only need to know that the invoice was rejected
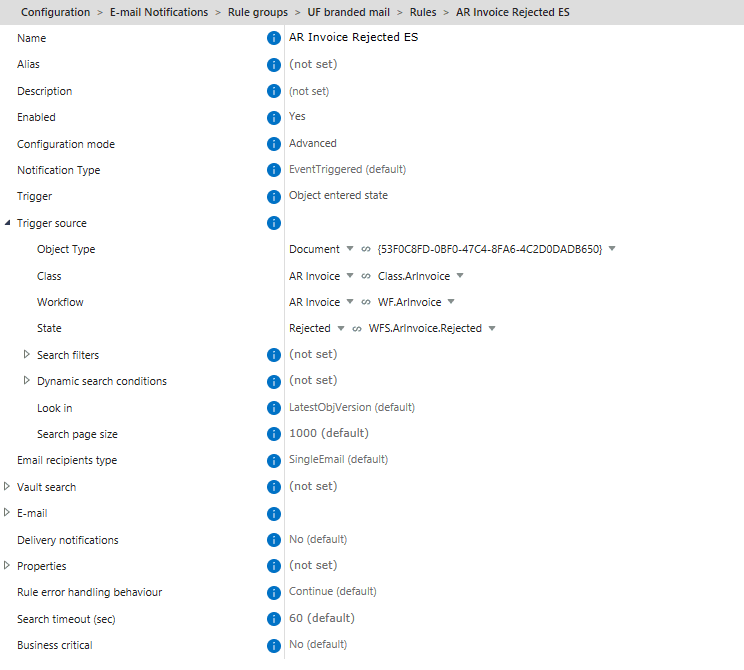
If you simply want the Responsible Person to receive a notification that the invoice has been rejected, regardless of who rejected it, use the Object entered state = Rejected trigger (Picture 2).
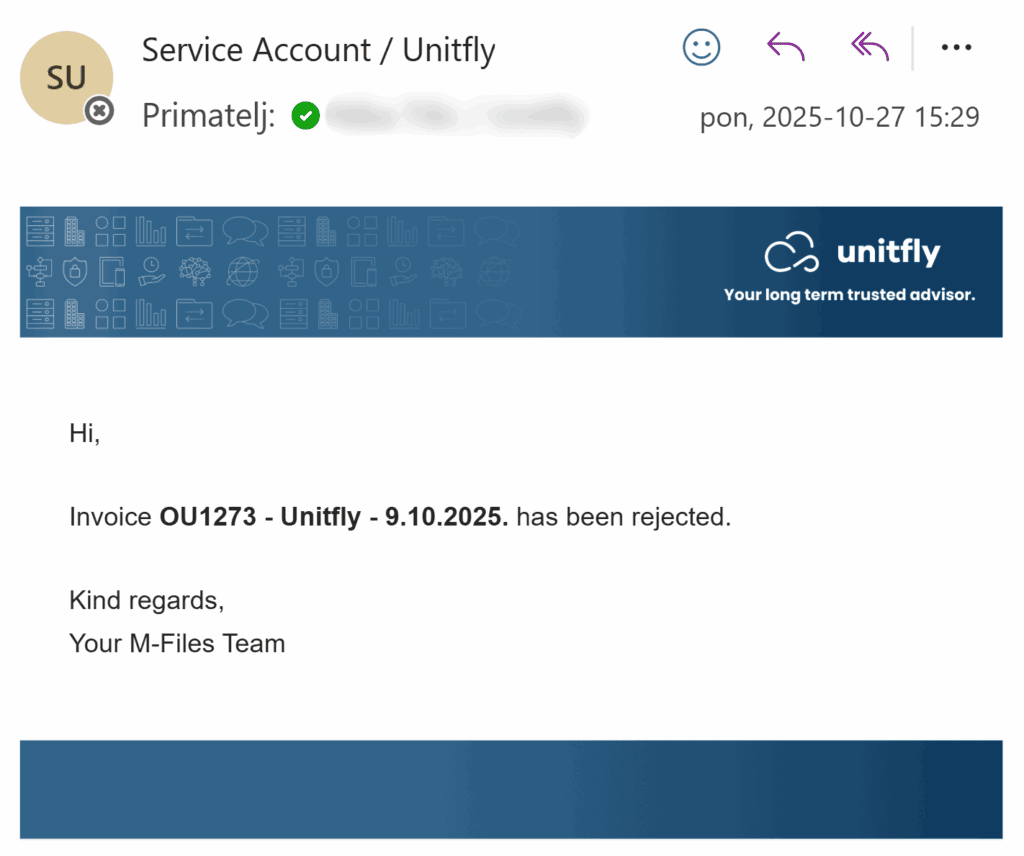
This way, whenever the invoice enters the Rejected state, the rule executes and sends the email (Picture 3).
Example #2: When you need to know who rejected the invoice
If you want to notify the Responsible Person who rejected the invoice, you can use the Object left state trigger. Each state (Invoice Received, Department Manager Review, Finance Review) will have its own rule that sends an email upon leaving that state.
However, since an invoice also leaves a state when it’s approved, you need to ensure emails are sent only for rejections. To do this, add a condition:
- In the Rejected state, the Rejection Reason property must not be empty.
- In the Approved state, the Rejection Reason property must be empty.
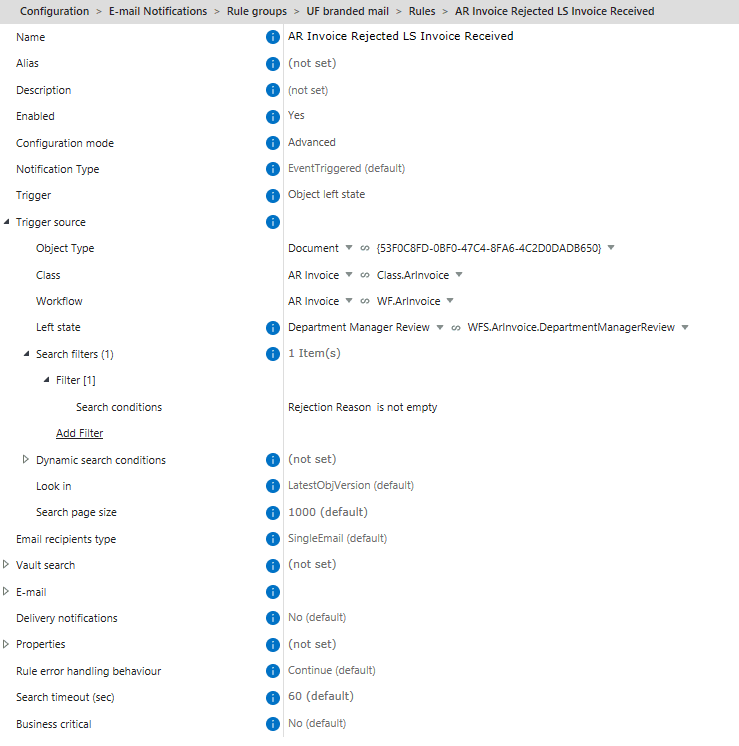
Then, in your Object left state rule, add the condition Rejection Reason is not empty (Picture 4).
This ensures the email is sent only when the invoice moves to Rejected, and you can include in the message who rejected it (Picture 5).
Conclusion
When the previous state contains information essential for the next steps in the process, the rule should be triggered when the object leaves that state. If all the necessary information is available in the state the object is entering, then trigger the rule when the object enters the state.
Managing Extension Kit Core versions
Managing Extension Kit Core versions #
Upgrading or downgrading your Extension Kit Core version is simple, but here are some important steps and tips to keep in mind:
1. Upgrading Extension Kit Core
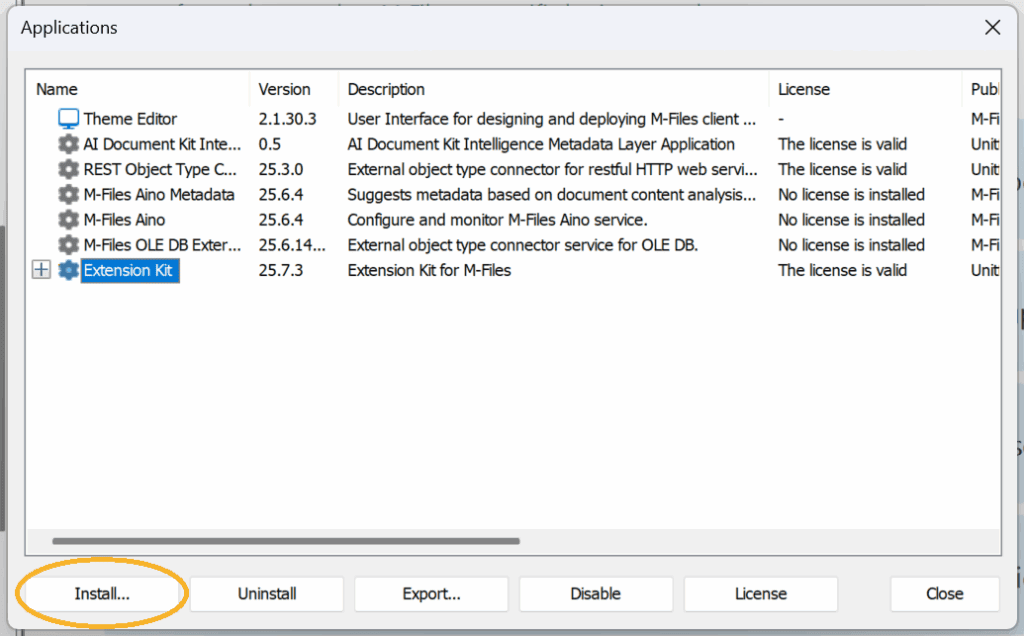
If you want to upgrade, select Extension Kit in your Applications, click Install, and the new version will be applied (Picture 1).
2. Downgrading Extension Kit Core
If you need to downgrade for any reason, you must Uninstall Extension Kit first, then Install the desired version (Picture 2). Before downgrading, note that it’s useful to export your entire configuration. This allows you to restore it easily if you later return to a higher version.

3. License installation
Whenever you change the Extension Kit Core version, always Install License again (Picture 3).

4. Refresh configuration
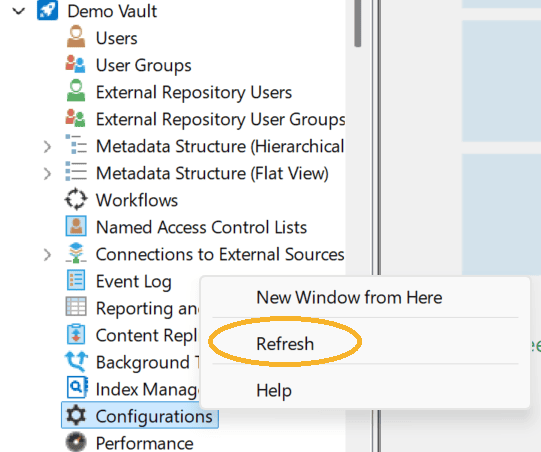
After changing versions, make sure to Refresh Configurations so that all changes are synced correctly (Picture 4).
Ways to create objects in Extension Kit Core
Ways to create objects in Extension Kit Core #
Extension Kit Core makes creating objects in M-Files convenient and efficient, no matter where your data comes from. Covering a wide range of business use cases, it gives you incredible flexibility to automate and streamline object creation.
Here are the eleven modules where objects can be created:
- Object Operations – Create objects based on a trigger. For example, when an Employee object moves to the Active state, an NDA can be created automatically.
- HTTP Integration – Create objects directly from an HTTP response.
- SQL Integration – Create objects from an SQL query response.
- Excel Reader – Create objects from data stored in Excel sheets.
- Word Reader – Create objects using data extracted from Word documents.
- Document Processing – Create new objects when splitting or merging documents.
- Data Transfer – Create objects when importing documents from SFTP or file shares.
- Vault to Vault – Create objects in the current vault or in another vault.
- Reporting – Generate a report as a new object.
- Archiving – Save compressed or decompressed files as new objects.
- Extension Methods – Create new objects via custom extension methods.
Whether you’re working with imported files, documents, APIs, or metadata, Extension Kit Core lets you automate object creation in the way that best fits your process.
Relationship between Execution Mode and Copy Mode
Relationship between Execution Mode and Copy Mode #
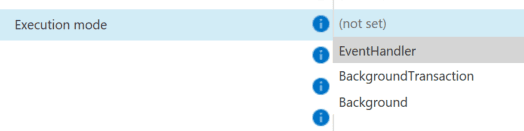
As part of Extension Kit’s advanced configuration, the Execution mode feature allows you to define when a rule is executed.
Understanding Execution Mode options
The key difference between the execution mode options lies in when the changes are applied:
- EventHandler: Executes changes during the object check-in process.
- Background and BackgroundTransaction: Executes changes after the object has been checked in.
How Execution Mode relates to Copy Mode settings
The Copy mode settings within the Property Operations module directly influence the default Execution mode:
- When Copy mode is set to FromSourceToTarget, the default Execution mode will be BackgroundTransaction.
- When Copy mode is set to OnSourceObject, the default Execution mode will be EventHandler.

While you can customize these settings to suit your specific use case, it’s important to understand the relationship between these two functionalities to ensure optimal configuration. For a more detailed explanation of Execution mode, please refer to the documentation here.
Understanding Direct vs. Indirect Reference Direction
Understanding Direct vs. Indirect Reference Direction #
In Extension Kit, some modules allow you to search and find target objects via a specific property. When doing so, you have the option to specify the reference direction.
Let’s dive into what this feature means and how to distinguish between direct and indirect reference directions.
Direct vs. Indirect Reference
When establishing a relationship between a source object and a target object, the connection can be either direct or indirect:
- Direct Reference (Default): Use this option when the source object directly references the target object through a specific property. This means the source has a direct link to the target, which can be used to identify and manipulate the target.
- Indirect Reference: Select this option when the target object references the source object. In this scenario, the relationship is reversed—the target knows about the source, not the other way around.
Example
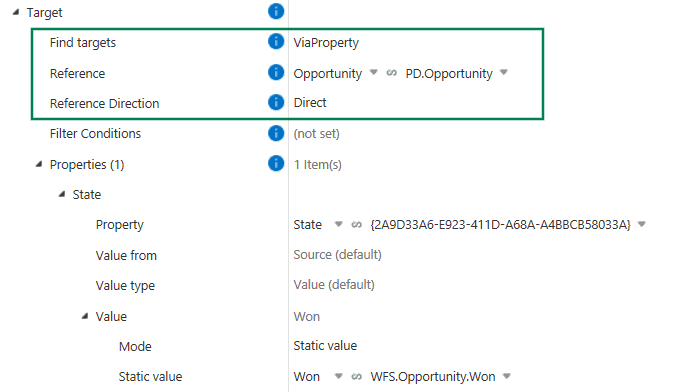
Consider a scenario where you want to automatically change the workflow state of an Opportunity to “Won” whenever an Offer reaches the “Accepted” state. This is achievable with the Property Operations module.
- Trigger Source: Offer
- Target: Opportunity
Here’s how the reference directions work in this example:
- Direct Reference direction: If the Offer object has a property named Opportunity, which is a lookup to Opportunity objects, this is a direct reference. When the Offer’s state changes to “Accepted”, the system will find the associated Opportunity using the direct reference and set its workflow state to “Won”.
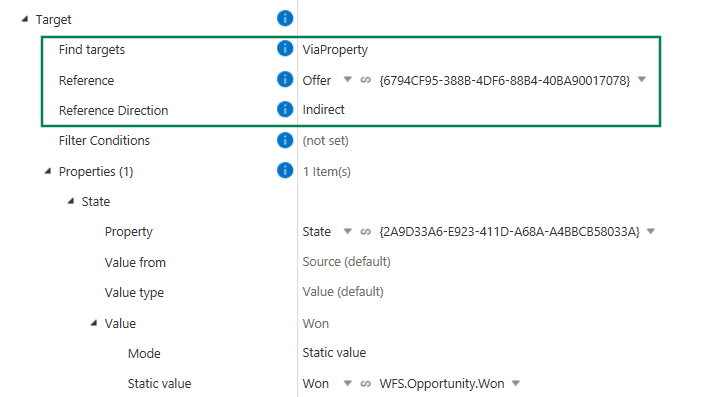
- Indirect Reference direction: Suppose the Offer does not have a direct reference to the Opportunity. Instead, the Opportunity has a reference to the Offer. In this case, you would set the reference direction to indirect. By specifying that the reference property is the Offer, the system will locate the Opportunity that references the Offer and update its state to “Won” accordingly.
Understanding whether to use a direct or indirect reference is key to ensuring that your automation workflows behave as expected.
Take full advantage of the Dashboard
Take full advantage of the Dashboard #
Whether you’re testing rules, tracking background tasks, or just checking your license status, the Dashboard in Extension Kit Core is your go-to place for everything happening behind the scenes.
Let’s break it down.
Key application info
The top section of the Dashboard (Picture 1) gives you essential details:
- Extension Kit Core version
- License status (valid or expired)
- List of licensed modules
- Service data such as serial number, license expiry date, and SEQ API key (for log tracking in SEQ)
You’ll also find two useful buttons:
- Refresh Dashboard: Updates rule execution and scheduling status. Especially useful during testing (e.g., Run Once/Scheduled rules) or when monitoring long-running rules.
- Destroy Task Queues: Emergency only! Clears all queued rules. This is helpful during testing if a rule locks the vault, but avoid using it in production, as it may disrupt valid rule execution.

Modules overview
The module table (Picture 2) displays:
- Module’s status (enabled/disabled)
- A short description of each module

If a module supports Run Once execution, you’ll see dedicated buttons to:
- Execute RunOnce Rules
- Stop RunOnce Rules
Once configured, any active RunOnce rules are listed right below the module description for easy tracking. After execution, completed rules are moved to the RunOnce rules table in the Dashboard.
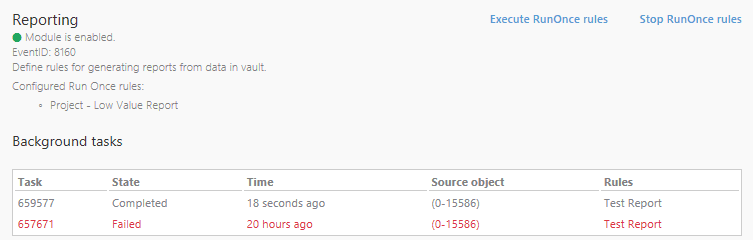
Monitor background tasks
If a rule is configured with Execution Mode: Background, a dedicated Background Tasks table appears in the Dashboard. This helps you track the execution status and catch issues as they happen. Below is an example of a RunOnce rule in the Reporting module with the background tasks listed (Picture 3).
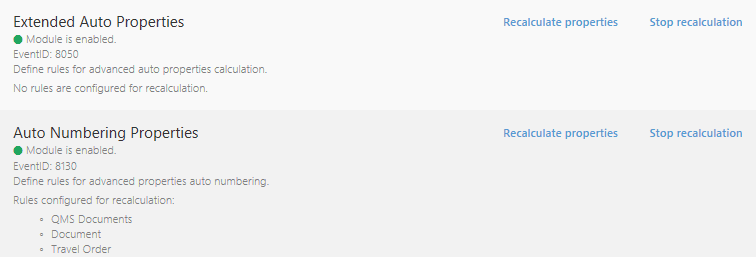
Recalculate properties with one click
For the Extended Auto Properties, Auto Numbering, and Property Builder modules, the Dashboard gives you control over property recalculation:
- Recalculate Properties: Triggers recalculation on all relevant objects.
- Stop Recalculation: Halts the process if needed (Picture 4).
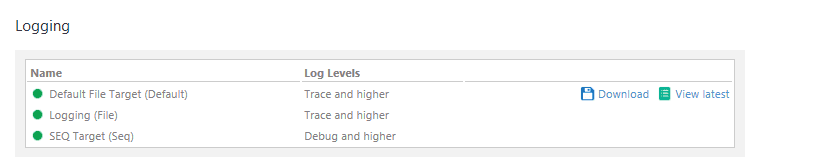
View & download logs
If Logging is enabled and a Default target is set, users can:
- View the latest logs
- Download logs directly from the Dashboard
You’ll also see a list of all configured log targets (e.g., File, SEQ) along with their corresponding log levels. (Picture 5)
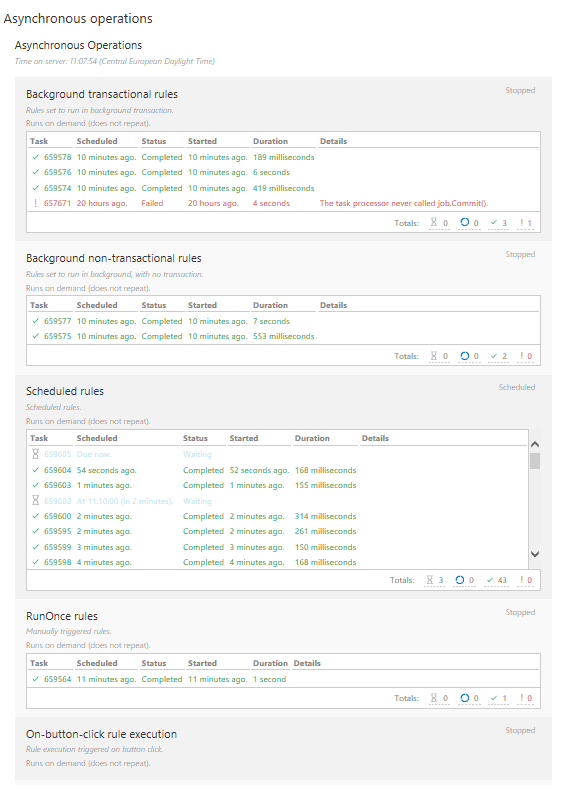
Track asynchronous rule execution in real time
The Asynchronous Operations section (Picture 6) shows the status of rules that aren’t triggered by event handlers. You can monitor:
- Execution status (Completed/Failed)
- Scheduling status
- Errors or misconfigurations
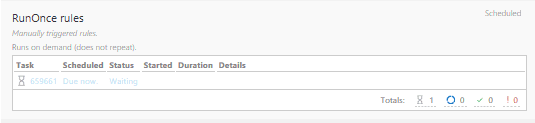
Tip: Use the Refresh Dashboard button to update the table and check current statuses. For example, if you run a rule using the Execute Run Once rules button, it will appear in the table immediately (Picture 7), but it won’t show as Completed or Failed until you refresh.
The Dashboard is packed with insights that help you troubleshoot faster, manage smarter, and test safer.
Keep your Extension Kit configuration organized
Keep your Extension Kit configuration organized #
As your Extension Kit Core configuration grows, keeping it organized becomes key. To help you maintain an orderly configuration, here are some best practices for managing Rule groups, Rules, Descriptions, and Aliases.
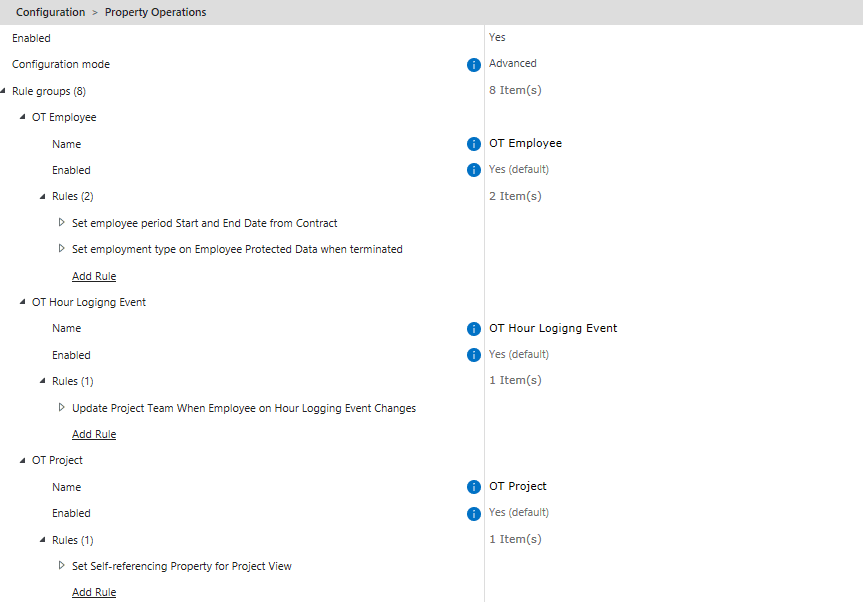
Rule groups and rule names
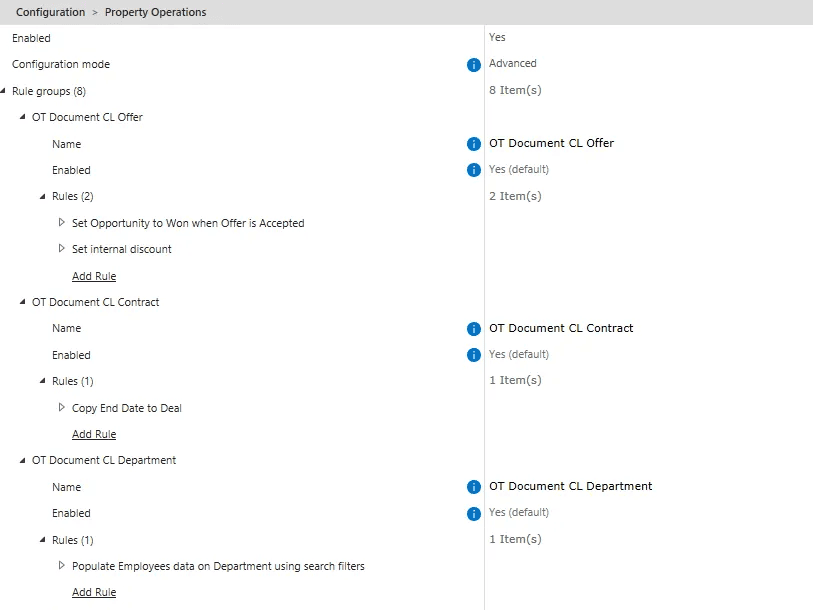
- As each module is designed to have rule groups that can contain one or more rules, a good starting point is to structure rule groups based on M-Files Object Types, and then organize rules within the groups based on actions performed on the objects (Picture 1). To name rules, use descriptive titles that clearly explain what the rule does and which classes it affects.
- For Object Types with many classes, like OT Document, it makes sense to organize and name rule groups by Object Type and Class, and rules by specific actions (Picture 2):
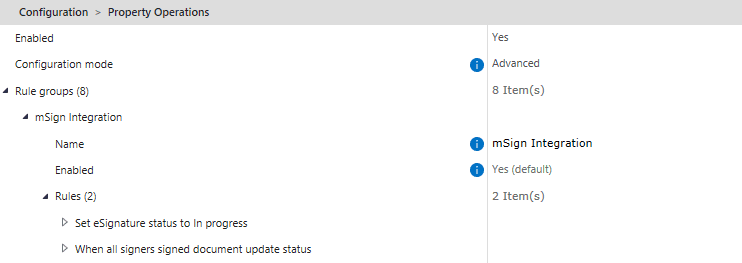
- Sometimes it’s best to create rule groups for a specific action, so changes can be made without searching through the entire module. For example, if mSign performs actions on both OT Document and OT mSign Signature objects, place them in the same rule group rather than splitting them by object type (Picture 3):
Rule descriptions
The Description field is crucial for future edits or when handing over your configuration to someone else (Picture 4).
Think of descriptions like comments in coding – they make navigating and maintaining your configuration much easier, even if they feel like extra work at first.

Aliases
Aliases are essential for making rules accessible across modules:
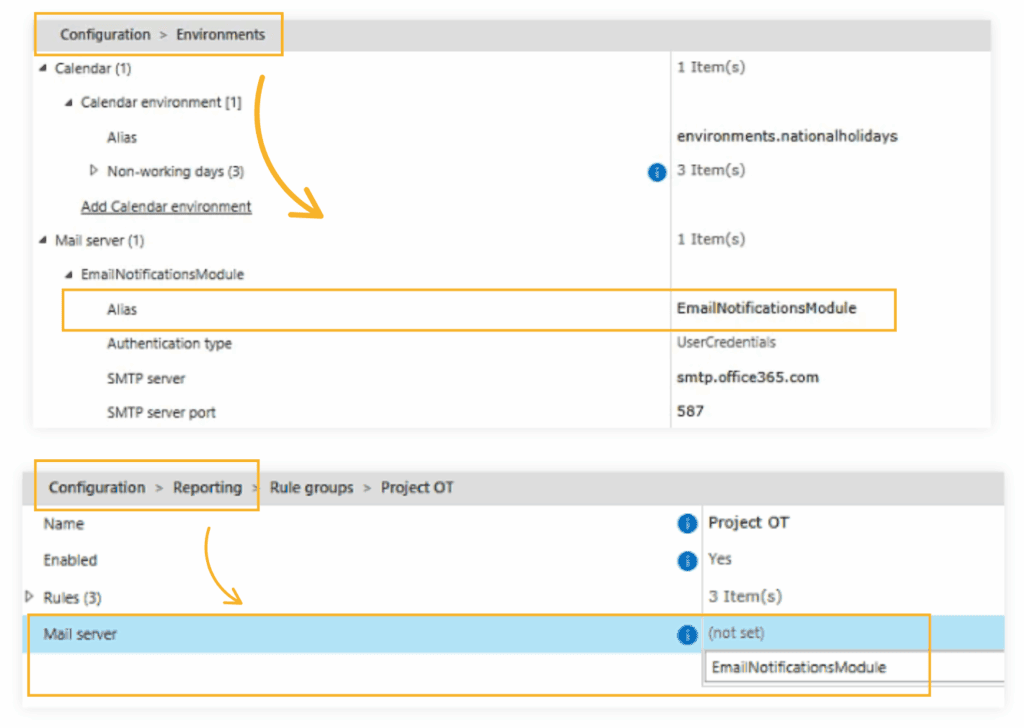
- Without an alias, configurations set in the Environments module cannot be used in other modules (Picture 5).
- In the Orchestrator module, only rules with aliases are visible in the configuration.
Tip: After adding an alias, refresh your configuration and/or restart the vault to ensure it’s visible in other modules.
A well-organized configuration makes your Extension Kit Core setup easier to maintain, reduces errors, and saves time in the long run.
Multi-level references
Multi-level references #
Reaching referenced objects in M-Files got easier and faster. Beyond single-level references, you can now find targets using multi-level references in Extension Kit Core.
Let’s break down the difference between these levels and see how you can use them.
Single-level reference
If you want to reach an object that is directly or indirectly referenced on the trigger object, you can use a single-level reference.
Example:
Suppose a Project is your trigger object. You want to find all Tasks related to that Project. A single-level reference works if:
- The Project object contains a direct reference to its Tasks, or
- The Task object contains a reference back to its Project (indirect reference). (Picture 1)
But what if the trigger and target objects aren’t directly connected by references?
Multi-level reference
A multi-level reference is a chain of connected objects that helps you reach target objects through multiple reference levels. Each level can be filtered, and connections can be direct or indirect.
This allows Extension Kit to follow relationships that aren’t immediately visible on the trigger object, without performing additional vault searches.
Example:
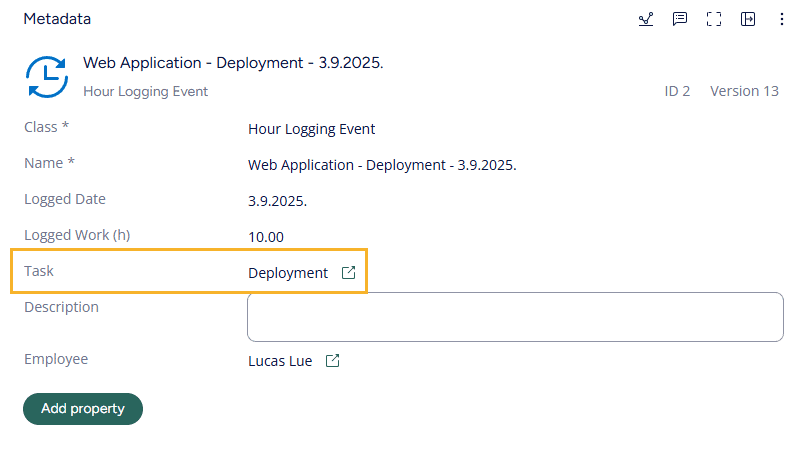
You want to find all Hour Logging Events (HLEs) related to the Project’s Tasks. HLEs aren’t referencing the Project, but only the Task (Picture 2), so reaching these HLEs isn’t possible using single-level references alone.
Before multi-level references, you had to search all HLEs in the vault and then filter those whose Task belongs to that Project.
Now, with multi-level references, you can follow the chain Project → Task → HLE and reach those HLEs even though they aren’t directly connected to the Project.
Configuration example
A rule triggers on the Project and is designed to send a report of all related HLEs to the Project Manager. Using multi-level references, the rule automatically:
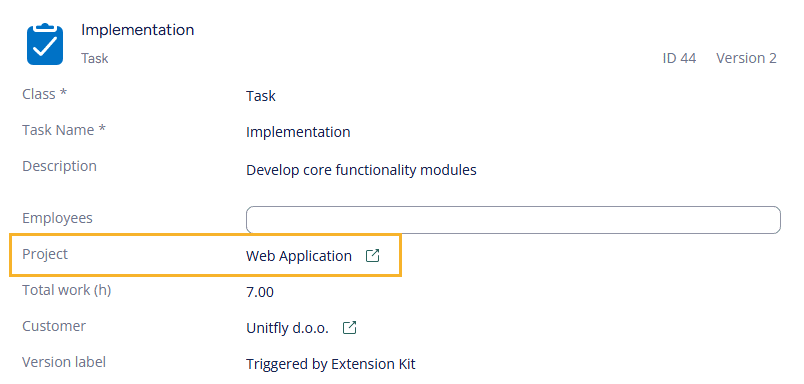
- Finds all Tasks where
PD.Projectreferences the Project. - Finds all HLEs where
PD.Taskreferences any of those Tasks. (Picture 3)
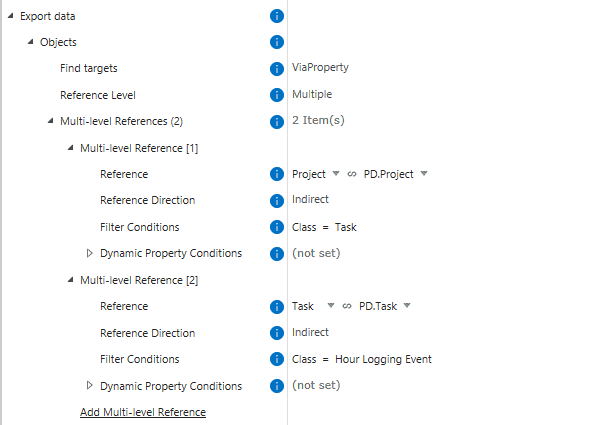
Result: A simpler configuration, no vault search needed, and much faster rule execution.
Customizing Logging in Extension Kit Core
Customizing Logging in Extension Kit Core #
In addition to developing new features, our team continuously works on improving logging — tracking all tasks executed within Extension Kit Core. Clear and consistent log messages make it much easier to develop, test, and automate any process.
Logging in Extension Kit Core
Logging can be fully customized to fit your needs, with all details defined directly in the configuration:
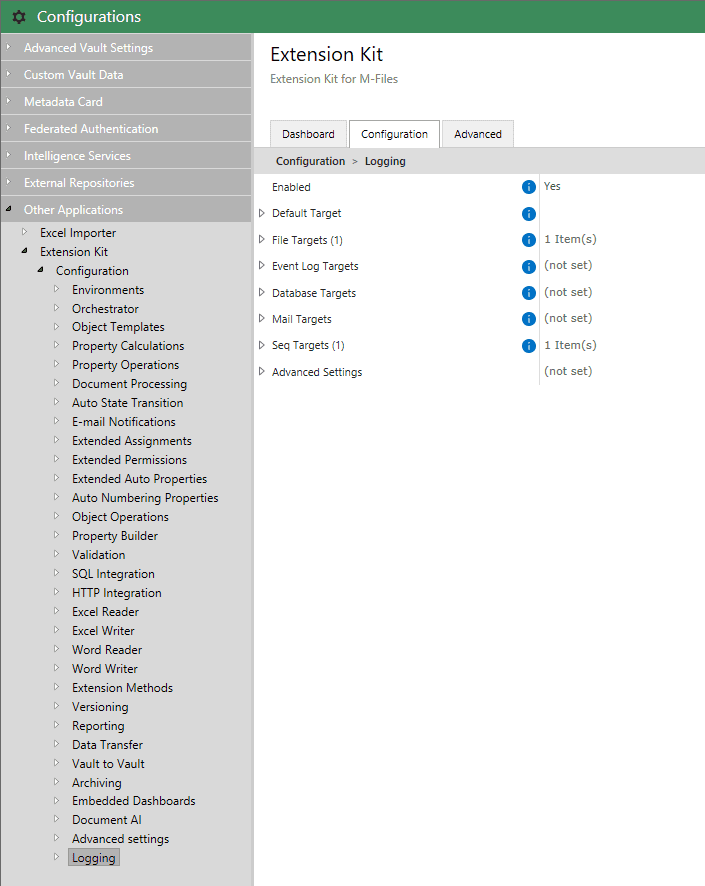
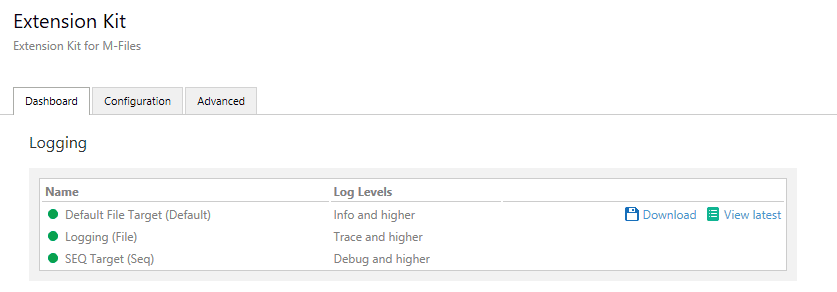
Within the configuration, you can define one or more targets (locations where logs will be exported). The Default File Target refers to logs that can be downloaded directly from the Dashboard:
Example
Let’s look at setting up a File target.
- The Default Log Level can be adjusted based on your needs and can be set to Trace, Debug, Info, Warning, Error, or Fatal. A recommended best practice is:
- For a detailed overview when troubleshooting issues, use Debug level (note that Trace is extremely detailed)
- For general operation, especially in production environments, use Info level
For example, once your production setup is stable and error-free, you can keep the log level at Info. If an issue occurs, temporarily switch to Debug or Trace to investigate, and then revert to Info once the issue is resolved.
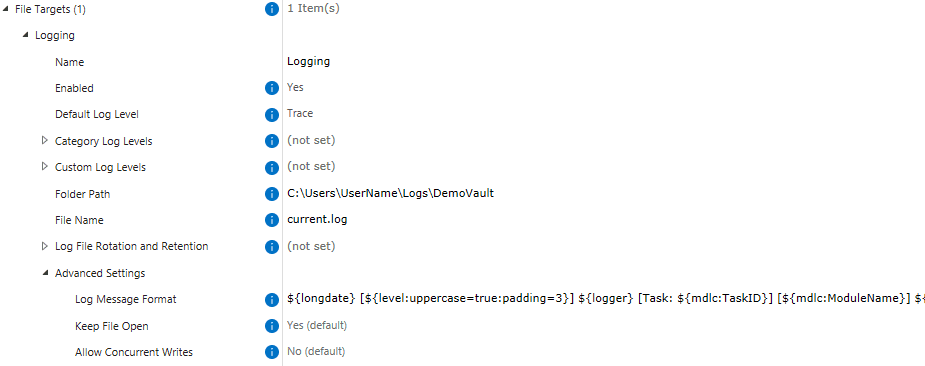
- After selecting the log level, define the Folder Path where the logs will be exported.
- Under Advanced settings, you can also specify the Log Message Format. The recommended log message format is:
${longdate} [${level:uppercase=true:padding=3}]${logger} [Task:${mdlc:TaskID}] [${mdlc:ModuleName}]${mdlc:Vault}${mdc:Rules}${message}${onexception:${newline}${exception:format=ToString:innerformat=ToString:separator=\\\\r\\\\n}}
For additional guidance, explore more tips for efficient Logging in Extension Kit Core.
Although logs may initially seem complex and difficult to follow, with a bit of practice, they become an extremely valuable source of information and a powerful tool for testing and troubleshooting potential configuration issues.