Welcome to Expert Tips — a growing collection of practical tips and real-world examples to help you get the most out of Extension Kit Core.
This page focuses on the following modules: E-mail Notifications, Reporting, Environments, Orchestrator, Embedded Dashboards, Extension Methods, Auto State Transition, plus Logging.
To get a new expert tip delivered to your inbox every week, subscribe to the Tip of the Week newsletter here.
E-mail Notifications
HTML formatting and attachments in email notifications
HTML formatting and attachments in email notifications #
Want your M-Files email notifications to look clean, professional, and visually appealing (think branded headers, styled sections, or CTA buttons)?
With the Email Notifications module in Extension Kit Core, you can send emails that not only reflect your brand using custom HTML but also include attachments directly from M-Files.
Why use this module?
The Email Notifications module gives you the flexibility to design emails that match your communication style:
- Create rich, styled layouts using custom HTML
- Attach documents or files from M-Files objects
- Trigger notifications based on any event or condition
Example configuration
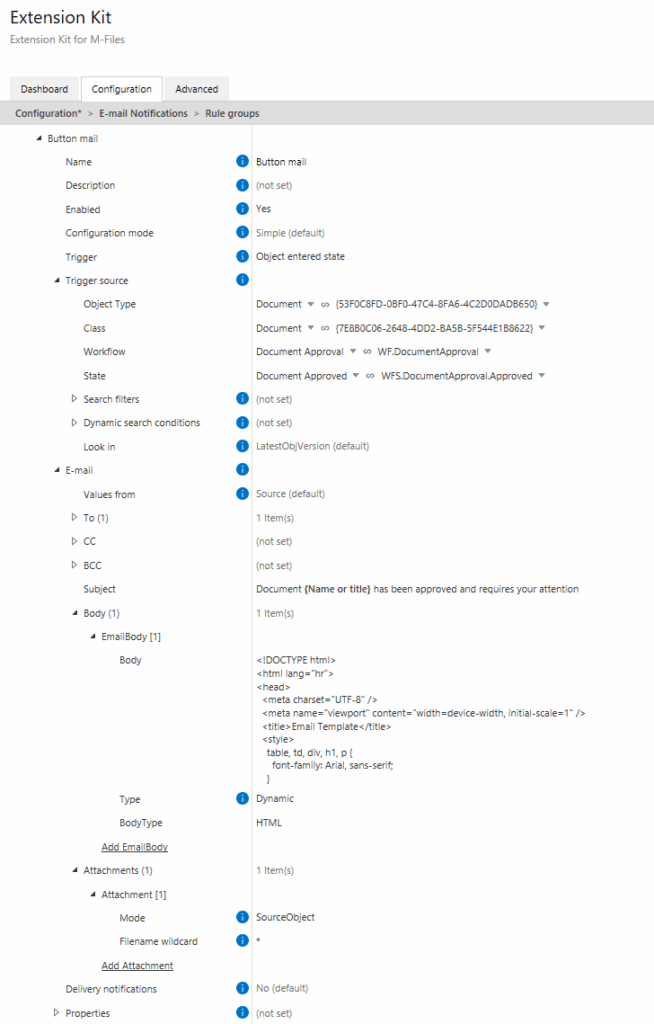
Let’s say you want to send a notification when an object enters a specific state. The email should:
- Match your brand style
- Include a document attachment
- Feature a call-to-action button
Here’s how you can configure it (Picture 1):
And here’s what the final email looks like — clean, styled, and effective (Picture 2):
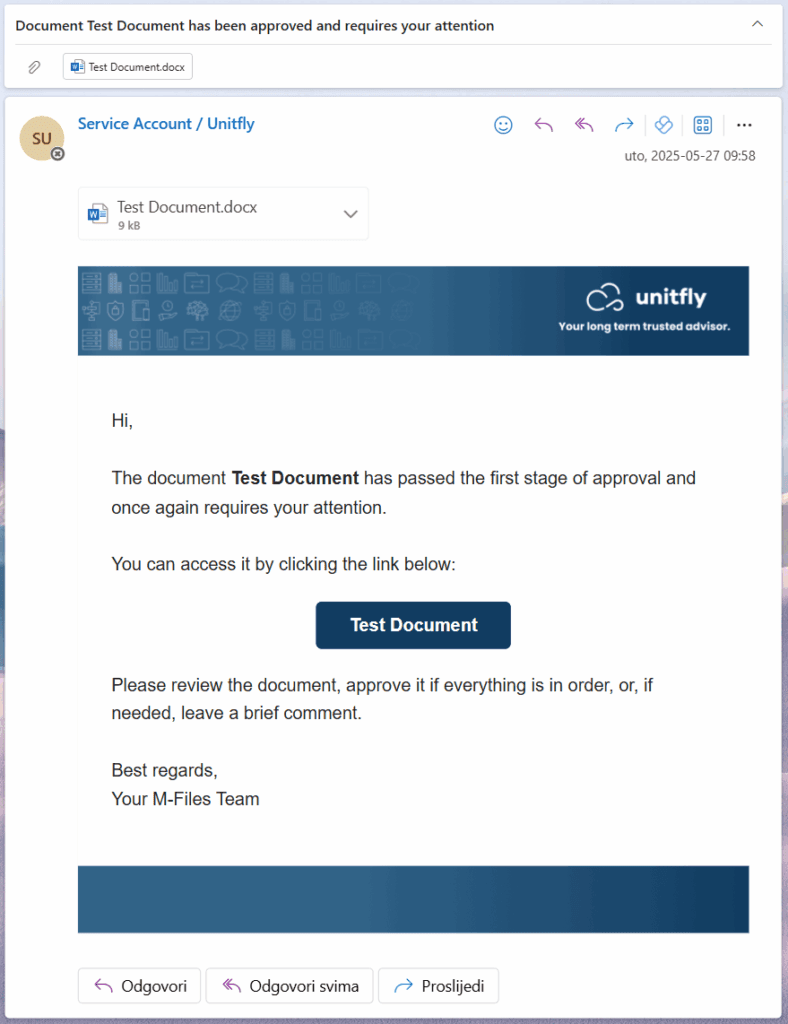
You can still send plain-text notifications if you prefer. But if you’re aiming for a branded or more complex layout, HTML gives you full creative control.
Automatically send documents as email attachments
Automatically send documents as email attachments #
With Extension Kit Core, you can easily set up rules to automatically send selected documents from M-Files via email, exactly when you need and to the right recipients. A smart way to save time and make sure the right files reach the right people.
Use case
A simple example: when a project moves to the Approved state, the project manager (PM) automatically receives all related documentation via email.
Configuration
All project documentation is attached to the Project OT, containing both PDF and DOCX files (Picture 1).

Picture 1: Project documentation contains both PDF and DOCX files.
The rule is configured to select only PDF files and send them to the PM (Picture 2), using the
*.pdf filename wildcard.
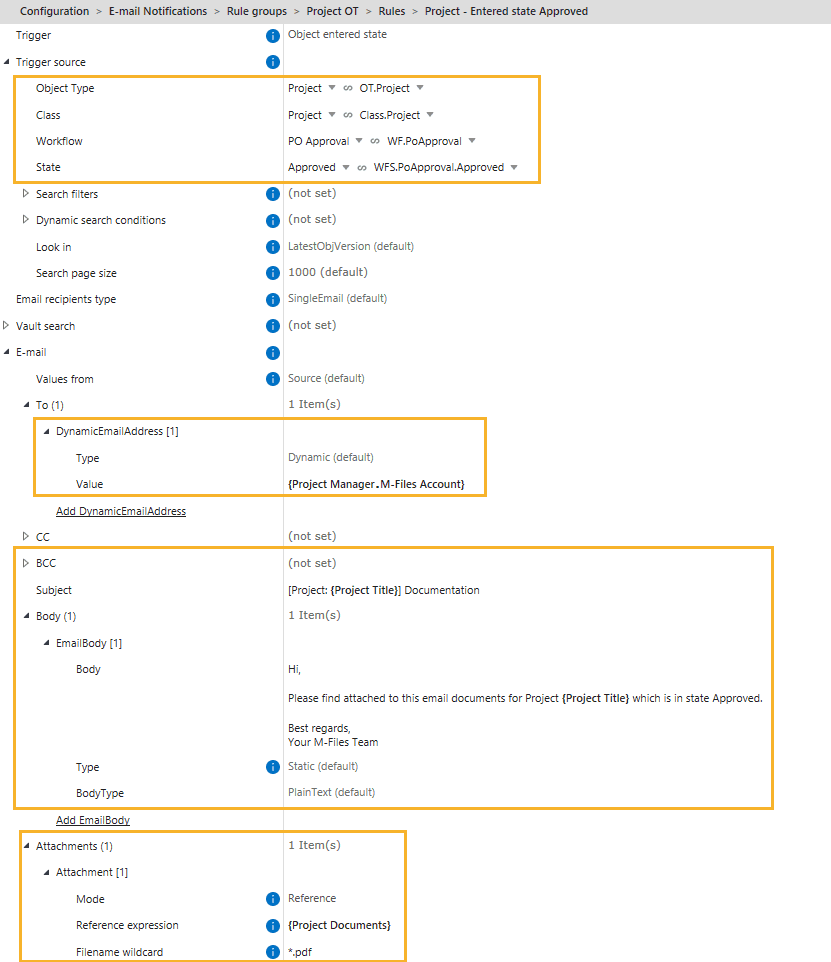
Picture 2: Configuration in the E-mail Notifications module.
Result
The PM receives an email with only the project’s PDF files attached (Picture 3).
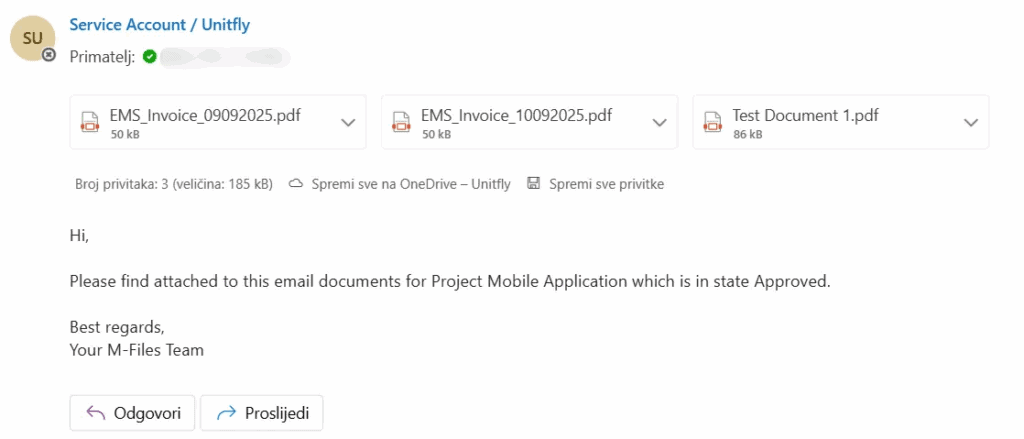
Picture 3: The email with only PDF files attached.
Reporting
Understanding rule execution in the Reporting module
Understanding rule execution in the Reporting module #
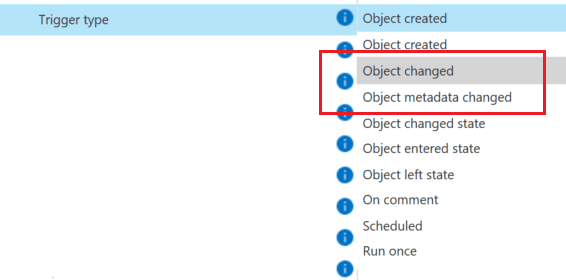
In the Reporting module, it’s important to note a key behavior when using certain trigger types combined with a specific export destination.
Prevented rule execution
In the Reporting module’s rule configuration, if the Trigger type is set to ObjectChanged or ObjectMetadataChanged and the Export destination is Vault, the rule will not be executed. This occurs because adding a report to the source object is detected as an object change, which would normally re-trigger the rule, potentially causing a loop. To prevent the looping, the system will not execute the rule. This event will be persisted in the log and noted in the validation messages within the configuration.

How to resolve the issue
If your rule is not executing as expected due to this configuration, there are two main solutions:
- Change the Trigger Type: Modify the trigger type to something other than ObjectChanged or ObjectMetadataChanged.
- Use Monitored Properties: Add a specific property to Monitored properties, ensuring that the rule executes only when the specified property changes on the source object.
Flexible reporting: Choose your format and destination
Flexible reporting: Choose your format and destination #
The Reporting module allows you to quickly and easily extract raw data from M-Files and turn it into structured reports. You can define which objects and classes to include, choose the export format, and decide where the report should be delivered.
Here’s how a simple report looks in each of the four supported export formats.
Export file formats and destinations
Available formats:
- HTML
- Word
- Excel
- CSV
Reports can be:
- Sent by email
- Stored in the vault
- Saved to disk
- Uploaded to an SFTP location
Example configuration
Here’s an example of a rule that generates a report containing information about employees in a company. The rule collects all objects of the Employee class (OT Person) and exports their properties in a predefined format (see Pictures 1 and 2). The report is then sent via email and includes the following properties:
- Display Name
- First Name
- Last Name
- Department Name
Export format: HTML
The export format in this configuration is HTML, which is delivered directly in the email body (Picture 3).

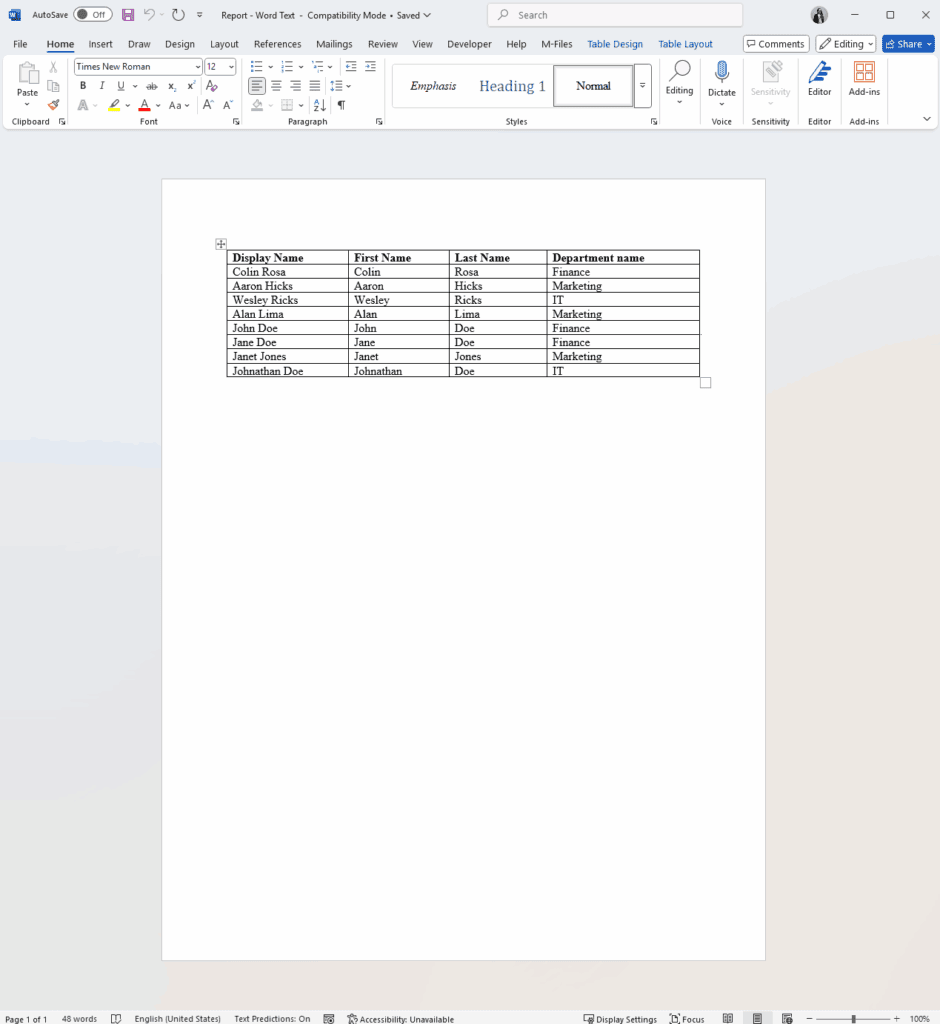
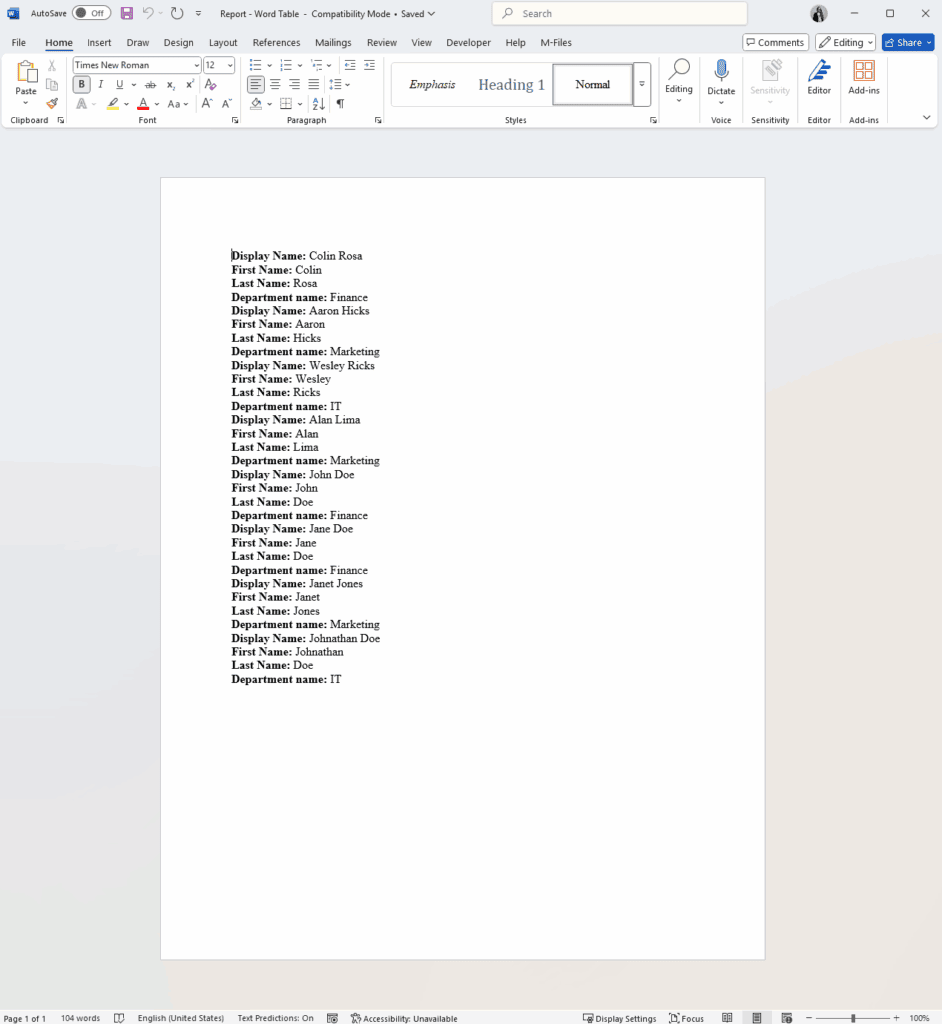
Export format: Word
To export data to Microsoft Word, select Word as the export format in the configuration. You can choose between a table (Picture 4) or a text layout (Picture 5). The report is sent as an email attachment.
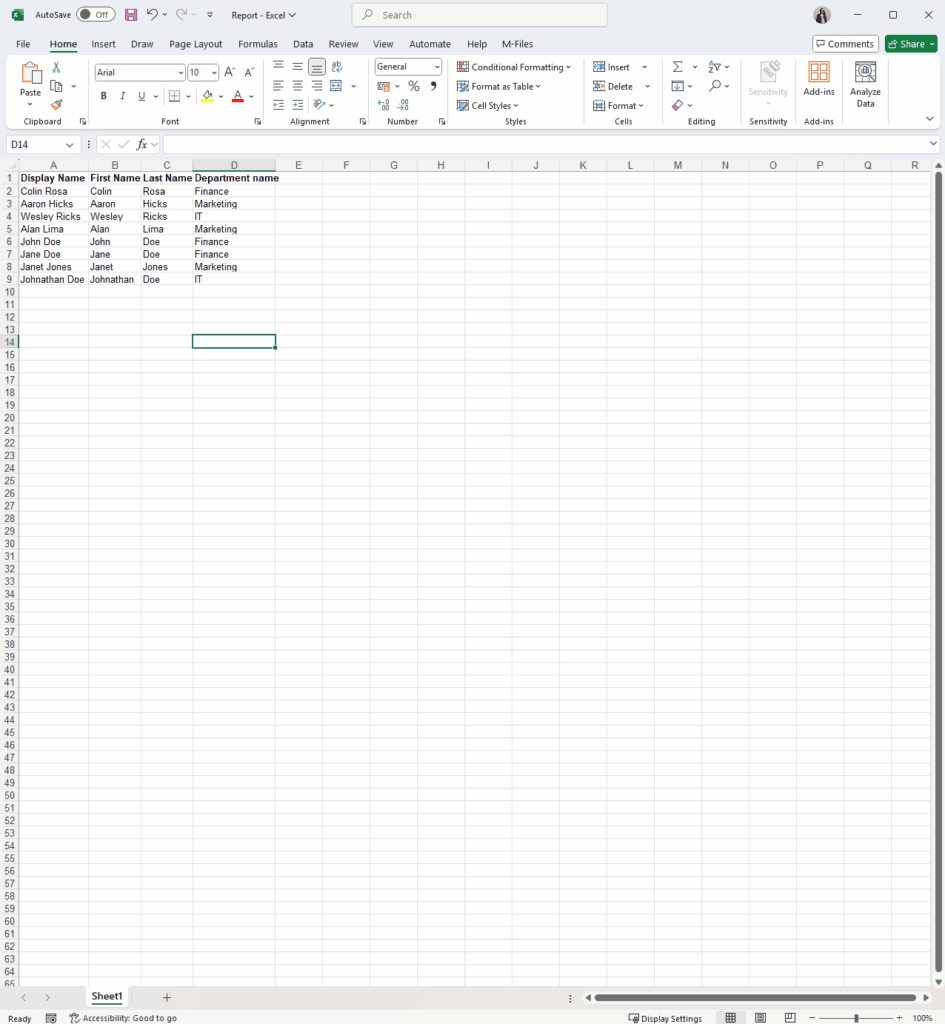
Export format: Excel
To export data in an Excel file, select Excel as the export format in the configuration (Picture 6).
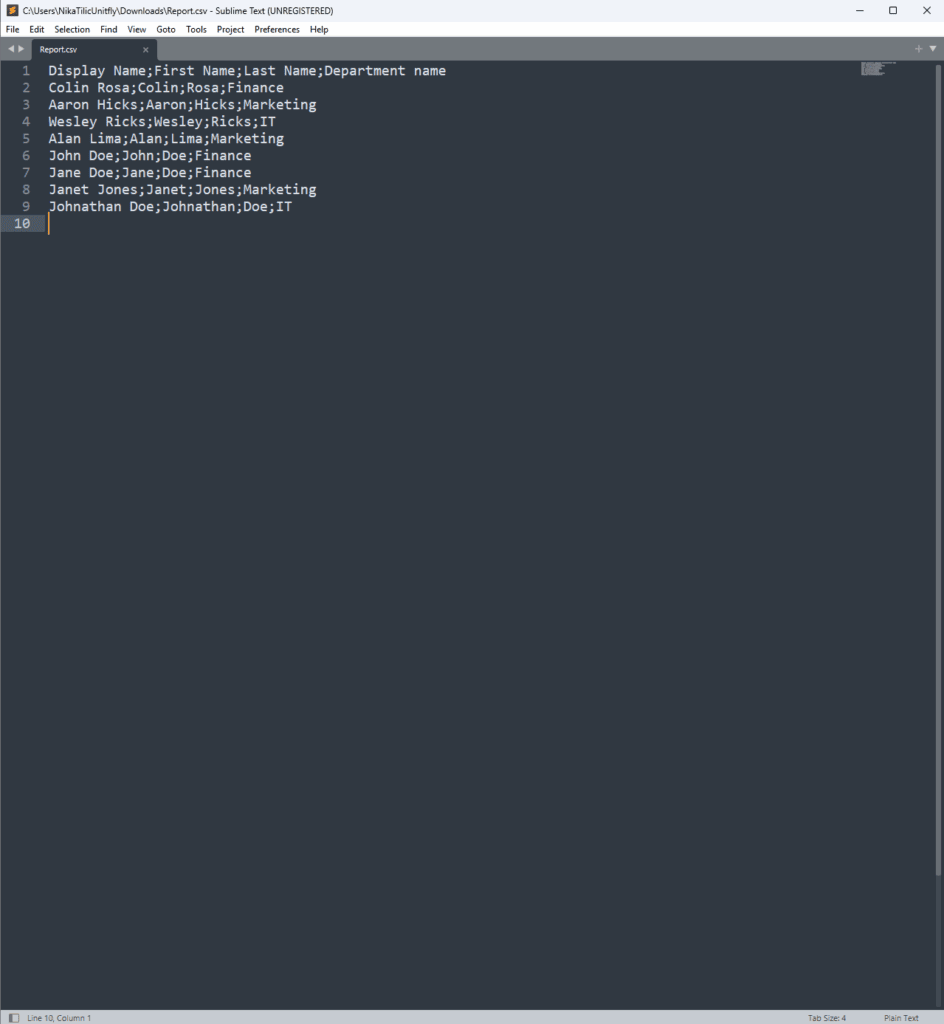
Export format: CSV
Select CSV as the export format in the configuration to create a plain text report (Picture 7).
With multiple export formats and destinations, the Reporting module adapts easily to the company’s existing systems and document formatting preferences, making reporting faster and more flexible.
Export destination options in the Reporting module
Export destination options in the Reporting module #
The Reporting module in Extension Kit lets you create custom reports based on triggers in M-Files or predefined schedules. You can tailor reports by selecting the format, specifying when and how reports are generated, or where they will be stored.
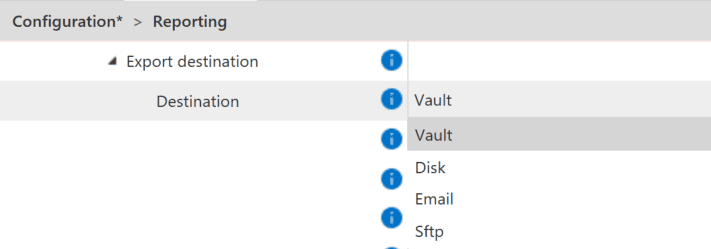
In this tip, we’ll focus on the Export destination feature, which allows you to configure where your exported reports are saved or delivered. Let’s explore the available destinations and their uses.
Export destination overview
When configuring an export in the Reporting module, you can choose from four different destination options:
- Vault Save reports directly to your M-Files Vault for centralized storage. This option is ideal for keeping reports easily accessible, securely stored, and integrated within your document management system, providing a single source of truth.
- Disk Save reports to a local or network drive. This is perfect for archiving reports in shared folders or integrating with external systems that rely on file-based access.
- Email Send reports as email attachments. This is ideal for quickly distributing reports to external stakeholders or team members.
- SFTP Securely transfer reports to an SFTP server. This method is perfect for sharing reports with external systems, partners, or services that require secure data exchange.
Business purpose
To streamline your reporting processes, consider combining export destination with scheduled tasks. For example, automate weekly reports to save them in the Vault for internal records, send a copy via Email to stakeholders, and securely transfer it via SFTP to an external partner.
Environments
Reduce repetitive configuration with Environments
Reduce repetitive configuration with Environments #
In Extension Kit Core, the Environments option is designed to help reduce repetitive configuration by allowing you to define common settings once and use them across multiple rules.
Example
Currently, Environments are available for Calendar settings. You can define non-working days in your Calendar environment (Picture 1) and then apply it to any Extended Auto Properties rule that uses calendar data (Picture 2).
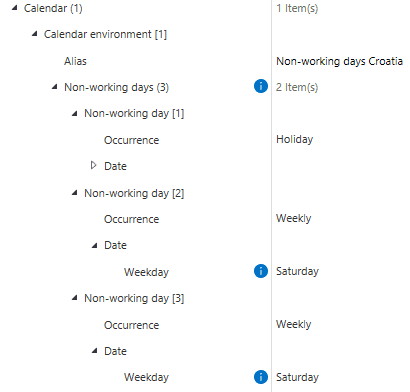

Instead of manually defining non-working days for each rule, you can simply reference the environment, saving time and reducing errors.
Centralized connection management with Environments
Centralized connection management with Environments #
Connections in Environments
In Extension Kit Core versions 25.7.0 and 25.10.0, connection configurations were moved to the Environments module, enabling centralized and more efficient management of external service connections.
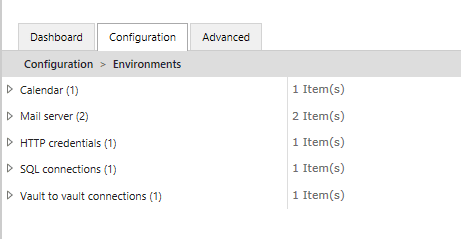
You can now configure different types of connections directly within Environments (Picture 1):
Configure once and reuse
Connections can still be configured at the rule group/rule level, but now you also have the option to pull existing connections from Environments.
This is especially useful if the same connection is used in multiple modules. For example, if the same mail server is used for Email Notifications, Data Transfer, and Reporting, you only need to configure it once in Environments and reuse it wherever needed (Picture 2).
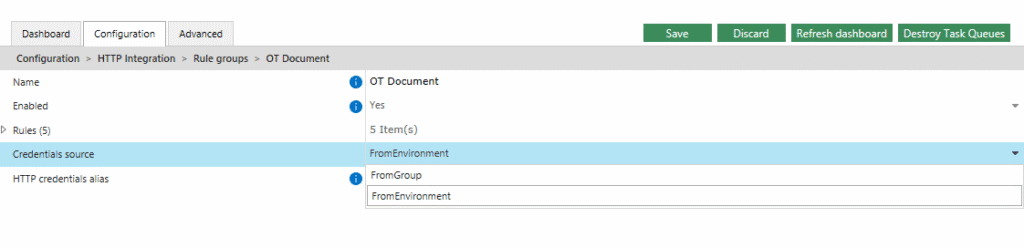
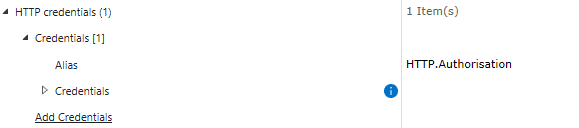
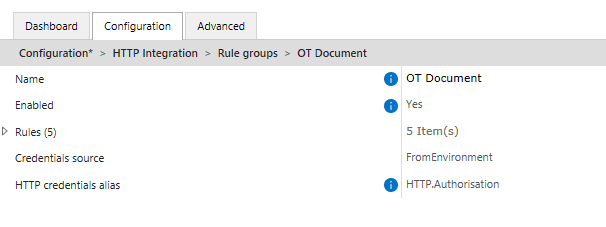
Key things to remember
- Alias is mandatory: Each connection must have an alias, as aliases are used to reference connections in modules and rule groups (Pictures 3 and 4). After adding or updating an alias, make sure to refresh the configuration and/or restart the vault so the connection becomes available.
- Re-enter Mail Server passwords: When upgrading from any version earlier than 25.7.0 to 25.7.0 or newer, you must re-enter the Mail Server password in Environments. Otherwise, migrated configurations may fail to send notifications. This is required only when upgrading from a pre-25.7.0 version.
This update in Extension Kit Core brings greater control over your external integrations and helps eliminate repetitive configuration across modules.
Embedded Dashboards
How to embed web pages in M-Files
How to embed web pages in M-Files #
Tired of switching between browser tabs to check a dashboard or an external tool while working in M-Files? With the Embedded Dashboards module in Extension Kit Core, you can bring external content — like reports, dashboards, or websites — directly into M-Files.
Display external content in M-Files
Depending on your use case, you can choose between two ways to display external content:
- Persistent dashboards These appear in a dedicated tab for all users, regardless of the object they’re viewing. Perfect for company-wide tools, such as reporting dashboards or help guides.
- Floating dashboards These appear conditionally, based on object properties. Ideal when you want to show content related to the currently selected object. Let’s say a manufacturing company maintains a product catalog on its website. You could store each product’s URL in a property and configure a floating dashboard that displays the matching product page when that object is selected in M-Files.
Example: Displaying dynamic dashboards
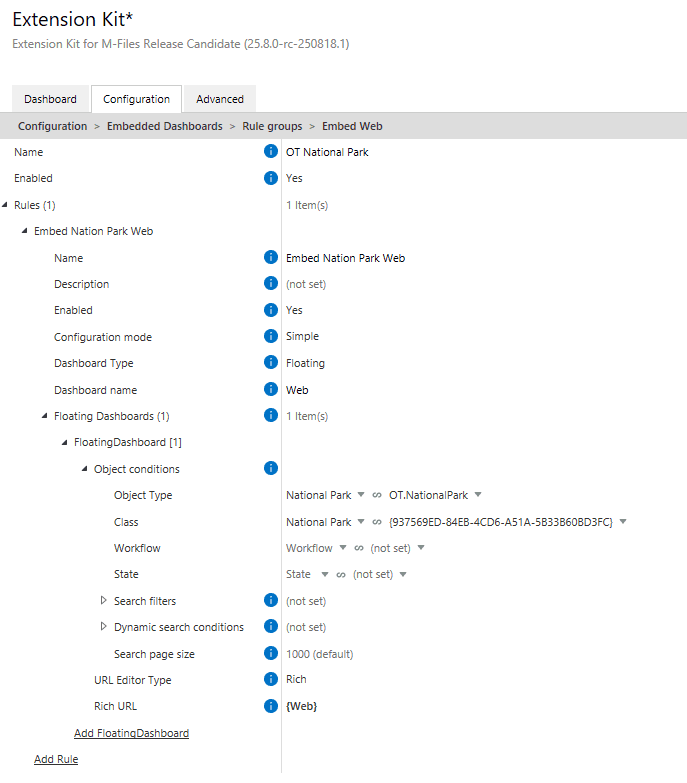
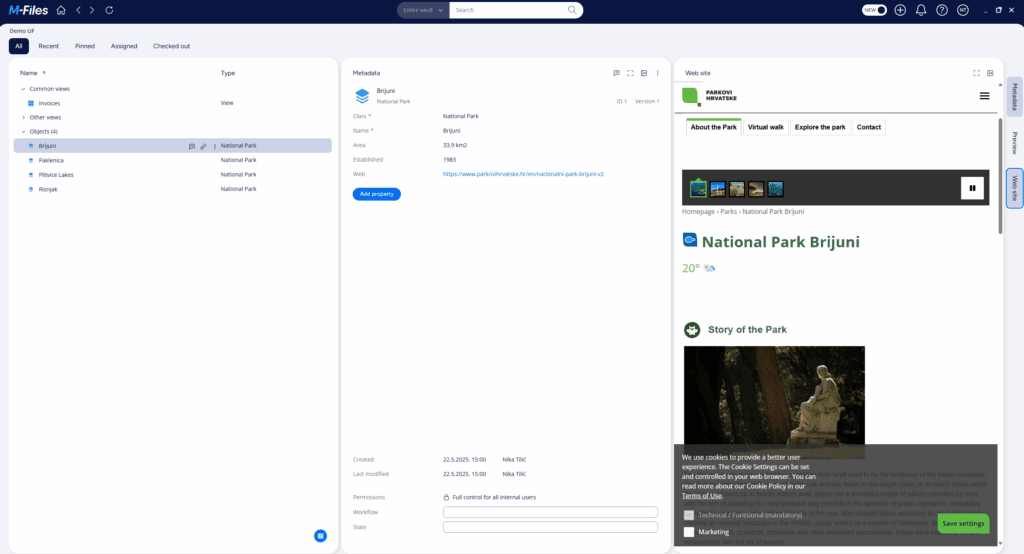
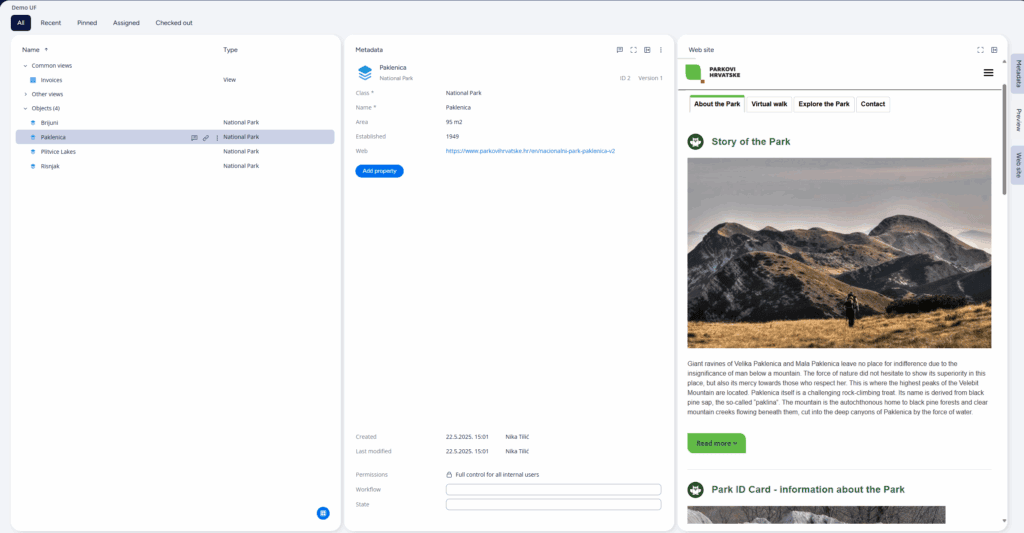
Here’s an example of configuring floating dashboards using national parks (Picture 1).
Each national park object in M-Files has a property with a link to its official webpage. A rule in the Embedded Dashboards module is configured to show a webpage in the Website tab based on the selected park.
The result
The user sees external content (like a public webpage) seamlessly displayed within M-Files (Pictures 2 and 3):
Technical notes
- Works only in the new M-Files Web and new M-Files Desktop clients.
- Some websites (e.g., Google Maps, YouTube) may restrict embedding due to browser security policies.
This feature helps you centralize external tools, reduce context switching, and keep key resources directly in the M-Files interface.
Orchestrator
How to orchestrate rules in Extension Kit Core
How to orchestrate rules in Extension Kit Core #
The Orchestrator module enables you to coordinate and manage the execution of rules in Extension Kit Core. However, linking rules to the Orchestrator requires defining an alias. Follow these steps to set it up correctly:
- Enable Advanced configuration mode for the rule you want to orchestrate. Otherwise, the alias field won’t be available.
- Enter the alias and save your changes – After defining the alias, click Save. (Picture 1)
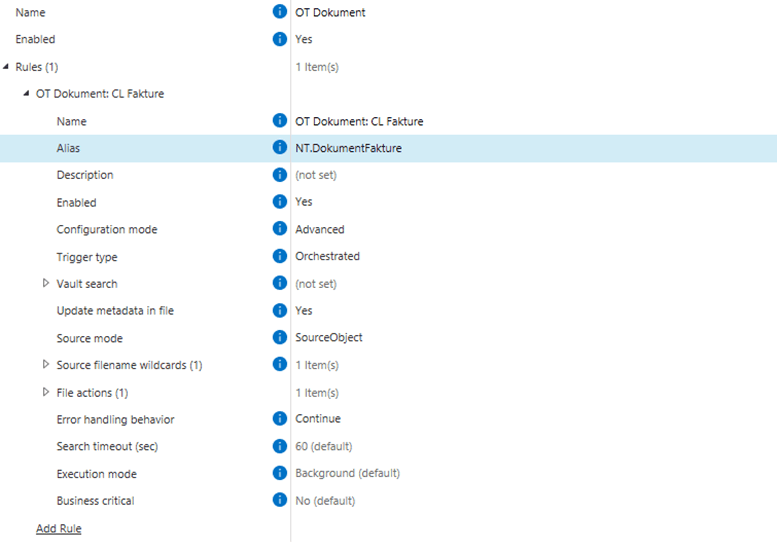
Picture 1: Define the Alias in the rule you want to orchestrate.
3. Refresh the configuration (Picture 2) – This step is essential for the alias to appear in the Orchestrator. Without refreshing, the newly created alias won’t be visible in the Orchestrator’s dropdown menu.
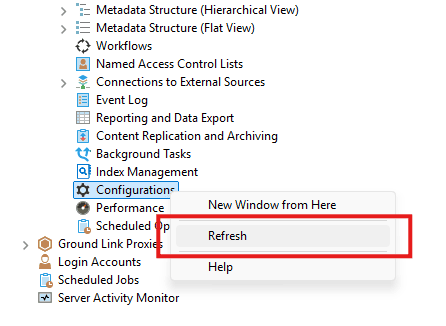
Picture 2: To refresh the configuration, right-click on Configurations in the vault and select Refresh.
Once you’ve saved the changes and refreshed the configuration, the alias will become available in the Orchestrator, allowing you to orchestrate the rule as needed. (Picture 3)
Picture 3: After saving and refreshing the configuration, you’ll find the alias in the Orchestrator rule.
Why and how to use the Orchestrator module
Why and how to use the Orchestrator module #
The Orchestrator module allows you to coordinate multiple rules in Extension Kit, giving you more control over how and when rules are executed. With Orchestrator, you can:
- Chain multiple rules and define the execution order. You can set rules to run sequentially or simultaneously, ensuring they happen in the correct order or at the same time.
- Define specific conditions for rule execution. For example, you can trigger rules based on rule success or failure, such as “execute this rule only if another rule succeeds” or “trigger this rule if a previous one fails.”
Rules can be orchestrated within the same module or across different modules. To orchestrate a rule:
- Set a Trigger type to Orchestrated within the rule configuration of a desired module.
- Create a rule within the Orchestrator module.
- Within Orchestrator, choose the module and the rule to be orchestrated and configure the additional conditions.
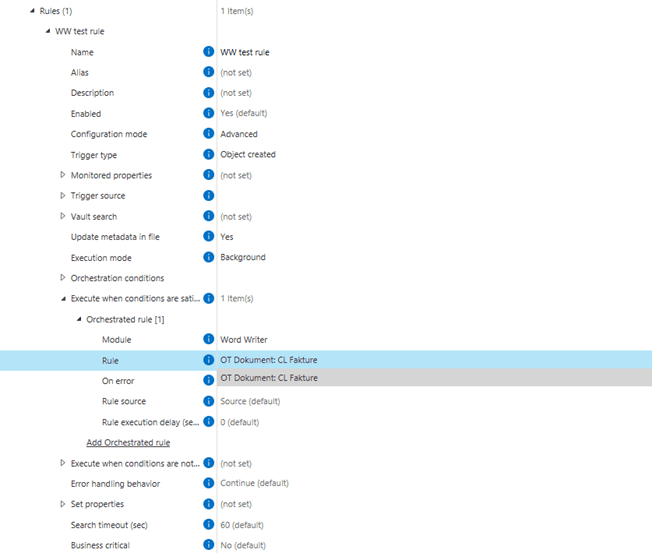
The example below shows the configuration of the rule Offer – Set discount and total amount based on offer type within the Orchestrator module. The rule is set with one orchestration condition, with separate configurations for rule execution depending on whether the condition is met or not.
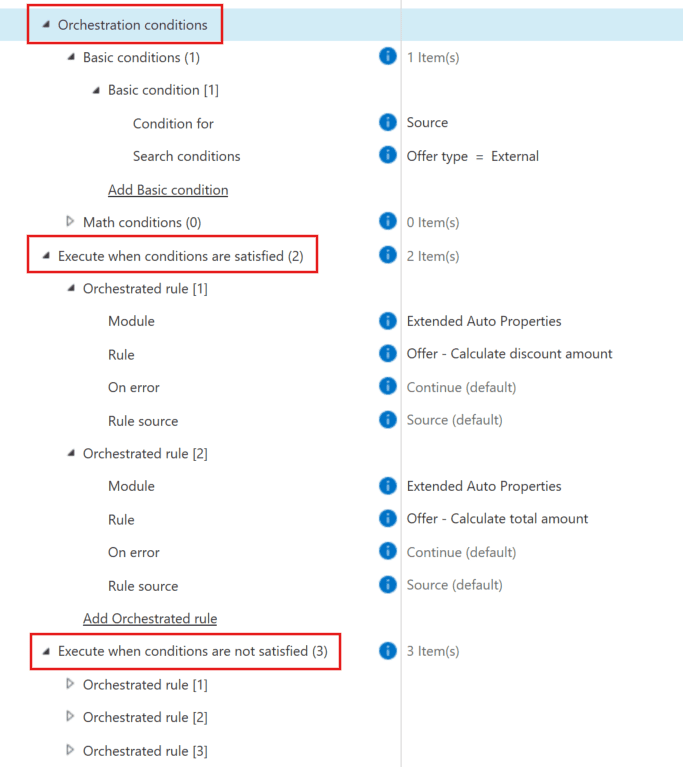
Example of orchestrated rule configuration within Orchestrator
Execution mode when orchestrating Validation rules
Execution mode when Orchestrating Validation rules #
In Extension Kit Core, there are three Execution Modes: EventHandler, Background, and Background Transaction. The selected mode determines when the rule runs:
- EventHandler – rules are executed during the event that triggered them.
- Background and Background Transaction – rules are executed after the event has finished.
Today, we’ll focus on how Execution Mode works in Validation rules, especially when those rules are used with the Orchestrator module.
Event handlers in Validation
When a user saves changes to an object, a Validation rule needs to check the data immediately and display an error message if something isn’t right. That’s why the Validation module works only in EventHandler mode.
If it could run in the background, the system wouldn’t behave logically. For example, if a Validation rule requires the Age property to be at least 18 and the user enters 16, the object would still be saved, and the error message would appear afterward.
Validation rules in Orchestrator
While the Orchestrator module supports all three Execution Modes, any Validation rule within it must run in EventHandler mode to ensure the system prevents saving invalid data (Picture 1).
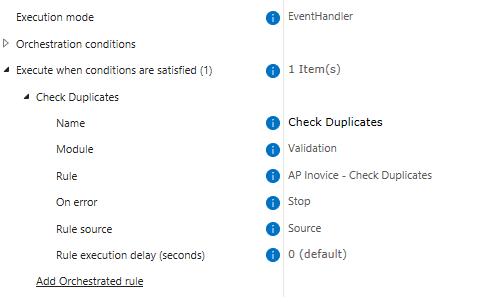
In short, Validation rules always execute in EventHandler mode, even when used inside Orchestrator. When configuring an orchestrated Validation rule, always set the Execution Mode to EventHandler to prevent saving objects that don’t meet the validation conditions.
Logging
Best practices for efficient Logging in Extension Kit Core
Best practices for efficient Logging in Extension Kit Core #
Effective logging is essential for maintaining a well-optimized and easily manageable system. Here are some best practices to ensure your logs are structured, accessible, and optimized for performance:
Separate Logs by Vault
Store logs for each vault in a dedicated folder to simplify locating relevant information when troubleshooting or analyzing activities.
Use the Appropriate Logging Level
For normal system operation, it’s best to use the Info logging level for a balance of detail and performance.
Customize File Log Format
Define a clear and consistent log format for easier readability and analysis. In the Advanced Settings of the File Targets configuration, you can customize log formatting. If you want to maintain the formatting of previous log structures (pre-v5.0.0), we recommend using the following custom Log Message Format:
ruby Copy code ${longdate} [${level:uppercase=true:padding=3}] ${logger} [Task: ${mdlc:TaskID}] [${mdlc:ModuleName}] ${mdlc:Vault} ${mdc:Rules} ${message}${onexception:${newline}${exception:format=ToString:innerformat=ToString:separator=\\r\\n}} For more details, refer to this page: Version 5.0.0 of Extension Kit for M-Files released! – Announcements – Unitfly Community.
Set a Log Retention Period
Define the retention period for logs based on the specific needs of each vault. This helps manage storage while retaining essential data for audits or debugging.
Define Maximum File Size
It’s crucial to set a maximum file size to ensure logs remain accessible and can be easily opened and reviewed, especially if you use a one-file-per-day configuration.
By following these best practices, you can streamline log management, improve performance, and ensure your system runs smoothly.